Brother International HE-800A Instruction Manual - English - Page 96
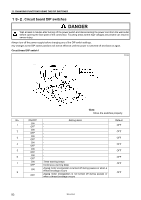
V, 110V, 240V, 220V, 380V, 400V, 415V specifications
 |
View all Brother International HE-800A manuals
Add to My Manuals
Save this manual to your list of manuals |
Page 96 highlights
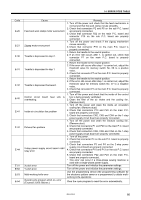
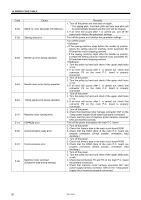
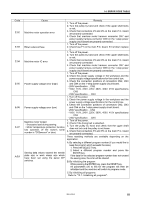
14. ERROR CODE TABLE Code E-92 E-93 E-94 E-95 E-96 E-97 ArEA Cause Machine motor operation error Blown solenoid fuse Machine motor IC error Power supply voltage error (high) Power supply voltage error (low) Machine motor locked Excessive load during sewing. ・Motor temperature protection function has operated. (If the motor's serial number is "G03xxxxxx" or later) Sewing data values exceed the needle plate size or work clamp size which have been set using the panel DIP switches. Remedy 1. Turn off the power. 2. Turn the pulley by hand and check if the upper shaft locks or not. 3. Check that connectors P3 and P6 on the main P.C. board are properly connected. 4. Check that machine motor harness connector CN7 and power supply harness connector CN8 on the 1-step power supply circuit board are properly connected. 1. Turn off the power. 2. Check fuse F1 on the main P.C. board. If it is blown replace it. 1. Turn off the power. 2. Turn the pulley by hand and check if the upper shaft locks or not. 3. Check that connectors P3 and P6 on the main P.C. board are properly connected. 4. Check that machine motor harness connector CN7 and power supply harness connector CN8 on the 1-step power supply circuit board are properly connected. 1. Turn off the power. 2. Check the power supply voltage in the workplace and the power supply voltage specifications for the control box. 3. Check the connection positions of connectors CN2, CN3 and CN4 on the 1-step power supply circuit board. 200V specification ...CN2 100V, 110V, 240V, 220V, 380V, 400V, 415V specifications ... CN3 230V specification ... CN4 1. Turn off the power. 2. Check the power supply voltage in the workplace and the power supply voltage specifications for the control box. 3. Check the connection positions of connectors CN2, CN3 and CN4 on the 1-step power supply circuit board. 200V specification ...CN2 100V, 110V, 240V, 220V, 380V, 400V, 415V specifications ... CN3 230V specification ... CN4 1. Turn off the power. 2. Check if the timing belt is attached. 3. Turn the pulley by hand and check that the upper shaft does not lock and the pulley is not loose. 4. Check that connectors P3 and P6 on the main P.C. board are properly connected. Three resetting methods are available depending on the application. A. By selecting a different program number (If you would like to keep the program which exceeds the area.) 1. Press the SELECT key. 2. Select a different program number and press the ENTER key. If the data for the selected program number does not exceed the sewing area, the error will be cleared. B. By initializing the program While pressing the ENTER key, press the RESET key. All parameters (00 to 69) for the program will then be initialized and the machine will switch to program mode. C. By initializing all programs Refer to "12-1. Initializing all programs". HE-800A 88
-
 1
1 -
2
-
3
-
4
-
5
-
6
-
7
-
8
-
9
-
10
-
11
-
12
-
13
-
14
-
15
-
16
-
17
-
18
-
19
-
20
-
21
-
22
-
23
-
24
-
25
-
26
-
27
-
28
-
29
-
30
-
31
-
32
-
33
-
34
-
35
-
36
-
37
-
38
-
39
-
40
-
41
-
42
-
43
-
44
-
45
-
46
-
47
-
48
-
49
-
50
-
51
-
52
-
53
-
54
-
55
-
56
-
57
-
58
-
59
-
60
-
61
-
62
-
63
-
64
-
65
-
66
-
67
-
68
-
69
-
70
-
71
-
72
-
73
-
74
-
75
-
76
-
77
-
78
-
79
-
80
-
81
-
82
-
83
-
84
-
85
-
86
-
87
-
88
-
89
-
90
-
 91
91 -
 92
92 -
 93
93 -
 94
94 -
 95
95 -
 96
96 -
 97
97 -
 98
98 -
 99
99 -
 100
100 -
 101
101 -
102
-
103
-
104
-
105
-
106
-
107
-
108
-
109
-
110
-
111
-
112
-
113
-
114
-
115
-
116
-
117
-
118
 |
 |
