Brother International HE-800A Instruction Manual - English - Page 82
Adjusting the inner rotary hook and rotary hook holder overlap, Adjusting the work clamp pressure,
 |
View all Brother International HE-800A manuals
Add to My Manuals
Save this manual to your list of manuals |
Page 82 highlights
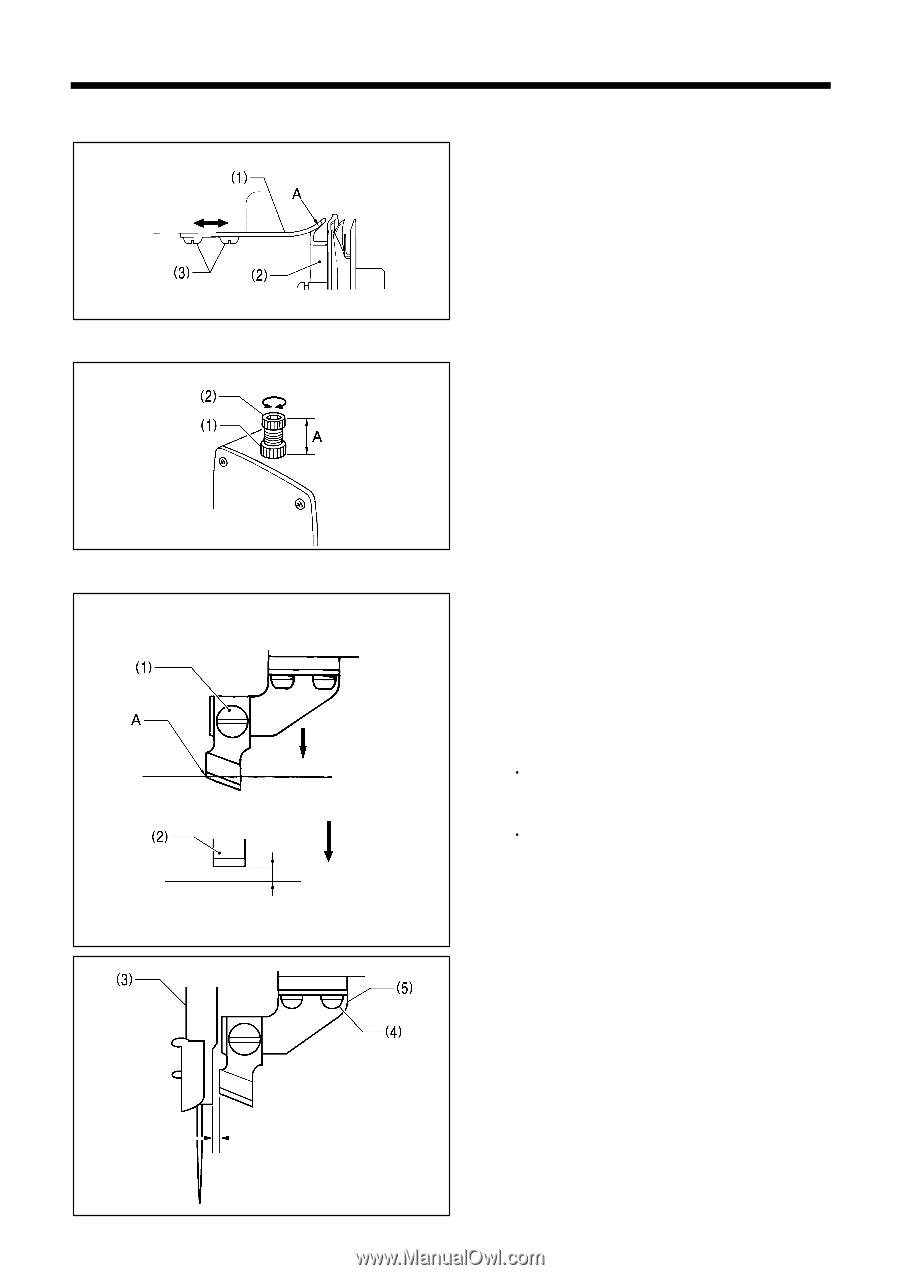
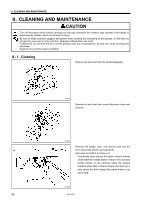
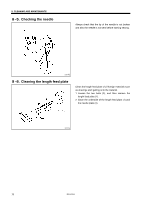
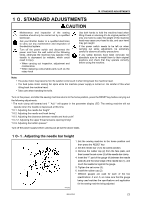
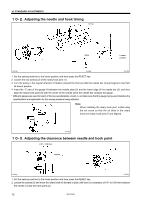
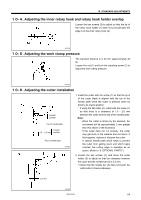
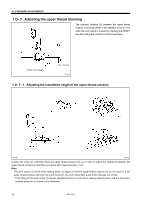
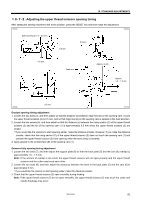
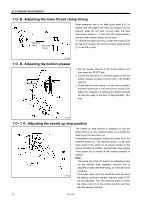
10. STANDARD ADJUSTMENTS 10-4. Adjusting the inner rotary hook and rotary hook holder overlap Loosen the two screws (3) to adjust so that the tip of the rotary hook holder (1) does not protrude past the edge A of the inner rotary hook (2). 3977Q 10-5. Adjusting the work clamp pressure The standard distance A is 30 mm (approximately 30 N). Loosen the nut (1) and turn the adjusting screw (2) to adjust the work clamp pressure. 3978Q 10-6. Adjusting the cutter installation Lowest position Top of needle plate Lowest 1.5 - 2.0 mm position Top of needle plate 3979Q 1. Install the cutter with the screw (1) so that the tip A of the cutter blade is aligned with the top of the needle plate when the cutter is pressed down by hand to its lowest position. * If using the flat cutter (2), install with the screw (1) so that there is a clearance of 1.5 - 2.0 mm between the cutter and the top of the needle plate. Note: When the cutter is driven by the solenoid, the movement will be approximately 2 mm greater than that shown in the illustration. If the cutter does not cut properly, the cutter may get stuck in the material and not return. If this happens, replace or sharpen the cutter. A special needle plate which helps to prevent the cutter from getting stuck and which helps maintain the cutting edge is available as an option. (Refer to "3. OPTIONAL PARTS".) 2. Loosen the two screws (4), and move the cutter holder (5) to adjust so that the clearance between the cutter and the needle bar (3) is 0.3 mm. * Check that the needle bar (3) does not touch the cutter when it moves sideways. 0.3 mm 3980Q HE-800A 74
-
 1
1 -
2
-
3
-
4
-
5
-
6
-
7
-
8
-
9
-
10
-
11
-
12
-
13
-
14
-
15
-
16
-
17
-
18
-
19
-
20
-
21
-
22
-
23
-
24
-
25
-
26
-
27
-
28
-
29
-
30
-
31
-
32
-
33
-
34
-
35
-
36
-
37
-
38
-
39
-
40
-
41
-
42
-
43
-
44
-
45
-
46
-
47
-
48
-
49
-
50
-
51
-
52
-
53
-
54
-
55
-
56
-
57
-
58
-
59
-
60
-
61
-
62
-
63
-
64
-
65
-
66
-
67
-
68
-
69
-
70
-
71
-
72
-
73
-
74
-
75
-
76
-
 77
77 -
 78
78 -
 79
79 -
 80
80 -
 81
81 -
 82
82 -
 83
83 -
 84
84 -
 85
85 -
 86
86 -
 87
87 -
88
-
89
-
90
-
91
-
92
-
93
-
94
-
95
-
96
-
97
-
98
-
99
-
100
-
101
-
102
-
103
-
104
-
105
-
106
-
107
-
108
-
109
-
110
-
111
-
112
-
113
-
114
-
115
-
116
-
117
-
118
 |
 |