Brother International HE-800A Instruction Manual - English - Page 85
Adjusting the lower thread clamp timing, Adjusting the bobbin presser, Adjusting the needle up stop
 |
View all Brother International HE-800A manuals
Add to My Manuals
Save this manual to your list of manuals |
Page 85 highlights
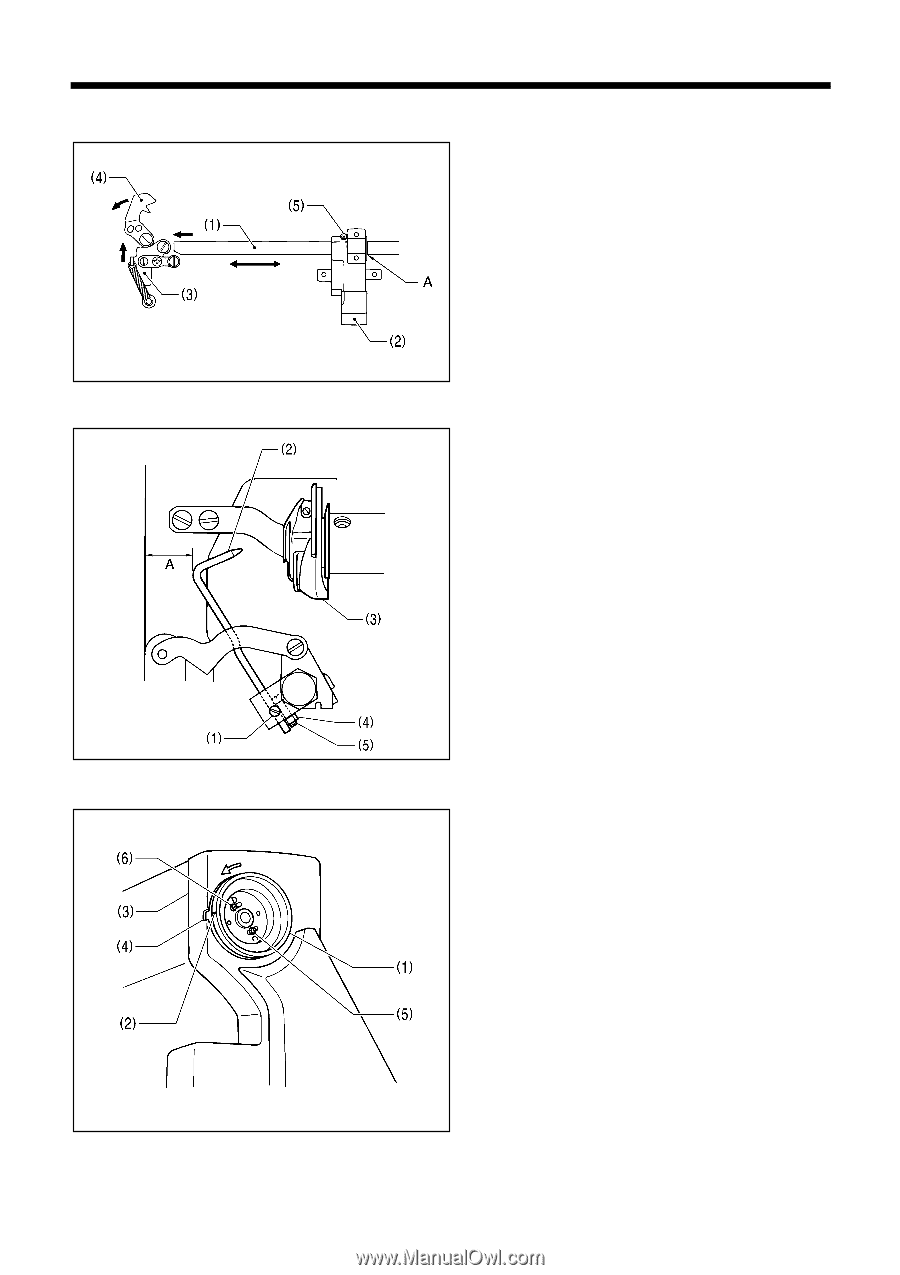
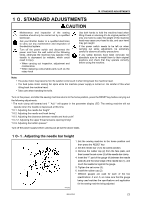
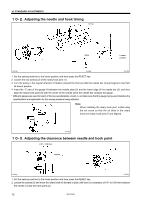
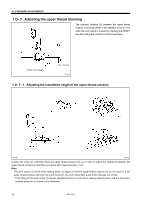
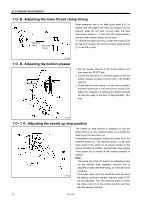
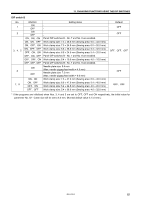
10. STANDARD ADJUSTMENTS 10-8. Adjusting the lower thread clamp timing Becomes faster Becomes slower When reference line A on feed guide shaft B (1) is aligned with the edge of the feed arm support (2), the opening plate (3) will start moving when the feed mechanism moves 6 - 7 mm from the home position, and the lower thread retainer (4) will open. To change the opening timing, loosen the screw (5) of the feed arm support (2) and move feed guide shaft B (1) to the left or right. 3988Q 10-9. Adjusting the bobbin presser 1. Set the sewing machine to the home position and then press the RESET key. 2. Loosen the set screw (1), and then adjust so that the bobbin presser (2) goes into the hole in the bobbin case (3). 3. Check that the work clamp is at the home position, and then loosen the nut (4) and turn the screw (5) to adjust the clearance A between the bobbin presser (2) and the edge of the bed to approximately 12.5 mm. 3989Q Adjusting the needle up stop position 3990Q The needle up stop position is adjusted so that the index mark (2) on the machine pulley (1) is inside the mark (4) on the belt cover (3). If adjustment is necessary, loosen the screw (5) of the machine pulley (1). The machine pulley (1) will stop more slowly if the screw (5) is moved counter to the normal direction of rotation, and will stop more quickly if the screw (5) is moved in the normal direction of rotation. Note: The screw (6) at the "D" mark is an adjusting screw for the needle down detection function and is adjusted to match the feed timing, so it should not be loosened. * If the index mark (2) is not inside the mark (4) when the sewing machine is started, and error code "E-02" will be displayed. Turn the machine pulley to move the index mark (2) to the correct position and then start the sewing machine. 77 HE-800A
-
 1
1 -
2
-
3
-
4
-
5
-
6
-
7
-
8
-
9
-
10
-
11
-
12
-
13
-
14
-
15
-
16
-
17
-
18
-
19
-
20
-
21
-
22
-
23
-
24
-
25
-
26
-
27
-
28
-
29
-
30
-
31
-
32
-
33
-
34
-
35
-
36
-
37
-
38
-
39
-
40
-
41
-
42
-
43
-
44
-
45
-
46
-
47
-
48
-
49
-
50
-
51
-
52
-
53
-
54
-
55
-
56
-
57
-
58
-
59
-
60
-
61
-
62
-
63
-
64
-
65
-
66
-
67
-
68
-
69
-
70
-
71
-
72
-
73
-
74
-
75
-
76
-
77
-
78
-
79
-
 80
80 -
 81
81 -
 82
82 -
 83
83 -
 84
84 -
 85
85 -
 86
86 -
 87
87 -
 88
88 -
 89
89 -
 90
90 -
91
-
92
-
93
-
94
-
95
-
96
-
97
-
98
-
99
-
100
-
101
-
102
-
103
-
104
-
105
-
106
-
107
-
108
-
109
-
110
-
111
-
112
-
113
-
114
-
115
-
116
-
117
-
118
 |
 |