Brother International HE-800A Instruction Manual - English - Page 69
Thread tension
 |
View all Brother International HE-800A manuals
Add to My Manuals
Save this manual to your list of manuals |
Page 69 highlights
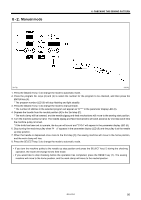
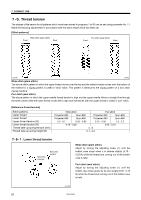
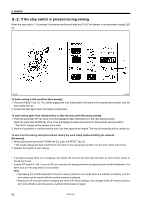
7. CORRECT USE 7-5. Thread tension The shapes of the seams for all patterns which have been stored in programs 1 to 90 can be set using parameter No. 11. Make the following adjustments in accordance with the seam shape which has been set. [Stitch patterns] Whip stitch (plain stitch) Front Back Purl stitch (seal stitch) Front Back 1228Q 1229Q Whip stitch (plain stitch) The above stitch pattern in which the upper thread moves over the top and the bottom thread moves over the bottom of the material in a zigzag pattern is called a "whip" stitch. This pattern is identical to the zigzag pattern of a lock stitch zigzag machine. Purl stitch (seal stitch) The above pattern in which the upper needle thread tension is high and the upper needle follows a straight line through the seam center while the lower thread moves left to right and intertwines with the upper thread is called a "purl" stitch. [Reference thread tension] Stitch patterns Upper thread Lower thread Upper thread tension (N) Lower thread tension (N) Thread take-up spring tension (mm) Thread take-up spring height (N) Whip stitch Purl stitch Polyester #50 Spun #60 Polyester #50 Spun #60 Polyester #50 Spun #60 Polyester #50 Spun #60 0.3 - 0.7 0.50 - 0.85 0.75 - 2.00 1.0 - 2.2 0.15 - 0.25 0.05 - 0.15 4 - 6 0.1 - 0.2 Lower thread tension Becomes stronger Becomes weaker Whip stitch (plain stitch) Adjust by turning the adjusting screw (1) until the bobbin case drops when it is shaken slightly (0.15 0.25 N) while the thread end coming out of the bobbin case is held. Purl stitch (seal stitch) Adjust by turning the adjusting screw (1) until the bobbin case drops gently by its own weight (0.05 - 0.15 N) while the thread end coming out of the bobbin case is held. 2813Q 61 HE-800A
-
 1
1 -
2
-
3
-
4
-
5
-
6
-
7
-
8
-
9
-
10
-
11
-
12
-
13
-
14
-
15
-
16
-
17
-
18
-
19
-
20
-
21
-
22
-
23
-
24
-
25
-
26
-
27
-
28
-
29
-
30
-
31
-
32
-
33
-
34
-
35
-
36
-
37
-
38
-
39
-
40
-
41
-
42
-
43
-
44
-
45
-
46
-
47
-
48
-
49
-
50
-
51
-
52
-
53
-
54
-
55
-
56
-
57
-
58
-
59
-
60
-
61
-
62
-
63
-
 64
64 -
 65
65 -
 66
66 -
 67
67 -
 68
68 -
 69
69 -
 70
70 -
 71
71 -
 72
72 -
 73
73 -
 74
74 -
75
-
76
-
77
-
78
-
79
-
80
-
81
-
82
-
83
-
84
-
85
-
86
-
87
-
88
-
89
-
90
-
91
-
92
-
93
-
94
-
95
-
96
-
97
-
98
-
99
-
100
-
101
-
102
-
103
-
104
-
105
-
106
-
107
-
108
-
109
-
110
-
111
-
112
-
113
-
114
-
115
-
116
-
117
-
118
 |
 |
