Brother International HE-800A Instruction Manual - English - Page 62
Danger - he 800 a 2
 |
View all Brother International HE-800A manuals
Add to My Manuals
Save this manual to your list of manuals |
Page 62 highlights
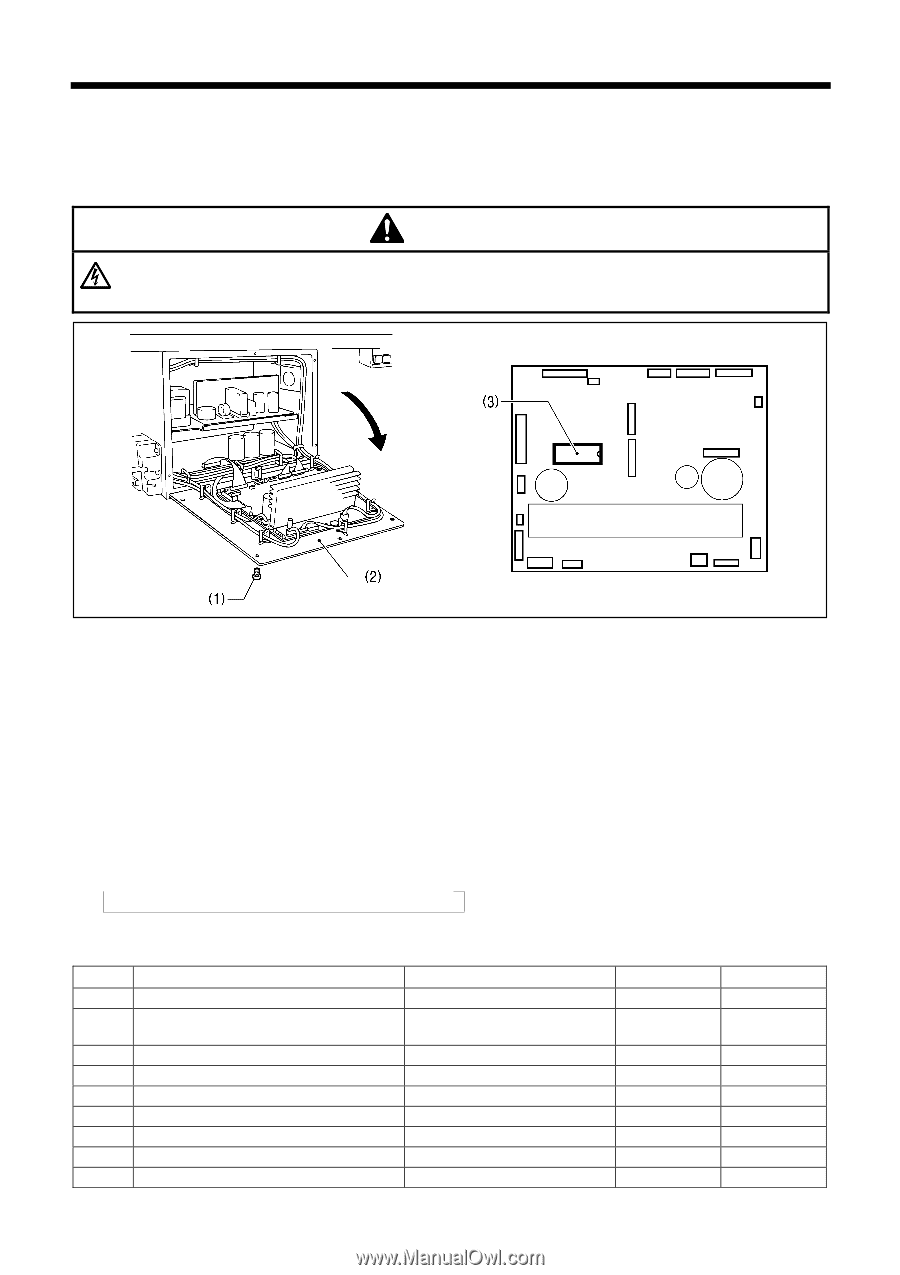
5. OPERATION 5-13. Adding patterns created using the programming software for electronic pattern sewer You can use the programming software for electronic pattern sewer to create your own sewing patterns. Up to nine of the patterns which you create in this way can be programmed into a P-ROM. DANGER Wait at least 5 minutes after turning off the power switch and disconnecting the power cord from the wall outlet before opening the face plate of the control box. Touching areas where high voltages are present can result in severe injury. 3944Q 3945Q 1. Remove the six screws (1), and then open the cover (main P.C. board mounting plate (2)). Note: When opening the cover, hold it securely so that it does not fall down. 2. Remove the P-ROM (3) from the main P.C. board. 3. Create the pattern(s) using the programming software for electronic pattern sewer. Refer to the Operating Instructions for the programming software for electronic pattern sewer for details on how to create patterns. 4. Add the pattern(s) created to the P-ROM (3). 5. Install the P-ROM (3) to the main P.C. board so that it faces as shown in the illustration. Note: If attached in reverse way, P-ROM may be damaged. 6. Close the cover (main P.C. board mounting plate (2)), and tighten the six screws (1). The program numbers for patterns which have been created using the programming software for electronic pattern sewer range from P1 to P9. However, program numbers which have not yet been assigned to a program will not appear on the program number LED. → 1→ 2→ 3 90→ P1→ P2 P9 You can check and change the following parameters for patterns which have been created using the programming software for electronic pattern sewer. No. Setting items Setting range Unit Default 00 Sewing speed (zigzag part) 1,000 - 4,000rpm 100 3,600 02 Length of knife Value is for checking purposes - - and cannot be changed. 08 Knife X position alignment -0.5 - 0.5mm 0.1 0.0 09 Knife Y position alignment -0.8 - 0.8mm 0.1 0.0 16 Running speed (Straight bar tack) 1,000 - 3,000rpm 100 2,000 48 Underlay speed 1,000 - 3,000rpm 100 2,000 60 Slow speed 500 - 1,500rpm 100 800 61 Rear tack speed 500 - 4,000rpm 100 4,000 62 Front tack speed 500 - 4,000rpm 100 4,000 HE-800A 54
-
 1
1 -
2
-
3
-
4
-
5
-
6
-
7
-
8
-
9
-
10
-
11
-
12
-
13
-
14
-
15
-
16
-
17
-
18
-
19
-
20
-
21
-
22
-
23
-
24
-
25
-
26
-
27
-
28
-
29
-
30
-
31
-
32
-
33
-
34
-
35
-
36
-
37
-
38
-
39
-
40
-
41
-
42
-
43
-
44
-
45
-
46
-
47
-
48
-
49
-
50
-
51
-
52
-
53
-
54
-
55
-
56
-
 57
57 -
 58
58 -
 59
59 -
 60
60 -
 61
61 -
 62
62 -
 63
63 -
 64
64 -
 65
65 -
 66
66 -
 67
67 -
68
-
69
-
70
-
71
-
72
-
73
-
74
-
75
-
76
-
77
-
78
-
79
-
80
-
81
-
82
-
83
-
84
-
85
-
86
-
87
-
88
-
89
-
90
-
91
-
92
-
93
-
94
-
95
-
96
-
97
-
98
-
99
-
100
-
101
-
102
-
103
-
104
-
105
-
106
-
107
-
108
-
109
-
110
-
111
-
112
-
113
-
114
-
115
-
116
-
117
-
118
 |
 |