Brother International HE-800A Instruction Manual - English - Page 81
Adjusting the needle and hook timing, Adjusting the clearance between needle and hook point
 |
View all Brother International HE-800A manuals
Add to My Manuals
Save this manual to your list of manuals |
Page 81 highlights
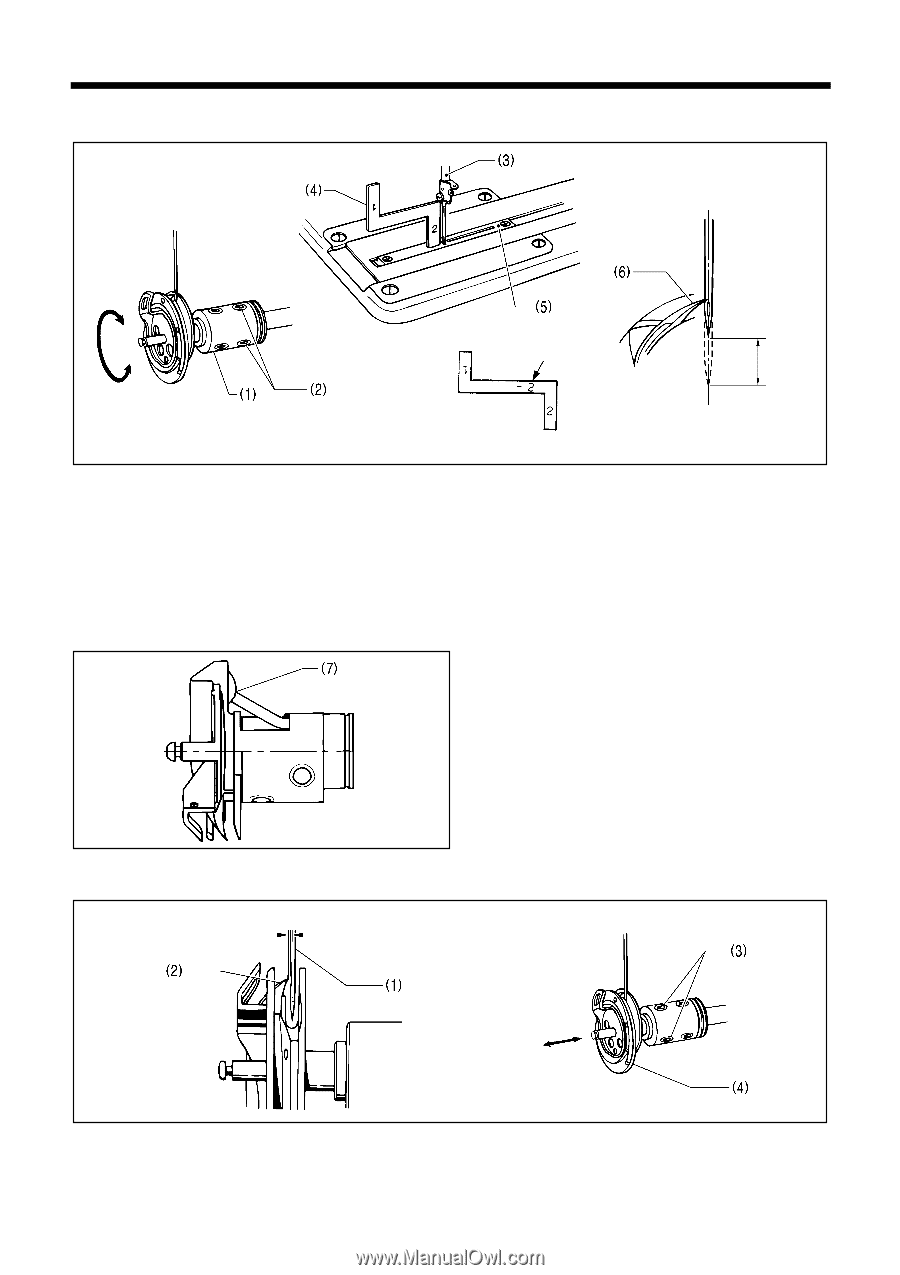
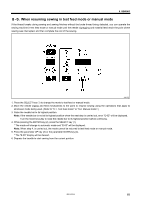
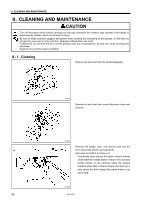
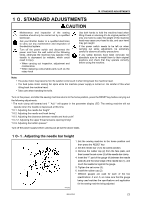
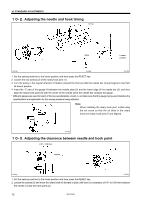
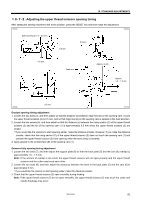
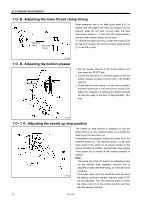
10. STANDARD ADJUSTMENTS 10-2. Adjusting the needle and hook timing 3974Q Mark Lowest position 3973Q 2168Q 2837Q 1. Set the sewing machine to the home position and then press the RESET key. 2. Loosen the two screws (2) of the rotary hook joint (1). 3. Turn the pulley in the regular direction of rotation (toward the front) so that the needle bar (3) just begins to rise from its lowest position. 4. Insert the "2" part of the gauge (4) between the needle plate (5) and the lower edge of the needle bar (3), and then align the rotary hook point (6) with the center of the needle when the needle bar contacts the gauge. * Different gauges are used for each of the two specifications -2 and -3, so make sure that the gauge being used matches the specifications and application for the sewing machine being adjusted. Note: When installing the rotary hook joint, install using the set screw so that the oil inlets in the rotary hook and rotary hook joint (7) are aligned. 3975Q 10-3. Adjusting the clearance between needle and hook point 0.01 - 0.08 mm 2839Q 3976Q 1. Set the sewing machine to the home position and then press the RESET key. 2. Loosen the screws (3) and move the rotary hook (4) forward or back until there is a clearance of 0.01 to 0.08 mm between the needle (1) and the hook point (2). 73 HE-800A
-
 1
1 -
2
-
3
-
4
-
5
-
6
-
7
-
8
-
9
-
10
-
11
-
12
-
13
-
14
-
15
-
16
-
17
-
18
-
19
-
20
-
21
-
22
-
23
-
24
-
25
-
26
-
27
-
28
-
29
-
30
-
31
-
32
-
33
-
34
-
35
-
36
-
37
-
38
-
39
-
40
-
41
-
42
-
43
-
44
-
45
-
46
-
47
-
48
-
49
-
50
-
51
-
52
-
53
-
54
-
55
-
56
-
57
-
58
-
59
-
60
-
61
-
62
-
63
-
64
-
65
-
66
-
67
-
68
-
69
-
70
-
71
-
72
-
73
-
74
-
75
-
 76
76 -
 77
77 -
 78
78 -
 79
79 -
 80
80 -
 81
81 -
 82
82 -
 83
83 -
 84
84 -
 85
85 -
 86
86 -
87
-
88
-
89
-
90
-
91
-
92
-
93
-
94
-
95
-
96
-
97
-
98
-
99
-
100
-
101
-
102
-
103
-
104
-
105
-
106
-
107
-
108
-
109
-
110
-
111
-
112
-
113
-
114
-
115
-
116
-
117
-
118
 |
 |