Brother International HE-800A Instruction Manual - English - Page 66
Threading the upper thread
 |
View all Brother International HE-800A manuals
Add to My Manuals
Save this manual to your list of manuals |
Page 66 highlights
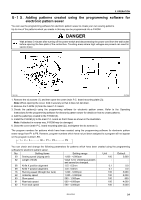
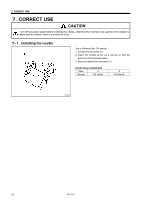
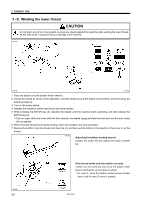
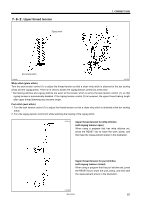
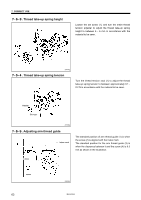
7. CORRECT USE 7-2. Threading the upper thread CAUTION Turn off the power switch before threading the thread, otherwise the machine may operate if the treadle is depressed by mistake, which could result in injury. For spun thread and cotton thread For polyester thread 3949Q 3950Q Thread the upper thread correctly as shown in the illustration. ▪ When pulling the thread out from the zigzag thread tension (1), move the tension release lever (2) in the direction of the arrow to open the tension discs (3) in order to make it easier to pull out the thread. ▪ After threading the arm thread guide (4), pass the thread under the thread guide (5) as shown in the illustration to make it easier to thread. ▪ Push the needle bar to the right to make it easier to pass the thread through the needle. Note: ▪ If you start sewing without passing the thread through the thread guide (5), error "E-01" will be generated and the sewing machine will stop. ▪ The thread tension (6) is used to prevent the upper thread from becoming knotted, tangled or loose, so do not touch it. It is tightened only gently. If it is tightened too firmly, the knob may become dam-aged. 3951Q Threading the thread at the sewing start position 1. Turn on the power and set the sewing machine to the home position. 2. Press the RESET key (7). * The work clamp will be lowered, and "¯AdJ" will be appear in the parameter display LED (8). The sewing machine will not operate during this time, even if the treadle is depressed. 3. Press the parameter UP key (9). * The needle bar will move to the right to make threading easier. 4. Press the RESET key (7). * The needle bar will move to the center position and the work clamp will rise. HE-800A 58
-
 1
1 -
2
-
3
-
4
-
5
-
6
-
7
-
8
-
9
-
10
-
11
-
12
-
13
-
14
-
15
-
16
-
17
-
18
-
19
-
20
-
21
-
22
-
23
-
24
-
25
-
26
-
27
-
28
-
29
-
30
-
31
-
32
-
33
-
34
-
35
-
36
-
37
-
38
-
39
-
40
-
41
-
42
-
43
-
44
-
45
-
46
-
47
-
48
-
49
-
50
-
51
-
52
-
53
-
54
-
55
-
56
-
57
-
58
-
59
-
60
-
 61
61 -
 62
62 -
 63
63 -
 64
64 -
 65
65 -
 66
66 -
 67
67 -
 68
68 -
 69
69 -
 70
70 -
 71
71 -
72
-
73
-
74
-
75
-
76
-
77
-
78
-
79
-
80
-
81
-
82
-
83
-
84
-
85
-
86
-
87
-
88
-
89
-
90
-
91
-
92
-
93
-
94
-
95
-
96
-
97
-
98
-
99
-
100
-
101
-
102
-
103
-
104
-
105
-
106
-
107
-
108
-
109
-
110
-
111
-
112
-
113
-
114
-
115
-
116
-
117
-
118
 |
 |
