Brother International HE-800A Instruction Manual - English - Page 95
If an error still occurs after 1. is carried out, check
 |
View all Brother International HE-800A manuals
Add to My Manuals
Save this manual to your list of manuals |
Page 95 highlights
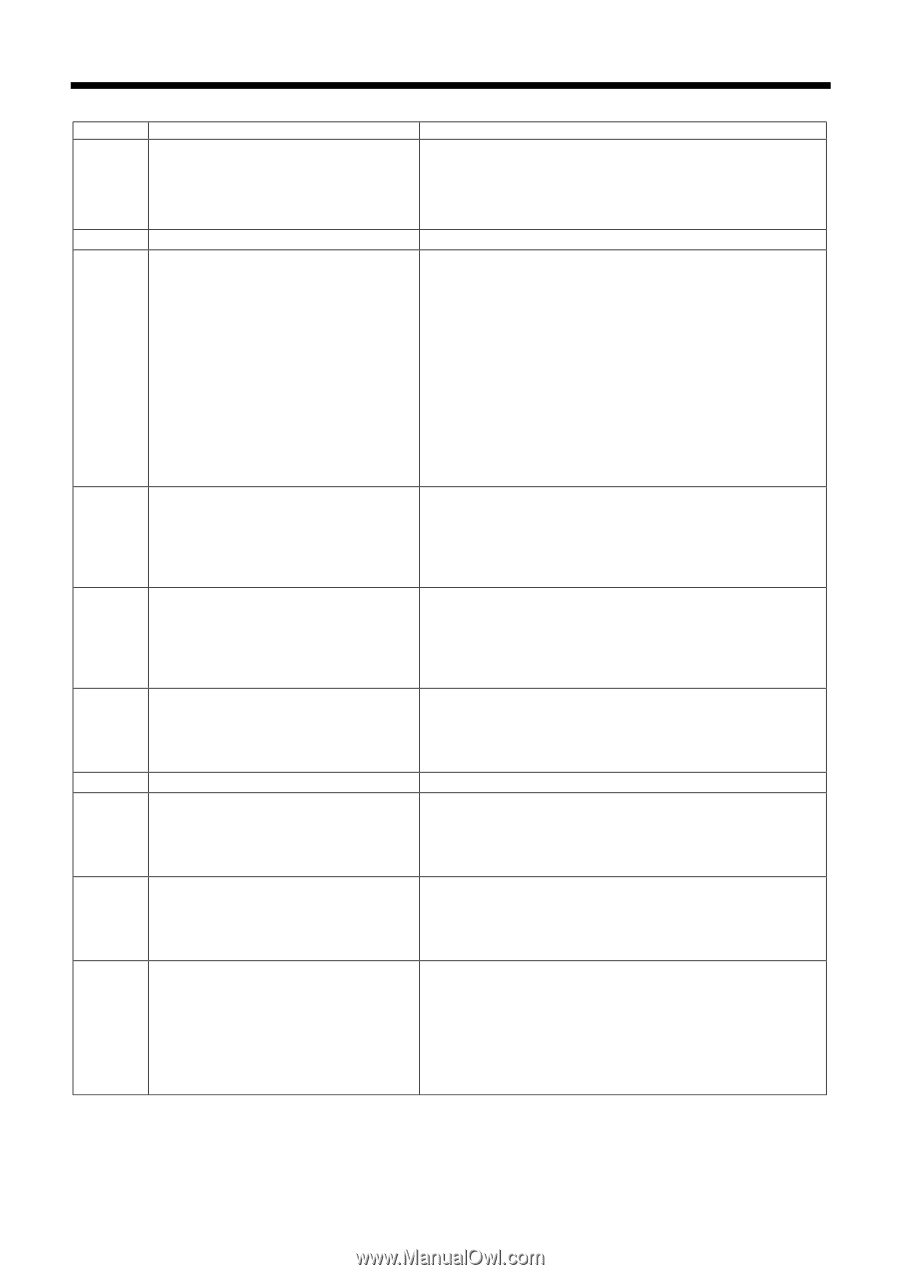
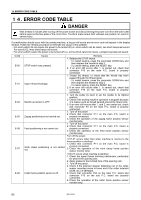
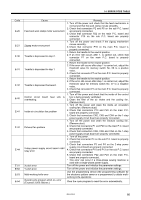
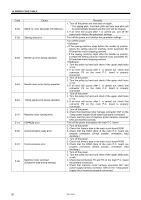
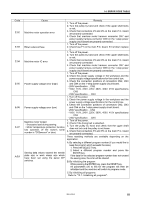
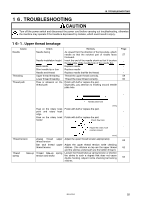
14. ERROR CODE TABLE Code E-55 E-59 E-62 E-63 E-64 E-70 E-74 E-80 E-81 E-90 Cause Stitch no. error (Exceeds 700 stitches.) Sewing data error Needle up error during operation Needle down error during operation Timing signal error during operation Machine motor running error EEPROM error Communication ready error Communication error Machine motor overload (Excessive load during sewing.) Remedy 1. Turn off the power and then back on again. * The zigzag pitch, front tack pitch and rear tack pitch will be automatically doubled and the error will be cleared. 2. If an error still occurs after 1. is carried out, turn off the power and initialize the parameter settings. Turn off the power and initialize the parameter settings. Turn off the power. ▪ If the sewing machine stops before the needle up position, reduce the setting value for machine motor parameter No. 00 (machine motor stopping position). ▪ If the sewing machine stops after the needle up position, increase the setting value for machine motor parameter No. 00 (machine motor stopping position). 1. Turn the pulley by hand and check if the upper shaft locks or not. 2. If an error still occurs after 1. is carried out, check that connector P3 on the main P.C. board is properly connected. 1. Turn off the power. 2. Turn the pulley by hand and check if the upper shaft locks or not. 3. If an error still occurs after 1. is carried out, check that connector P3 on the main P.C. board is properly connected. 1. Turn off the power. 2. Turn the pulley by hand and check if the upper shaft locks or not. 3. If an error still occurs after 1. is carried out, check that connector P3 on the main P.C. board is properly connected. 1. Turn off the power. 2. Check that machine motor harness connector CN7 on the 1-step power supply circuit board is properly connected. 3. Check that the pins of machine motor harness connector CN7 are inserted correctly. Turn off the power and replace the main P.C. board. 1. Turn off the power. 2. Check that there is data in the main circuit board ROM. 3. Check that the ROM chips of the main P.C. board are properly connected. (Check position, orientation, lead clinching.) 1. Turn off the power. 2. Check that there is data in the main circuit board ROM. 3. Check that the ROM chips of the main P.C. board are properly connected. (Check position, orientation, lead clinching.) 1. Turn off the power. 2. Turn the pulley by hand and check if the upper shaft locks or not. 3. Check that connectors P3 and P6 on the main P.C. board are properly connected. 4. Check that machine motor harness connector CN7 and power supply harness connector CN8 on the 1-step power supply circuit board are properly connected. 87 HE-800A
-
 1
1 -
2
-
3
-
4
-
5
-
6
-
7
-
8
-
9
-
10
-
11
-
12
-
13
-
14
-
15
-
16
-
17
-
18
-
19
-
20
-
21
-
22
-
23
-
24
-
25
-
26
-
27
-
28
-
29
-
30
-
31
-
32
-
33
-
34
-
35
-
36
-
37
-
38
-
39
-
40
-
41
-
42
-
43
-
44
-
45
-
46
-
47
-
48
-
49
-
50
-
51
-
52
-
53
-
54
-
55
-
56
-
57
-
58
-
59
-
60
-
61
-
62
-
63
-
64
-
65
-
66
-
67
-
68
-
69
-
70
-
71
-
72
-
73
-
74
-
75
-
76
-
77
-
78
-
79
-
80
-
81
-
82
-
83
-
84
-
85
-
86
-
87
-
88
-
89
-
 90
90 -
 91
91 -
 92
92 -
 93
93 -
 94
94 -
 95
95 -
 96
96 -
 97
97 -
 98
98 -
 99
99 -
 100
100 -
101
-
102
-
103
-
104
-
105
-
106
-
107
-
108
-
109
-
110
-
111
-
112
-
113
-
114
-
115
-
116
-
117
-
118
 |
 |