Brother International Innov-is 4750D Instruction Manual for Bobbin work
Brother International Innov-is 4750D Manual
 |
View all Brother International Innov-is 4750D manuals
Add to My Manuals
Save this manual to your list of manuals |
Brother International Innov-is 4750D manual content summary:
- Brother International Innov-is 4750D | Instruction Manual for Bobbin work - Page 1
FRANÇAIS NEDERLANDS ITALIANO ESPAÑOL РYCCKИЙ Bobbin Work Instruction Manual Anleitung für Bobbin Work Manuel d'instructions pour le travail à la canette Werken met de spoel Gebruiksaanwijzing Manuale d'istruzioni del ricamo con spolina Manual de instrucciones para efectos decorativos con bobinas - Brother International Innov-is 4750D | Instruction Manual for Bobbin work - Page 2
- Brother International Innov-is 4750D | Instruction Manual for Bobbin work - Page 3
Thread 4 Creating Bobbin Work ...8 Positioning the Fabric and Sewing 8 Finishing the Thread Ends...10 Bobbin Work Free-Motion Sewing 10 Adjusting the Thread Tension 11 Troubleshooting ...12 1 - Brother International Innov-is 4750D | Instruction Manual for Bobbin work - Page 4
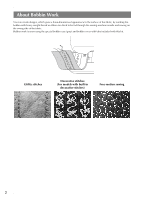
About Bobbin Work You can create designs, which gives a three-dimensional appearance to the surface of the fabric, by winding the bobbin with heavy weight thread or ribbon too thick to be fed through the sewing machine needle and sewing on the wrong side of the fabric. Bobbin work is sewn using the - Brother International Innov-is 4750D | Instruction Manual for Bobbin work - Page 5
being used. For details, refer to your machine's Operation Manual. ■ Presser Foot Utility stitches or decorative stitches: Monogramming foot we recommend that tension not be applied. Refer to page 6 for more detailed instructions. Note • Do not use thread heavier than No.5 hand embroidery thread. - Brother International Innov-is 4750D | Instruction Manual for Bobbin work - Page 6
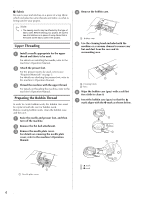
used. For details on installing the needle, refer to the machine's Operation Manual. b Attach the presser foot. For the presser foot to be used, details on removing the needle plate cover, refer to the machine's Operation Manual. d Remove the bobbin case. a Bobbin case e Use the cleaning - Brother International Innov-is 4750D | Instruction Manual for Bobbin work - Page 7
ENGLISH Note • The bobbin case (gray) cannot be used for sewing in any way other than bobbin work. After sewing bobbin work, refer back to the steps in "Preparing the Bobbin Thread" for removing and cleaning the bobbin case (gray), and then reinstall the standard bobbin case (black). CAUTION • Be - Brother International Innov-is 4750D | Instruction Manual for Bobbin work - Page 8
may result in the thread catching on the tension spring of the bobbin case, the thread becoming tangled or damage to the machine. • Do not guide the bobbin thread through the groove in the needle plate cover, otherwise the lower threading cannot be done correctly. k Pull out about 8 cm (approx - Brother International Innov-is 4750D | Instruction Manual for Bobbin work - Page 9
needle plate. p Install the needle plate cover and bobbin cover. For details on installing the needle plate cover, refer to the machine's Operation Manual. A loop of the bobbin thread comes out through the hole in the needle plate. n Insert tweezers through bobbin thread loop and pull bobbin - Brother International Innov-is 4750D | Instruction Manual for Bobbin work - Page 10
Creating Bobbin Work Positioning the Fabric and Sewing Note • Be sure to sew trial stitches using same fabric and threads as your project in order to check the sewing results. • The bobbin thread may become tangled due to the type of pattern and thread that are being used. Since this may cause the - Brother International Innov-is 4750D | Instruction Manual for Bobbin work - Page 11
the stitch length and stitch width settings. For details on adjusting the stitch length and stitch width, refer to the machine's Operation Manual. • Depending on the fabric, bunched stitches may result. We recommend selecting a simple stitch and sewing trial stitches to check the sewing results - Brother International Innov-is 4750D | Instruction Manual for Bobbin work - Page 12
Free-Motion Sewing Note • For bobbin work free motion sewing use the instructions for "Creating Bobbin Work" beginning on page 8. • Use the quilting purchase. For details on using the quilting foot, refer to the Operation Manual provided with your machine or with the presser foot. If so desired, - Brother International Innov-is 4750D | Instruction Manual for Bobbin work - Page 13
the Upper Thread Tension We recommend an upper thread tension that is higher than the standard setting. Refer to the machine's Operation Manual for detailed instruction. ■ Adjusting the Tension of the Bobbin Thread If the desired stitching cannot be achieved after adjusting the upper thread tension - Brother International Innov-is 4750D | Instruction Manual for Bobbin work - Page 14
case. (Refer to see "When Tension is Not Applied to the Bobbin Thread" on page 6.) Troubleshooting Several solutions for minor problems are described below. If the problem persists, contact your nearest authorized dealer. ■ The Thread was Accidentally Cut Automatically and the Bobbin Thread - Brother International Innov-is 4750D | Instruction Manual for Bobbin work - Page 15
DEUTSCH INHALT Über Bobbin Work ...2 Erforderliches Material ...3 Einfädeln des Oberfadens...4 Vorbereiten des Unterfadens 4 Kreieren von Bobbin Work ...8 Positionieren des Stoffes und Nähen 8 Verarbeiten der Fadenenden 10 Bobbin Work-Freihandnähen 10 Einstellen der Fadenspannung 11 - Brother International Innov-is 4750D | Instruction Manual for Bobbin work - Page 16
Über Bobbin Work Stickdesigns mit einer dreidimensionalen Wirkung auf der Stoffoberfläche können Sie erzeugen, indem Sie die Spule mit einem schweren Garn oder Band aufspulen, das zur Führung durch die Nadel zu dick ist, und mit dem Sie dann auf der linken Stoffseite nähen. Eine Bobbin Work wird mit - Brother International Innov-is 4750D | Instruction Manual for Bobbin work - Page 17
DEUTSCH Erforderliches Material ■ Spulenkapsel und Spulenfachabdeckung a Spulenkapsel (grau) Diese Spulenkapsel ist nur für Bobbin Work vorgesehen. Mit dieser Spulenkapsel können Sie mit dickem Garn oder schmalem Band nähen, das nicht durch das Nadelöhr geführt werden kann. An der mit dem - Brother International Innov-is 4750D | Instruction Manual for Bobbin work - Page 18
■ Stoff Nähen Sie auf jeden Fall eine Probenaht auf einem Stoffrest und mit dem gleichen Garn und Stoff wie in Ihrem Projekt. Hinweis • Das Nähergebnis wird ggf. von der verwendeten Stoffart beeinflusst. Bevor Sie an Ihrem Projekt arbeiten, sollten Sie Probestiche auf einem Stoffrest des Stoffes nä - Brother International Innov-is 4750D | Instruction Manual for Bobbin work - Page 19
DEUTSCH Hinweis • Die Spulenkapsel (grau) kann ausschließlich zum Nähen von Bobbin Work Projekten verwendet werden. Entfernen und reinigen Sie die Spulenkapsel (grau) nach dem Nähen von Bobbin Work entsprechend den Schritten in „Vorbereiten des Unterfadens" und setzen Sie die StandardSpulenkapsel ( - Brother International Innov-is 4750D | Instruction Manual for Bobbin work - Page 20
■ Wenn mit Unterfadenspannung genäht werden soll Setzen Sie die Spule so in die Spulenkapsel ein, dass der Faden von der linken Seite abgewickelt wird. Führen Sie dann den Faden richtig durch die Spannfeder (siehe unten). ■ Wenn ohne Unterfadenspannung genäht werden soll Wenn der Unterfaden in der - Brother International Innov-is 4750D | Instruction Manual for Bobbin work - Page 21
DEUTSCH m Ziehen Sie vorsichtig am Oberfaden, um den Unterfaden durch die Stichplatte heraufzuholen. p Setzen Sie die Stichplattenabdeckung und die Spulenfachabdeckung ein. Einzelheiten zum Einsetzen der Stichplattenabdeckung finden Sie in der Bedienungsanleitung der Maschine. → Durch die Ö - Brother International Innov-is 4750D | Instruction Manual for Bobbin work - Page 22
Kreieren von Bobbin Work Positionieren des Stoffes und Nähen Hinweis • Prüfen Sie das Nähergebnis auf jeden Fall vorher durch Probenähen mit einem Ihrem Projekt entsprechenden Garn und Stoff. • Aufgrund der verwendeten Muster- und Garnart kann sich der Unterfaden verwickeln. Da dabei die Nadel - Brother International Innov-is 4750D | Instruction Manual for Bobbin work - Page 23
h Richten Sie Ober- und Unterfaden miteinander aus und führen Sie sie unter dem Nähfuß zur Rückseite der Maschine. m Halten Sie die Fäden locker auf der Maschinenrückseite, drehen Sie dann das Handrad, um die Nadel wieder in das gestochene Loch zu führen und stellen Sie dann den Nähfußhebel - Brother International Innov-is 4750D | Instruction Manual for Bobbin work - Page 24
q Schneiden Sie die Fäden mit einer Schere auf ein ca. 10 cm (ca. 4 Zoll) langes Fadenende ab. b Binden Sie den Unterfaden und Oberfaden auf der linken Stoffseite mit der Hand zusammen und schneiden Sie dann überschüssige Fäden mit einer Schere ab. a 10 cm (ca. 4 Zoll) Hinweis • Nähen Sie am - Brother International Innov-is 4750D | Instruction Manual for Bobbin work - Page 25
b Bringen Sie das Stickunterlegvlies auf der linken Stoffseite an. c Legen Sie ein handelsübliches Pauspapier auf das Stickunterlegvlies, dann das bedruckte Papier mit der Schablone oben darauf und zeichnen Sie das Design mit einem Bleistift nach. a Verstellen Sie nicht die - Brother International Innov-is 4750D | Instruction Manual for Bobbin work - Page 26
. (Siehe „Wenn ohne Unterfadenspannung genäht werden soll" auf Seite 6.) Fehlersuche und -behebung Für kleinere Probleme werden nachfolgend mehrere Lösungen beschrieben. Wenn das Problem weiterhin besteht, wenden Sie sich an Ihren nächstgelegenen Vertragshändler. ■ Der Faden wurde versehentlich - Brother International Innov-is 4750D | Instruction Manual for Bobbin work - Page 27
FRANÇAIS TABLE DES MATIÈRES À propos du travail à la canette 2 Matériel nécessaire...3 Enfilage supérieur...4 Préparation du fil de la canette 4 Création d'un travail à la canette 8 Positionnement du tissu et couture 8 Finition des extrémités de fil 10 Couture en mouvement libre pour le - Brother International Innov-is 4750D | Instruction Manual for Bobbin work - Page 28
À propos du travail à la canette Vous pouvez créer des motifs qui donnent un aspect tridimensionnel à la surface du tissu, en enroulant autour de la canette un fil très épais ou du ruban trop épais pour passer par le chas de l'aiguille de la machine à coudre, puis en le cousant sur l'envers du tissu - Brother International Innov-is 4750D | Instruction Manual for Bobbin work - Page 29
env. 1/8 de pouce) ou moins recommandés) * Si vous utilisez du ruban, nous vous recommandons de ne pas le tendre. Reportez-vous à la page 6 pour des instructions plus détaillées. Remarque • N'utilisez pas de fil plus lourd que du fil de broderie à la main N° 5. • Certains fils peuvent ne pas être ad - Brother International Innov-is 4750D | Instruction Manual for Bobbin work - Page 30
-de-biche utiliser, reportezvous à la section « Matériel nécessaire » à la page 3. Pour plus de détails sur la fixation du pied-debiche, consultez le Manuel d'instructions de la machine. c Enfilez la machine avec le fil supérieur. Pour plus de détails sur la façon d'enfiler la machine, consultez le - Brother International Innov-is 4750D | Instruction Manual for Bobbin work - Page 31
FRANÇAIS Remarque • Le boîtier de la canette (gris) ne peut pas être utilisé pour coudre autrement que pour le travail à la canette. Une fois le travail à la canette cousu, reportez-vous de nouveau à la procédure décrite dans la section « Préparation du fil de la canette » pour enlever et nettoyer - Brother International Innov-is 4750D | Instruction Manual for Bobbin work - Page 32
■ Tension appliquée au fil de la canette Insérez la canette dans le boîtier de la canette de sorte que le fil se déroule du côté gauche. Passez ensuite le fil correctement dans le ressort de tension comme illustré ci-dessous. ■ Tension non appliquée au fil de la canette Si le fil de la canette est - Brother International Innov-is 4750D | Instruction Manual for Bobbin work - Page 33
plaque de l'aiguille et le capot du compartiment à canette. Pour plus de détails sur l'installation du capot de la plaque d'aiguille, consultez le Manuel d'instructions de la machine. → Une boucle formée par le fil de la canette sort par le trou de la plaque de l'aiguille. n Insérez une petite - Brother International Innov-is 4750D | Instruction Manual for Bobbin work - Page 34
Création d'un travail à la canette Positionnement du tissu et couture Remarque • Veillez à effectuer vos essais de couture en utilisant le même tissu et les mêmes fils pour pouvoir en vérifier les résultats. • Le fil de la canette pourrait s'emmêler à cause des types de motifs et de fils utilisés. - Brother International Innov-is 4750D | Instruction Manual for Bobbin work - Page 35
longueur et la largeur du point. Pour plus de détails sur le réglage de la longueur et de la largeur du point, consultez le Manuel d'instructions de la machine. • Selon le tissu utilisé, les points peuvent se tasser. Nous recommandons de sélectionner un point simple et de faire des essais de - Brother International Innov-is 4750D | Instruction Manual for Bobbin work - Page 36
, contactez votre revendeur agréé le plus proche pour en acheter un. Pour plus de détails sur l'utilisation du pied pour quilting, consultez le Manuel d'instructions fourni avec la machine ou avec le pied. Si vous le souhaitez, pour plus de facilité, vous pouvez utiliser un modèle ou tracer votre - Brother International Innov-is 4750D | Instruction Manual for Bobbin work - Page 37
la tension du fil supérieur Nous recommandons une tension du fil supérieur plus importante que le réglage standard. Consultez le manuel d'instructions de la machine pour des instructions détaillées. ■ Réglage de la tension du fil de la canette Si vous ne parvenez pas à obtenir le point souhaité apr - Brother International Innov-is 4750D | Instruction Manual for Bobbin work - Page 38
ATTENTION • NE réglez PAS la position de la vis cruciforme (+) sur le boîtier de la canette (gris) car ceci pourrait endommager le boîtier de la canette et le rendre inutilisable. • Si la vis fendue (-) est difficile à tourner, ne forcez pas. Trop tourner la vis ou forcer dessus dans n'importe quel - Brother International Innov-is 4750D | Instruction Manual for Bobbin work - Page 39
NEDERLANDS INHOUDSOPGAVE Info over werken met de spoel 2 Vereist materiaal ...3 Bovendraad inrijgen ...4 Onderdraad voorbereiden ...4 Werken met de spoel...8 Stof plaatsen en naaien...8 Draaduiteinden afwerken ...10 Vrij werken met de spoel...10 Draadspanning aanpassen 11 Probleemoplossing ...12 - Brother International Innov-is 4750D | Instruction Manual for Bobbin work - Page 40
Info over werken met de spoel U kunt ontwerpen maken waarbij het oppervlak van de stof een driedimensionaal uiterlijk krijgt, door dikke draad of lint - te dik om in te rijgen in de naald - op te spoelen en aan de achterkant van de stof te naaien. Voor het werken met de spoel gebruikt u het speciale - Brother International Innov-is 4750D | Instruction Manual for Bobbin work - Page 41
Vereist materiaal ■ Spoelhuis en spoelhuisdeksel a Spoelhuis (grijs) Dit spoelhuis is alleen voor het werken met de spoel. Met het spoelhuis kunt u dikke draad of smal lint naaien dat u niet door het oog van de naald kunt rijgen. Op de met "A" aangegeven plaats bevindt zich een inkeping. ■ - Brother International Innov-is 4750D | Instruction Manual for Bobbin work - Page 42
■ Stof Naai altijd enkele steken op een proeflapje met dezelfde draad en stof als u voor het echte werk gebruikt. Opmerking • De naairesultaten kunnen worden beïnvloed door het soort stof dat u gebruikt. Naai altijd eerst enkele steken op een proeflapje van de stof die u ook voor het echte werk - Brother International Innov-is 4750D | Instruction Manual for Bobbin work - Page 43
Opmerking • U kunt het spoelhuis (grijs) alleen gebruiken om te werken met de spoel, dus niet voor ander naaiwerk. Na het werken met de spoel raadpleegt u de stappen in "Onderdraad voorbereiden" om het spoelhuis (grijs) te verwijderen en te reinigen. Vervolgens installeert u het standaard spoelhuis - Brother International Innov-is 4750D | Instruction Manual for Bobbin work - Page 44
■ Wanneer u spanning gebruikt voor de onderdraad Plaats de spoel zo in het spoelhuis dat de draad vanaf de linkerkant afwikkelt. Leid de draad vervolgens zorgvuldig door de spanningsveer zoals hieronder aangegeven. ■ Wanneer u geen spanning gebruikt voor de onderdraad Als de onderdraad in het - Brother International Innov-is 4750D | Instruction Manual for Bobbin work - Page 45
m Trek zachtjes aan de bovendraad om de onderdraad door de steekplaat te trekken. p Installeer de steekplaat en het spoelhuisdeksel. Meer bijzonderheden over het installeren van het steekplaatdeksel vindt u in de Bedieningshandleiding. → Een lus van de onderdraad komt door de opening in de - Brother International Innov-is 4750D | Instruction Manual for Bobbin work - Page 46
Werken met de spoel Stof plaatsen en naaien Opmerking • Naai enkele proefsteken met dezelfde stof en draad als het naaiproject om de naairesultaten te controleren. • De onderdraad kan verstrikt raken afhankelijk van het soort patroon en draad dat u gebruikt. Aangezien de naald hierdoor kan breken, - Brother International Innov-is 4750D | Instruction Manual for Bobbin work - Page 47
h Lijn de bovendraad en de onderdraad uit en leid deze vervolgens onder de persvoet naar de achterkant van de machine. m Houd de draden aan de achterkant van de machine losjes vast, draai het handwiel om de naald opnieuw door het gepriemde gat te leiden en zet vervolgens de persvoethendel - Brother International Innov-is 4750D | Instruction Manual for Bobbin work - Page 48
q Knip de draden met een schaar af en laat hierbij ongeveer 10 cm (ca. 4 inch) draad aan de uiteinden over. b Knoop aan de achterkant van de stof de bovendraad en de onderdraad met de hand aan elkaar en knip overtollige draden af met een schaar. a 10 cm (ca. 4 inch) Opmerking • Naai geen - Brother International Innov-is 4750D | Instruction Manual for Bobbin work - Page 49
b Bevestig de steunstof aan de achterkant van de stof. c Plaats overtrekpapier (in de winkel verkrijgbaar) op de steunstof, en daarop het papier waarop het sjabloon is afgedrukt. Trek het ontwerp over met een potlood. a Draai niet aan de kruiskopschroef (+). b Aanpassen met de kleine - Brother International Innov-is 4750D | Instruction Manual for Bobbin work - Page 50
VOORZICHTIG • Draai NIET aan de kruiskopschroef (+) van het spoelhuis (grijs). Hierdoor kan het spoelhuis beschadigd raken, waardoor het onbruikbaar wordt. • Gebruik geen kracht als de sleufschroef (-) moeilijk draait. Door de schroef te veel te draaien of te veel kracht te zetten (in welke richting - Brother International Innov-is 4750D | Instruction Manual for Bobbin work - Page 51
SOMMARIO Informazioni sul ricamo con spolina 2 Materiali necessari ...3 Infilatura superiore ...4 Preparazione del filo della spolina 4 Creazione del ricamo con spolina 8 Posizionamento del tessuto e della cucitura 8 Rifinitura delle estremità del filo 10 Cucitura a moto libero del ricamo con - Brother International Innov-is 4750D | Instruction Manual for Bobbin work - Page 52
Informazioni sul ricamo con spolina È possibile creare disegni, che offrono un aspetto tridimensionale alla superficie del tessuto, avvolgendo la spolina con un filo pesante o con un nastro troppo spesso per poter essere inserito nell'ago della macchina da cucire e cucire sul rovescio del tessuto. - Brother International Innov-is 4750D | Instruction Manual for Bobbin work - Page 53
"N" non è stato fornito con la macchina, utilizzare il piedino per zig-zag "J". • Quando si cuce un disegno descritto nel manuale d'istruzione della macchina e viene consigliato il piedino per monogrammi "N", assicurarsi di utilizzare questo piedino, altrimenti potrebbe non essere possibile ottenere - Brother International Innov-is 4750D | Instruction Manual for Bobbin work - Page 54
adeguato per il filo superiore e per il tipo di tessuto da utilizzare. Per i dettagli sull'installazione dell'ago, consultare il manuale d'istruzione della macchina. b Montare il piedino premistoffa. Per il piedino premistoffa da usare, consultare "Materiali necessari" a pagina 3. Per i dettagli - Brother International Innov-is 4750D | Instruction Manual for Bobbin work - Page 55
Nota • La custodia della spolina (grigia) può essere utilizzata esclusivamente per la cucitura di un ricamo con spolina. Terminata la cucitura del ricamo con spolina, fare riferimento ai passaggi riportati in "Preparazione del filo della spolina" per rimuovere e pulire la custodia della spolina ( - Brother International Innov-is 4750D | Instruction Manual for Bobbin work - Page 56
■ Se si applica tensione sul filo della spolina Inserire la spolina nella custodia in modo che il filo si svolga dalla parte sinistra. Fare quindi passare correttamente il filo attraverso la molla della tensione, come mostrato di seguito. ■ Se non si applica tensione sul filo della spolina Se il - Brother International Innov-is 4750D | Instruction Manual for Bobbin work - Page 57
ago. p Installare il coperchio placca ago e lo sportello della spolina. Per i dettagli sull'installazione del coperchio placca ago, consultare il manuale d'istruzione della macchina. → Una porzione di filo della spolina uscirà dal foro nella placca ago. n Inserire le pinzette attraverso la - Brother International Innov-is 4750D | Instruction Manual for Bobbin work - Page 58
Creazione del ricamo con spolina Posizionamento del tessuto e della cucitura Nota • Assicurarsi di cucire i punti di prova utilizzando lo stesso tessuto e gli stessi fili del proprio lavoro, in modo da verificare i risultati della cucitura. • In base al tipo di motivo e di filo utilizzato, il filo - Brother International Innov-is 4750D | Instruction Manual for Bobbin work - Page 59
impostazioni della lunghezza e della larghezza del punto. Per i dettagli sulla regolazione della lunghezza e della larghezza del punto, consultare il manuale d'istruzione della macchina. • A seconda del tipo di tessuto, si potrebbero ottenere punti ravvicinati. Si consiglia di selezionare un punto - Brother International Innov-is 4750D | Instruction Manual for Bobbin work - Page 60
per trapuntatura, contattare il rivenditore autorizzato più vicino e acquistarne uno. Per i dettagli sull'utilizzo del piedino per trapuntatura, consultare il manuale d'istruzione fornito con la macchina o con il piedino premistoffa. Se lo si desidera, utilizzare un modello o tratteggiare il disegno - Brother International Innov-is 4750D | Instruction Manual for Bobbin work - Page 61
Regolazione della tensione del filo superiore Si consiglia una tensione del filo superiore più elevata rispetto all'impostazione standard. Consultare il manuale d'istruzione per le istruzioni dettagliate. ■ Regolazione della tensione del filo della spolina Se dopo aver regolato la tensione del filo - Brother International Innov-is 4750D | Instruction Manual for Bobbin work - Page 62
ATTENZIONE • NON regolare la posizione della vite a croce (+) sulla custodia della spolina (grigia), in quanto la custodia della spolina potrebbe danneggiarsi e risultare inutilizzabile. • Se è difficile ruotare la vite a taglio (-), non forzarla. Ruotando eccessivamente la vite o forzandola nella - Brother International Innov-is 4750D | Instruction Manual for Bobbin work - Page 63
CONTENIDO Acerca de los efectos decorativos con bobinas 2 Materiales necesarios ...3 Hilo superior ...4 Preparación del hilo de la bobina 4 Creación de efectos decorativos con bobinas 8 Colocación de la tela y costura 8 Acabado de los extremos del hilo 10 Costura libre para efectos decorativos - Brother International Innov-is 4750D | Instruction Manual for Bobbin work - Page 64
Acerca de los efectos decorativos con bobinas Puede crear diseños para proporcionar un aspecto tridimensional a la superficie de la tela, enrollando la bobina con hilo o cinta pesados de un grosor superior al permitido para la aguja de la máquina y cosiendo en el revés de la tela. Los efectos - Brother International Innov-is 4750D | Instruction Manual for Bobbin work - Page 65
.)) Nota • Si su máquina no incluía el pie para monogramas "N", utilice el pie para zigzag "J". • Cuando cosa un patrón descrito en el Manual de instrucciones de la máquina y se recomiende el pie para monogramas "N", utilice siempre este pie porque en caso contrario posiblemente no conseguirá los - Brother International Innov-is 4750D | Instruction Manual for Bobbin work - Page 66
. c Extraiga la cubierta de la placa de la aguja. Para obtener más información sobre cómo retirar la cubierta de la placa de la aguja, consulte el Manual de instrucciones de la máquina. d Retire la caja de la bobina. a Caja de la bobina e Utilice el cepillo de limpieza que se incluye con la - Brother International Innov-is 4750D | Instruction Manual for Bobbin work - Page 67
Nota • La caja de la bobina (gris) no se puede utilizar para otras costuras distintas de los efectos decorativos con bobinas. Después de crear efectos decorativos con bobinas, consulte los pasos indicados en "Preparación del hilo de la bobina" para quitar y limpiar la caja de la bobina (gris) y, a - Brother International Innov-is 4750D | Instruction Manual for Bobbin work - Page 68
■ Si se aplica tensión al hilo de la bobina Inserte la bobina en la caja de la bobina de forma que el hilo se desenrolle desde el lado izquierdo. A continuación, pase correctamente el hilo por el resorte de tensión, como se muestra a continuación. ■ Si no se aplica tensión al hilo de la bobina Si - Brother International Innov-is 4750D | Instruction Manual for Bobbin work - Page 69
placa de la aguja y la tapa de la bobina. Para obtener más información sobre cómo colocar la cubierta de la tapa de la aguja, consulte el Manual de instrucciones de la máquina. → Del orificio en la placa de la aguja saldrá un lazo del hilo de la bobina. n Inserte unas tenacillas por - Brother International Innov-is 4750D | Instruction Manual for Bobbin work - Page 70
Creación de efectos decorativos con bobinas Colocación de la tela y costura Nota • Asegúrese de realizar algunas puntadas de prueba con los mismos hilos y la misma tela que vaya a utilizar en la labor para comprobar los resultados de la costura. • El hilo de la bobina podría enredarse debido al - Brother International Innov-is 4750D | Instruction Manual for Bobbin work - Page 71
cambiar los ajustes de largo y el ancho de puntada. Para obtener más información sobre como ajuste el largo y ancho de puntada, consulte el Manual de instrucciones de la máquina. • Según la tela empleada, las puntadas pueden amontonarse. Se recomienda seleccionar una puntada sencilla y coser algunas - Brother International Innov-is 4750D | Instruction Manual for Bobbin work - Page 72
ngase en contacto con su distribuidor autorizado más cercano para adquirir uno. Para obtener más información sobre cómo utilizar el pie para acolchado, consulte el Manual de instrucciones que se entrega con la máquina o con el pie prensatela. Si lo desea, utilice una plantilla o dibuje su diseño en - Brother International Innov-is 4750D | Instruction Manual for Bobbin work - Page 73
costura. ■ Ajuste de la tensión del hilo superior Recomendamos una tensión del hilo superior más alta de lo normal. Consulte las instrucciones detalladas en el Manual de instrucciones de la máquina. ■ Ajuste de la tensión del hilo de la bobina Si no se obtiene la costura deseada después de ajustar - Brother International Innov-is 4750D | Instruction Manual for Bobbin work - Page 74
PRECAUCIÓN • NO ajuste la posición del tornillo Phillips (+) situado en la caja de la bobina (gris), ya que esta última podría dañarse y quedar inservible. • Si resulta difícil girar el tornillo de cabeza ranurada (-), no ejerza fuerza. Si gira demasiado el tornillo o ejerce fuerza en cualquiera de - Brother International Innov-is 4750D | Instruction Manual for Bobbin work - Page 75
2 3 4 4 8 8 10 10 11 12 1 - Brother International Innov-is 4750D | Instruction Manual for Bobbin work - Page 76
2 - Brother International Innov-is 4750D | Instruction Manual for Bobbin work - Page 77
a 50 wt ■ Игла N" b 5 2 5/64 дюйма) 3,5 1/8 6. 5. N J". N O 3 - Brother International Innov-is 4750D | Instruction Manual for Bobbin work - Page 78
d a e a b 3 c a b f g S a b c a 4 a Метка S b - Brother International Innov-is 4750D | Instruction Manual for Bobbin work - Page 79
h 80 i a j 11,5 7/16 дюйма) 5 - Brother International Innov-is 4750D | Instruction Manual for Bobbin work - Page 80
11 a k 8 3 l 6 - Brother International Innov-is 4750D | Instruction Manual for Bobbin work - Page 81
m p n o 10 см (около 4 a b q a 7 - Brother International Innov-is 4750D | Instruction Manual for Bobbin work - Page 82
4. a b e a b f c d g a b 8 - Brother International Innov-is 4750D | Instruction Manual for Bobbin work - Page 83
h m i j n k l o p 9 - Brother International Innov-is 4750D | Instruction Manual for Bobbin work - Page 84
q 10 b a 10 см a a b c 11. a b 8 a 10 - Brother International Innov-is 4750D | Instruction Manual for Bobbin work - Page 85
b c a b 30-45 a b c 30-45 d a 11 - Brother International Innov-is 4750D | Instruction Manual for Bobbin work - Page 86
c d 6.) a a Нить b a b 6.) 12 - Brother International Innov-is 4750D | Instruction Manual for Bobbin work - Page 87
- Brother International Innov-is 4750D | Instruction Manual for Bobbin work - Page 88
English German French Dutch Italian Spanish Russian XF0662-001 Printed in Taiwan
-
 1
1 -
 2
2 -
 3
3 -
 4
4 -
 5
5 -
 6
6 -
 7
7 -
8
-
9
-
10
-
11
-
12
-
13
-
14
-
15
-
16
-
17
-
18
-
19
-
20
-
21
-
22
-
23
-
24
-
25
-
26
-
27
-
28
-
29
-
30
-
31
-
32
-
33
-
34
-
35
-
36
-
37
-
38
-
39
-
40
-
41
-
42
-
43
-
44
-
45
-
46
-
47
-
48
-
49
-
50
-
51
-
52
-
53
-
54
-
55
-
56
-
57
-
58
-
59
-
60
-
61
-
62
-
63
-
64
-
65
-
66
-
67
-
68
-
69
-
70
-
71
-
72
-
73
-
74
-
75
-
76
-
77
-
78
-
79
-
80
-
81
-
82
-
83
-
84
-
85
-
86
-
87
-
88
 |
 |
ENGLISH
FRANÇAIS
ESPAÑOL
Bobbin Work
Instruction Manual
Manuel d'instructions pour
le travail à la canette
Manual de instrucciones para
efectos decorativos con bobinas
Р
YCCK
ИЙ
Руководство
пользователя
по
объемному
вышиванию
DEUTSCH
Anleitung für Bobbin Work
NEDERLANDS
Werken met de spoel
Gebruiksaanwijzing
ITALIANO
Manuale d'istruzioni del
ricamo con spolina