Canon MultiPASS F80 MultiPASS F80 Comprehensive Guide - Page 120
Menu: USER DATA, Function keys: [Copy], [Scan], [Photo Print]
 |
View all Canon MultiPASS F80 manuals
Add to My Manuals
Save this manual to your list of manuals |
Page 120 highlights
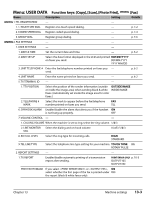
Menu: USER DATA Function keys: [Copy], [Scan], [Photo Print], FaxModel [Fax] Name Description Setting Details Fax Model 1. TEL REGISTRATION - - 1. 1-TOUCH SPD DIAL Register one-touch speed dialing. - p. 7-2 2. CODED SPEED DIAL Register coded speed dialing. - p. 7-4 3. GROUP DIAL Register group dialing. - p. 7-6 Fax Model 2. FAX SETTINGS - - 1. USER SETTINGS - - 1. DATE & TIME Set the current date and time. - p. 6-2 2. DATE SETUP Select the date format displayed in the LCD and printed MM/DD/YYYY on faxes you send. DD/MM YYYY YYYY MM/DD 3. UNIT TELEPHONE # Enter the fax/telephone number printed on faxes you - send. p. 6-2 4. UNIT NAME Enter the name printed on faxes you send. - p. 6-2 5. TX TERMINAL ID - - 1. TTI POSITION Select the position of the sender information (outside OUTSIDE IMAGE or inside the image area) when sending black & white INSIDE IMAGE faxes. (Automatically set inside the image area for color faxes.) 2. TELEPHONE # Select the mark to appear before the fax/telephone FAX MARK number printed on faxes you send. TEL 6. OFFHOOK ALARM Enable/disable the alarm that alerts you if the handset ON is not hung up properly. OFF 7. VOLUME CONTROL - - 1. CALLING VOLUME When the machine is set to ring, select the ring volume. 1/2/3 2. LINE MONITOR Select the dialing and on-hook volume. VOL 0 (off )/1/2/3 8. RX CALL LEVEL Select the ring type for incoming calls. HIGH STANDARD 9. TEL LINE TYPE Select the telephone line type setting for your machine. TOUCH TONE BG ROTARY PULSE 2. REPORT SETTINGS - - 1. TX REPORT Enable/disable automatic printing of a transmission report after sending. PRINT ERROR ONLY p. 10-3 OUTPUT YES OUTPUT NO PRINT WITH IMAGE If you select or , ON select whether the first page of the fax is printed under OFF the report (black & white faxes only). Chapter 13 Machine settings 13-3
-
 1
1 -
2
-
3
-
4
-
5
-
6
-
7
-
8
-
9
-
10
-
11
-
12
-
13
-
14
-
15
-
16
-
17
-
18
-
19
-
20
-
21
-
22
-
23
-
24
-
25
-
26
-
27
-
28
-
29
-
30
-
31
-
32
-
33
-
34
-
35
-
36
-
37
-
38
-
39
-
40
-
41
-
42
-
43
-
44
-
45
-
46
-
47
-
48
-
49
-
50
-
51
-
52
-
53
-
54
-
55
-
56
-
57
-
58
-
59
-
60
-
61
-
62
-
63
-
64
-
65
-
66
-
67
-
68
-
69
-
70
-
71
-
72
-
73
-
74
-
75
-
76
-
77
-
78
-
79
-
80
-
81
-
82
-
83
-
84
-
85
-
86
-
87
-
88
-
89
-
90
-
91
-
92
-
93
-
94
-
95
-
96
-
97
-
98
-
99
-
100
-
101
-
102
-
103
-
104
-
105
-
106
-
107
-
108
-
109
-
110
-
111
-
112
-
113
-
114
-
 115
115 -
 116
116 -
 117
117 -
 118
118 -
 119
119 -
 120
120 -
 121
121 -
 122
122 -
 123
123 -
 124
124 -
 125
125 -
126
-
127
-
128
-
129
-
130
-
131
-
132
-
133
-
134
 |
 |
