Canon imagePROGRAF iPF650 iPF650 655 750 755 Basic Guide Step2 - Page 10
Line Drawing/Text
 |
View all Canon imagePROGRAF iPF650 manuals
Add to My Manuals
Save this manual to your list of manuals |
Page 10 highlights
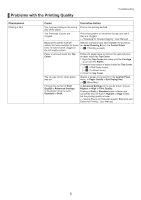
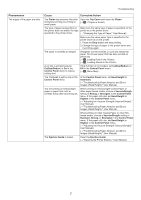
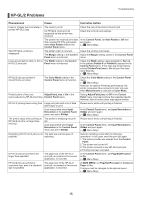
Troubleshooting Phenomenon Colors in printed images are uneven Cause Corrective Action Line Drawing/Text is selected In Print Priority in the Advanced Settings of the when printing images in many solid printer driver, choose Image. colors. You are printing on paper that curls Printed colors may appear uneven on the leading easily. edge of paper that is susceptible to curling. Select a stronger level in VacuumStrngth in the Control Panel menu to increase suction against the paper, or specify a trailing margin of 20 mm (0.79 in) or more. (→"Adjusting the Vacuum Strength (VacuumStrngth)," User Manual) Printed colors may be uneven if you set the Print Quality too low. Choose a higher level of Print Quality in the Advanced Settings of the printer driver. Printing in Draft or Standard mode is faster and consumes less ink than in Highest or High modes, but the printing quality is lower. (→"Giving Priority to Particular Graphic Elements and Colors for Printing," User Manual) Color may be uneven between dark and light image areas. Select Unidirectional Printing in the Advanced Settings of the printer driver. When borderless printing is used, the edge of the paper is cut during printing. Thus, ink density may be slightly uneven at the edges. Specify No in Auto Cut in the printer driver before printing. In this case, the paper can be printed without borders on the left and right sides only. Cut the printed document ejected from the printer, then use scissors to cut away the edges on the top and bottom. Choose a higher level of Print Quality in the Advanced Settings of the printer driver. (→"Giving Priority to Particular Graphic Elements and Colors for Printing," User Manual) The Printhead is out of alignment. Adjust the Printhead alignment. (→ , If Vertical Lines are Warped or Colors are Misaligned) Drying documents stacked on each other may cause uneven colors. To avoid uneven colors, we recommend drying each sheet separately. Density may be uneven if you use In Advanced Settings of the printer driver, choose Glossy Paper or Coated Paper. Highest or High in Print Quality. The type of paper specified in the printer driver does not match the type loaded in the printer. Load paper of the same type as you have specified in the printer driver. (→ , Loading Rolls in the Printer) (→ , Loading Sheets in the Printer) Make sure the same type of paper is specified in the printer driver as you have loaded in the printer. 1. Press the Stop button and stop printing. 2. Change the type of paper in the printer driver and try printing again. 10
-
 1
1 -
2
-
3
-
4
-
 5
5 -
 6
6 -
 7
7 -
 8
8 -
 9
9 -
 10
10 -
 11
11 -
 12
12 -
 13
13 -
 14
14 -
 15
15 -
16
-
17
-
18
-
19
-
20
-
21
-
22
-
23
-
24
-
25
-
26
-
27
-
28
-
29
-
30
-
31
-
32
-
33
-
34
-
35
-
36
-
37
-
38
-
39
-
40
-
41
-
42
-
43
-
44
-
45
-
46
-
47
-
48
-
49
-
50
-
51
-
52
 |
 |