Canon imagePROGRAF iPF650 iPF650 655 750 755 Basic Guide Step2 - Page 13
Cannot Print Over Network
 |
View all Canon imagePROGRAF iPF650 manuals
Add to My Manuals
Save this manual to your list of manuals |
Page 13 highlights
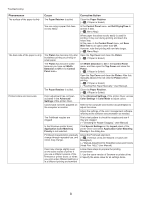
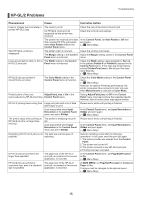
Cannot Print Over Network Troubleshooting Phenomenon Cannot connect the printer to the network Cannot print over a TCP/IP network Cause Corrective Action The Ethernet cable is not connected correctly to the printer's Ethernet port. 1. Make sure the printer is connected to the network with the correct Ethernet cable, and then turn the printer on. For instructions on connecting the cable, refer to the Setup Guide. 2. Make sure the Link indicator is lit. The bottom indicator is green if the printer is connected via 1000BASE-T, while the top indicator is orange if connected via 100BASE-TX and the top indicator is green if connected via 10BASE-T. If the Link indicator is not lit, check the following points. • Make sure the hub is on. • Make sure the end of the Ethernet cable is connected correctly. Insert the Ethernet cable until it clicks and locks in place. • Make sure there is no problem with the Ethernet cable. If there is any problem, replace the Ethernet cable. • Check the communication mode with the hub. Although the printer normally detects the hub communication mode and transmission rate automatically (in auto negotiation mode), sometimes the hub settings cannot be detected. In this case, configure the connection method manually, specifying the communication mode in use. (→"Configuring the Communication Mode Manually," User Manual) The printer's IP address is not configured correctly. Make sure the printer's IP address is configured correctly. (→"Configuring the IP Address Using imagePROGRAF Device Setup Utility," User Manual) (→"Configuring the IP Address Using the Printer Control Panel," User Manual) The printer's TCP/IP network settings are not configured correctly. Make sure the printer's TCP/IP network settings are configured correctly. (→"Configuring the Printer's TCP/IP Network Settings," User Manual) The computer you are trying to print from is not configured correctly. Make sure the computer's TCP/IP network settings are configured correctly. (→"Configuring the Printer Driver Destination (Windows)," User Manual) (→"Configuring the Destination in TCP/IP Networks (Macintosh)," User Manual) 13
-
 1
1 -
2
-
3
-
4
-
5
-
6
-
7
-
 8
8 -
 9
9 -
 10
10 -
 11
11 -
 12
12 -
 13
13 -
 14
14 -
 15
15 -
 16
16 -
 17
17 -
 18
18 -
19
-
20
-
21
-
22
-
23
-
24
-
25
-
26
-
27
-
28
-
29
-
30
-
31
-
32
-
33
-
34
-
35
-
36
-
37
-
38
-
39
-
40
-
41
-
42
-
43
-
44
-
45
-
46
-
47
-
48
-
49
-
50
-
51
-
52
 |
 |
