Cisco WS-C3750X-24T-L Hardware Installation Guide - Page 96
Table or Shelf Mounting
 |
View all Cisco WS-C3750X-24T-L manuals
Add to My Manuals
Save this manual to your list of manuals |
Page 96 highlights
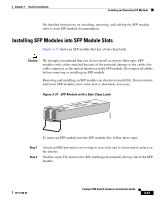
Installing the Switch Chapter 3 Switch Installation • Run the setup program. See the "Completing the Setup Program" section on page D-11. • Connect to the front-panel ports. See the "Connecting to the 10/100 and 10/100/1000 Ports" section on page 3-44 and the "Connecting to an SFP Module" section on page 3-46 to complete the installation. To use the CLI, enter commands at the Switch> prompt through the console port by using a terminal program or through the network by using Telnet. For configuration information, refer to the switch software configuration guide or the switch command reference. To use CMS, go to the "Launching the Switch Home Page" section on page C-3. Table or Shelf Mounting Follow these steps to install the switch on a table or shelf: Step 1 Step 2 Locate the adhesive strip with the rubber feet in the mounting-kit envelope. Attach the four rubber feet to the recessed areas on the bottom of the unit. Place the switch on the table or shelf near an AC power source. After the switch is mounted on the table, you might need to perform these tasks to complete the installation, run the setup program, and access the switch: • (Optional) Connect the switches in the stacks. See the "Connecting StackWise Cable to StackWise Ports" section on page 3-37. • Connect to the console port, and start the emulation software. See the "Connecting to the Console Port" section on page 1-4 and the "Starting the Terminal Emulation Software" section on page 1-6. • Power on the switch. See the "Connecting to a Power Source" section on page 1-6. If the switches are stacked, see the "Powering Considerations" section on page 3-13. • Run the setup program. See the "Completing the Setup Program" section on page D-11. • Connect to the front-panel ports. See the "Connecting to the 10/100 and 10/100/1000 Ports" section on page 3-44 and the "Connecting to an SFP Module" section on page 3-46 to complete the installation. 3-36 Catalyst 3750 Switch Hardware Installation Guide 78-15136-02
-
 1
1 -
2
-
3
-
4
-
5
-
6
-
7
-
8
-
9
-
10
-
11
-
12
-
13
-
14
-
15
-
16
-
17
-
18
-
19
-
20
-
21
-
22
-
23
-
24
-
25
-
26
-
27
-
28
-
29
-
30
-
31
-
32
-
33
-
34
-
35
-
36
-
37
-
38
-
39
-
40
-
41
-
42
-
43
-
44
-
45
-
46
-
47
-
48
-
49
-
50
-
51
-
52
-
53
-
54
-
55
-
56
-
57
-
58
-
59
-
60
-
61
-
62
-
63
-
64
-
65
-
66
-
67
-
68
-
69
-
70
-
71
-
72
-
73
-
74
-
75
-
76
-
77
-
78
-
79
-
80
-
81
-
82
-
83
-
84
-
85
-
86
-
87
-
88
-
89
-
90
-
 91
91 -
 92
92 -
 93
93 -
 94
94 -
 95
95 -
 96
96 -
 97
97 -
 98
98 -
 99
99 -
 100
100 -
 101
101 -
102
-
103
-
104
-
105
-
106
-
107
-
108
-
109
-
110
-
111
-
112
-
113
-
114
-
115
-
116
-
117
-
118
-
119
-
120
-
121
-
122
-
123
-
124
-
125
-
126
-
127
-
128
-
129
-
130
-
131
-
132
-
133
-
134
-
135
-
136
-
137
-
138
-
139
-
140
-
141
-
142
-
143
-
144
-
145
-
146
-
147
-
148
-
149
-
150
-
151
-
152
-
153
-
154
-
155
-
156
-
157
-
158
-
159
-
160
-
161
-
162
-
163
-
164
-
165
-
166
-
167
-
168
-
169
-
170
-
171
-
172
-
173
-
174
-
175
-
176
-
177
-
178
-
179
-
180
-
181
-
182
-
183
-
184
-
185
-
186
-
187
-
188
-
189
-
190
-
191
-
192
-
193
-
194
-
195
-
196
-
197
-
198
 |
 |