D-Link DES-3028 Product Manual - Page 172
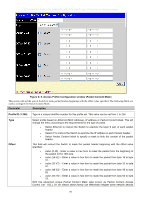
Access Profile Configuration window Ethernet, Parameter, Description, Profile ID 1-256
 |
UPC - 790069305375
View all D-Link DES-3028 manuals
Add to My Manuals
Save this manual to your list of manuals |
Page 172 highlights
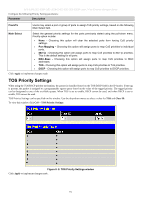
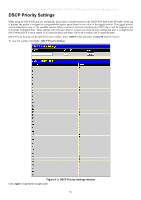
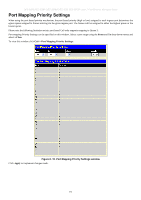
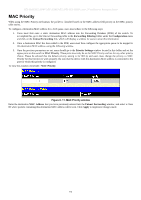
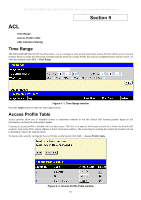
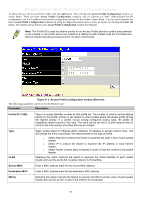
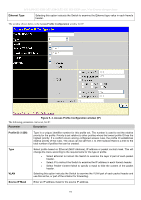
DES-3028 DES-3028P DES-3028G DES-3052 DES-3052P Layer 2 Fast Ethernet Managed Switch To add an entry to the Access Profile Table, click the Add button. This will open the Access Profile Configuration window, as shown below. There are three Access Profile Configuration windows; one for Ethernet (or MAC address-based) profile configuration, one for IP address-based profile configuration and one for the Packet Content Mask. You can switch between the three Access Profile Configuration windows by using the Type drop-down menu or clear all entries by clicking the Clear All button. The window shown below is the Access Profile Configuration window for Ethernet. Note: The Profile ID is used for relative priority for an Access Profile should a conflict arise between a rule created in one profile and a rule created in a different profile. Please read the CLI Reference Manual chapter discussing Access Control List (ACL) Commands. Figure 9- 3. Access Profile Configuration window (Ethernet) The following parameters can be set, for the Ethernet type: Parameter Description Profile ID (1-256) Type in a unique identifier number for this profile set. The number is used to set the relative priority for the profile. Priority is set relative to other profiles where the lowest profile ID has the highest priority. If a conflict occurs among configured access rules, the profile ID establishes relative priority of the rules. The value can be set from 1 to 256 however there is a limit to the total number of profiles that can be created. Type VLAN Select profile based on Ethernet (MAC Address), IP address or packet content mask. This will change the menu according to the requirements for the type of profile. Select Ethernet to instruct the Switch to examine the layer 2 part of each packet header. Select IP to instruct the Switch to examine the IP address in each frame's header. Select Packet Content Mask to specify a mask to hide the content of the packet header. Selecting this option instructs the Switch to examine the VLAN identifier of each packet header and use this as the full or partial criterion for forwarding. Source MAC Enter a MAC address mask for the source MAC address. Destination MAC Enter a MAC address mask for the destination MAC address. 802.1p Selecting this option instructs the Switch to examine the 802.1p priority value of each packet header and use this as the, or part of the criterion for forwarding. 158
-
 1
1 -
2
-
3
-
4
-
5
-
6
-
7
-
8
-
9
-
10
-
11
-
12
-
13
-
14
-
15
-
16
-
17
-
18
-
19
-
20
-
21
-
22
-
23
-
24
-
25
-
26
-
27
-
28
-
29
-
30
-
31
-
32
-
33
-
34
-
35
-
36
-
37
-
38
-
39
-
40
-
41
-
42
-
43
-
44
-
45
-
46
-
47
-
48
-
49
-
50
-
51
-
52
-
53
-
54
-
55
-
56
-
57
-
58
-
59
-
60
-
61
-
62
-
63
-
64
-
65
-
66
-
67
-
68
-
69
-
70
-
71
-
72
-
73
-
74
-
75
-
76
-
77
-
78
-
79
-
80
-
81
-
82
-
83
-
84
-
85
-
86
-
87
-
88
-
89
-
90
-
91
-
92
-
93
-
94
-
95
-
96
-
97
-
98
-
99
-
100
-
101
-
102
-
103
-
104
-
105
-
106
-
107
-
108
-
109
-
110
-
111
-
112
-
113
-
114
-
115
-
116
-
117
-
118
-
119
-
120
-
121
-
122
-
123
-
124
-
125
-
126
-
127
-
128
-
129
-
130
-
131
-
132
-
133
-
134
-
135
-
136
-
137
-
138
-
139
-
140
-
141
-
142
-
143
-
144
-
145
-
146
-
147
-
148
-
149
-
150
-
151
-
152
-
153
-
154
-
155
-
156
-
157
-
158
-
159
-
160
-
161
-
162
-
163
-
164
-
165
-
166
-
 167
167 -
 168
168 -
 169
169 -
 170
170 -
 171
171 -
 172
172 -
 173
173 -
 174
174 -
 175
175 -
 176
176 -
 177
177 -
178
-
179
-
180
-
181
-
182
-
183
-
184
-
185
-
186
-
187
-
188
-
189
-
190
-
191
-
192
-
193
-
194
-
195
-
196
-
197
-
198
-
199
-
200
-
201
-
202
-
203
-
204
-
205
-
206
-
207
-
208
-
209
-
210
-
211
-
212
-
213
-
214
-
215
-
216
-
217
-
218
-
219
-
220
-
221
-
222
-
223
-
224
-
225
-
226
-
227
-
228
-
229
-
230
-
231
-
232
-
233
-
234
-
235
-
236
-
237
-
238
-
239
-
240
-
241
-
242
-
243
-
244
-
245
-
246
-
247
-
248
-
249
-
250
-
251
-
252
-
253
-
254
-
255
-
256
-
257
-
258
-
259
-
260
-
261
-
262
-
263
-
264
-
265
-
266
-
267
-
268
-
269
-
270
-
271
-
272
-
273
-
274
-
275
-
276
-
277
-
278
-
279
-
280
-
281
-
282
-
283
-
284
-
285
-
286
-
287
-
288
-
289
-
290
-
291
-
292
-
293
-
294
-
295
-
296
-
297
-
298
-
299
-
300
-
301
-
302
-
303
-
304
-
305
-
306
-
307
-
308
-
309
-
310
-
311
-
312
-
313
-
314
-
315
-
316
-
317
-
318
-
319
-
320
-
321
-
322
-
323
-
324
-
325
-
326
-
327
-
328
-
329
-
330
-
331
-
332
-
333
 |
 |
