D-Link DES-3028 Product Manual - Page 228
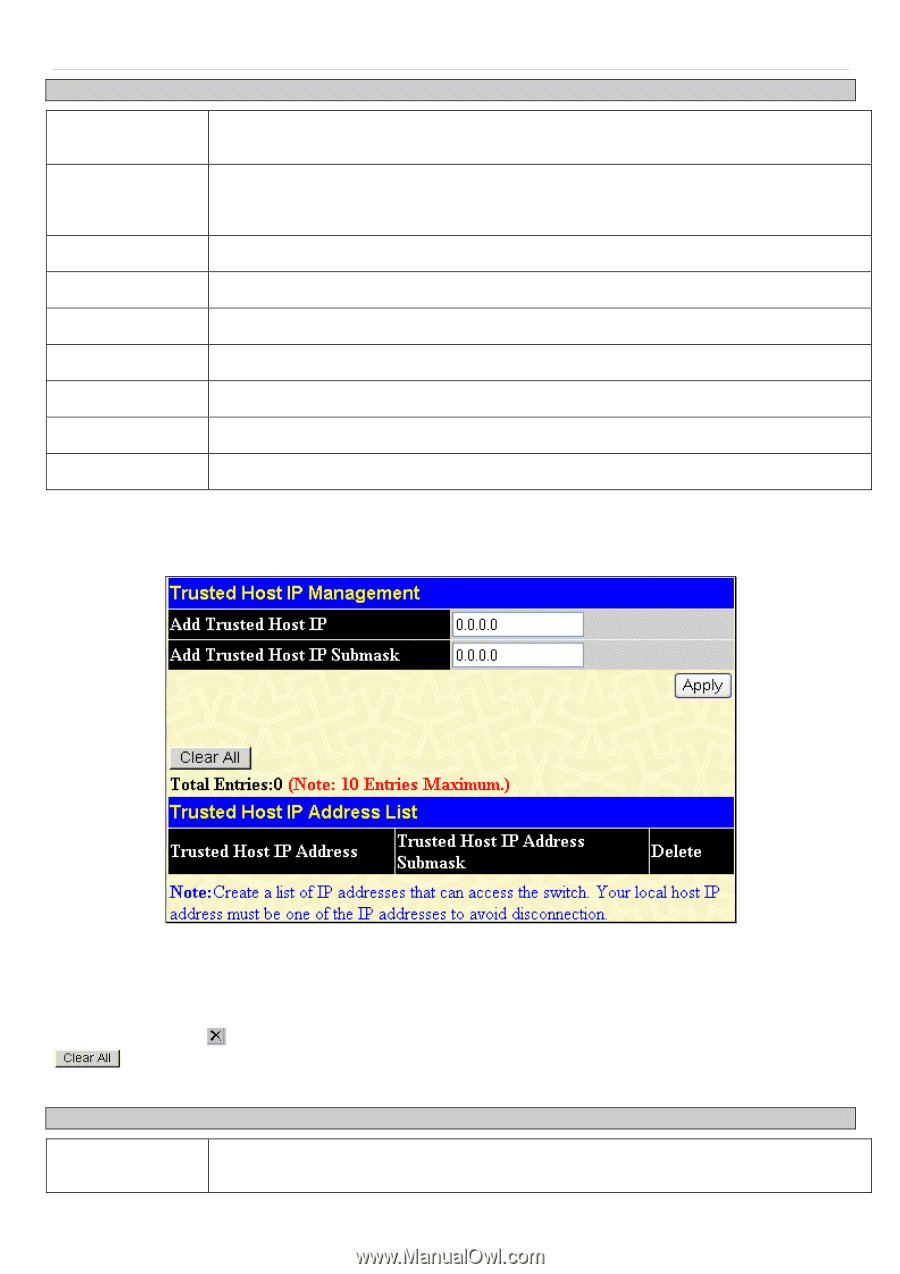
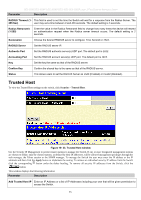
Trusted Host, Trusted Host window
 |
UPC - 790069305375
View all D-Link DES-3028 manuals
Add to My Manuals
Save this manual to your list of manuals |
Page 228 highlights
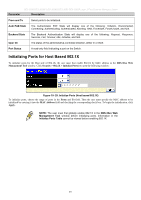
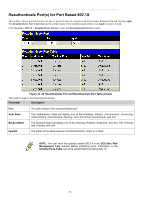
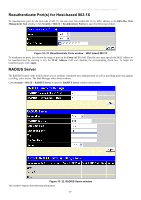
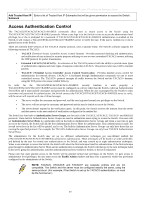
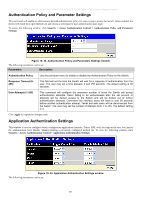
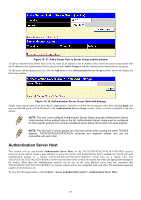
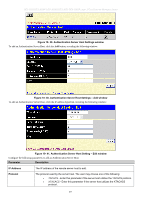
Parameter DES-3028 DES-3028P DES-3028G DES-3052 DES-3052P Layer 2 Fast Ethernet Managed Switch Description RADIUS Timeout (1- This field is used to set the time the Switch will wait for a response from the Radius Server. The 255 Sec) user may set a time between 0 and 255 seconds. The default setting is 5 seconds. Radius Retransmit (1-255) Enter the value in the Radius Retransmit field to change how many times the device will resend an authentication request when the Radius server timeout occurs. The default setting is 2 seconds. Succession RADIUS Server Choose the desired RADIUS server to configure: First, Second or Third. Set the RADIUS server IP. Authentic Port Set the RADIUS authentic server(s) UDP port. The default port is 1812. Accounting Port Key Set the RADIUS account server(s) UDP port. The default port is 1813. Set the key the same as that of the RADIUS server. Confirm Key Confirm the shared key is the same as that of the RADIUS server. Status This allows users to set the RADIUS Server as Valid (Enabled) or Invalid (Disabled). Trusted Host To view the Trusted Host settings on the switch, click Security > Trusted Host. Figure 10- 33. Trusted Host window Use the Security IP Management to permit remote stations to manage the Switch. If one or more designated management stations are chosen to define, only the chosen stations, as defined by their IP addresses, will be allowed management privileges through the web manager, the Telnet session or the SNMP manager. To manage the Switch the user must enter the IP address or the IP submask and then click the Apply button to implement the setting. To remove an individual security IP address from the Switch click the corresponding button under the delete heading. To remove all security IP addresses from the Switch, click the button. This window displays the following information: Parameter Description Add Trusted Host IP Enter an IP Address or a list of IP Addresses including your own that will be given permission to access the Switch. 214
-
 1
1 -
2
-
3
-
4
-
5
-
6
-
7
-
8
-
9
-
10
-
11
-
12
-
13
-
14
-
15
-
16
-
17
-
18
-
19
-
20
-
21
-
22
-
23
-
24
-
25
-
26
-
27
-
28
-
29
-
30
-
31
-
32
-
33
-
34
-
35
-
36
-
37
-
38
-
39
-
40
-
41
-
42
-
43
-
44
-
45
-
46
-
47
-
48
-
49
-
50
-
51
-
52
-
53
-
54
-
55
-
56
-
57
-
58
-
59
-
60
-
61
-
62
-
63
-
64
-
65
-
66
-
67
-
68
-
69
-
70
-
71
-
72
-
73
-
74
-
75
-
76
-
77
-
78
-
79
-
80
-
81
-
82
-
83
-
84
-
85
-
86
-
87
-
88
-
89
-
90
-
91
-
92
-
93
-
94
-
95
-
96
-
97
-
98
-
99
-
100
-
101
-
102
-
103
-
104
-
105
-
106
-
107
-
108
-
109
-
110
-
111
-
112
-
113
-
114
-
115
-
116
-
117
-
118
-
119
-
120
-
121
-
122
-
123
-
124
-
125
-
126
-
127
-
128
-
129
-
130
-
131
-
132
-
133
-
134
-
135
-
136
-
137
-
138
-
139
-
140
-
141
-
142
-
143
-
144
-
145
-
146
-
147
-
148
-
149
-
150
-
151
-
152
-
153
-
154
-
155
-
156
-
157
-
158
-
159
-
160
-
161
-
162
-
163
-
164
-
165
-
166
-
167
-
168
-
169
-
170
-
171
-
172
-
173
-
174
-
175
-
176
-
177
-
178
-
179
-
180
-
181
-
182
-
183
-
184
-
185
-
186
-
187
-
188
-
189
-
190
-
191
-
192
-
193
-
194
-
195
-
196
-
197
-
198
-
199
-
200
-
201
-
202
-
203
-
204
-
205
-
206
-
207
-
208
-
209
-
210
-
211
-
212
-
213
-
214
-
215
-
216
-
217
-
218
-
219
-
220
-
221
-
222
-
 223
223 -
 224
224 -
 225
225 -
 226
226 -
 227
227 -
 228
228 -
 229
229 -
 230
230 -
 231
231 -
 232
232 -
 233
233 -
234
-
235
-
236
-
237
-
238
-
239
-
240
-
241
-
242
-
243
-
244
-
245
-
246
-
247
-
248
-
249
-
250
-
251
-
252
-
253
-
254
-
255
-
256
-
257
-
258
-
259
-
260
-
261
-
262
-
263
-
264
-
265
-
266
-
267
-
268
-
269
-
270
-
271
-
272
-
273
-
274
-
275
-
276
-
277
-
278
-
279
-
280
-
281
-
282
-
283
-
284
-
285
-
286
-
287
-
288
-
289
-
290
-
291
-
292
-
293
-
294
-
295
-
296
-
297
-
298
-
299
-
300
-
301
-
302
-
303
-
304
-
305
-
306
-
307
-
308
-
309
-
310
-
311
-
312
-
313
-
314
-
315
-
316
-
317
-
318
-
319
-
320
-
321
-
322
-
323
-
324
-
325
-
326
-
327
-
328
-
329
-
330
-
331
-
332
-
333
 |
 |