Dell 968w All In One Wireless Photo Printer User's Guide - Page 50
Fax Mode
 |
View all Dell 968w All In One Wireless Photo Printer manuals
Add to My Manuals
Save this manual to your list of manuals |
Page 50 highlights
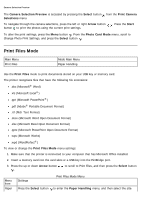
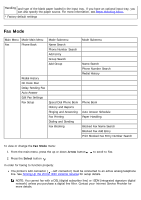
Handling and type of the blank paper loaded in the input tray. If you have an optional input tray, you can also specify the paper source. For more information, see Paper Handling Menu. * Factory default settings Fax Mode Main Menu Mode Main Menu Fax Phone Book Mode Submenu Name Search Phone Number Search Add Entry Group Search Add Group Redial History On Hook Dial Delay Sending Fax Auto Answer Edit Fax Settings Fax Setup Speed Dial Phone Book History and Reports Ringing and Answering Fax Printing Dialing and Sending Fax Blocking Mode Submenu Name Search Phone Number Search Redial History Phone Book Auto Answer Schedule Paper Handling Blocked Fax Name Search Blocked Fax Add Entry Print Blocked Fax Entry Number Search To view or change the Fax Mode menu: 1. From the main menu, press the up or down Arrow button to scroll to Fax. 2. Press the Select button . In order for faxing to function properly: The printer's FAX connector ( -left connector) must be connected to an active analog telephone line. See Setting Up the Printer With External Devices for setup details. NOTE: You cannot fax with a DSL (digital subscriber line) or ISDN (integrated signature digital network) unless you purchase a digital line filter. Contact your Internet Service Provider for more details.
-
 1
1 -
2
-
3
-
4
-
5
-
6
-
7
-
8
-
9
-
10
-
11
-
12
-
13
-
14
-
15
-
16
-
17
-
18
-
19
-
20
-
21
-
22
-
23
-
24
-
25
-
26
-
27
-
28
-
29
-
30
-
31
-
32
-
33
-
34
-
35
-
36
-
37
-
38
-
39
-
40
-
41
-
42
-
43
-
44
-
 45
45 -
 46
46 -
 47
47 -
 48
48 -
 49
49 -
 50
50 -
 51
51 -
 52
52 -
 53
53 -
 54
54 -
 55
55 -
56
-
57
-
58
-
59
-
60
-
61
-
62
-
63
-
64
-
65
-
66
-
67
-
68
-
69
-
70
-
71
-
72
-
73
-
74
-
75
-
76
-
77
-
78
-
79
-
80
-
81
-
82
-
83
-
84
-
85
-
86
-
87
-
88
-
89
-
90
-
91
-
92
-
93
-
94
-
95
-
96
-
97
-
98
-
99
-
100
-
101
-
102
-
103
-
104
-
105
-
106
-
107
-
108
-
109
-
110
-
111
-
112
-
113
-
114
-
115
-
116
-
117
-
118
-
119
-
120
-
121
-
122
-
123
-
124
-
125
-
126
-
127
-
128
-
129
-
130
-
131
-
132
-
133
-
134
-
135
-
136
-
137
-
138
-
139
-
140
-
141
-
142
-
143
-
144
-
145
-
146
-
147
-
148
-
149
-
150
-
151
-
152
-
153
-
154
-
155
-
156
-
157
-
158
-
159
-
160
-
161
-
162
-
163
-
164
-
165
-
166
-
167
-
168
-
169
-
170
-
171
-
172
-
173
-
174
-
175
-
176
-
177
-
178
-
179
-
180
-
181
 |
 |
