Dell 968w All In One Wireless Photo Printer User's Guide - Page 68
Printer Default Settings, Setup, Select, Arrow, Paper Handling
 |
View all Dell 968w All In One Wireless Photo Printer manuals
Add to My Manuals
Save this manual to your list of manuals |
Page 68 highlights
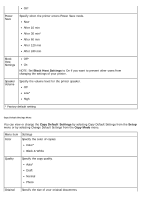
Tray1* Tray2 Print Files Specify the paper source for printing files. Source Tray1* Tray2 Fax Source Specify the paper source for printing faxes. Tray1* Tray2 Auto NOTE: Select Auto if you want the printer to pick from the tray containing the paper that matches the size of the incoming fax. You also need to specify the correct paper size for both trays. PictBridge Specify the paper source for printing photos from a PictBridge-enabled camera. Source Tray1* Tray2 Bluetooth Specify the paper source for printing files from a Bluetooth-enabled device. Source Tray1* Tray2 * Factory default setting Printer Default Settings Menu You can view or change the Printer Default Settings by selecting Change Printer Default Settings from the Setup menu. Menu item Settings Set Date Press the Select button , and then use the keypad to enter the current date and time. and Time Press the left or right Arrow button to move to the next entry field. Paper Press the Select button to enter the Paper Handling menu. For more information, see Handling Paper Handling Menu. Language Press the left or right Arrow button to scroll through the language options. Country Press the left or right Arrow button to scroll through the country options. Key Press Specify whether or not a tone sounds when you press the operator panel buttons. Tone Off
-
 1
1 -
2
-
3
-
4
-
5
-
6
-
7
-
8
-
9
-
10
-
11
-
12
-
13
-
14
-
15
-
16
-
17
-
18
-
19
-
20
-
21
-
22
-
23
-
24
-
25
-
26
-
27
-
28
-
29
-
30
-
31
-
32
-
33
-
34
-
35
-
36
-
37
-
38
-
39
-
40
-
41
-
42
-
43
-
44
-
45
-
46
-
47
-
48
-
49
-
50
-
51
-
52
-
53
-
54
-
55
-
56
-
57
-
58
-
59
-
60
-
61
-
62
-
 63
63 -
 64
64 -
 65
65 -
 66
66 -
 67
67 -
 68
68 -
 69
69 -
 70
70 -
 71
71 -
 72
72 -
 73
73 -
74
-
75
-
76
-
77
-
78
-
79
-
80
-
81
-
82
-
83
-
84
-
85
-
86
-
87
-
88
-
89
-
90
-
91
-
92
-
93
-
94
-
95
-
96
-
97
-
98
-
99
-
100
-
101
-
102
-
103
-
104
-
105
-
106
-
107
-
108
-
109
-
110
-
111
-
112
-
113
-
114
-
115
-
116
-
117
-
118
-
119
-
120
-
121
-
122
-
123
-
124
-
125
-
126
-
127
-
128
-
129
-
130
-
131
-
132
-
133
-
134
-
135
-
136
-
137
-
138
-
139
-
140
-
141
-
142
-
143
-
144
-
145
-
146
-
147
-
148
-
149
-
150
-
151
-
152
-
153
-
154
-
155
-
156
-
157
-
158
-
159
-
160
-
161
-
162
-
163
-
164
-
165
-
166
-
167
-
168
-
169
-
170
-
171
-
172
-
173
-
174
-
175
-
176
-
177
-
178
-
179
-
180
-
181
 |
 |
