Dell 968w All In One Wireless Photo Printer User's Guide - Page 95
Print, Preferences, Properties, Options, Setup, Printing Preferences, Print Setup, Automatic, Paper
 |
View all Dell 968w All In One Wireless Photo Printer manuals
Add to My Manuals
Save this manual to your list of manuals |
Page 95 highlights
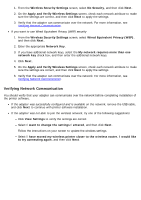
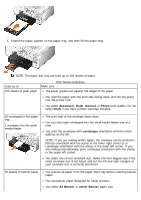
(optional tray), the printer selects print media from Tray 1 until it becomes empty, and then the printer automatically feeds print paper from Tray 2. In addition, you can load a different size of paper for each tray so that the printer picks the paper that matches the size of the fax you received. For example, if letter size is loaded in Tray 1 and legal size is loaded in Tray 2, if you receive a legal size fax, the printer picks from Tray 2. NOTE: You can only load letter size, legal size, or A4 paper in the optional paper tray. You can enable Tray Linking after you have installed the optional paper tray. You can also turn this option on and off, as needed. Enabling Tray Linking for Print Jobs Using the Computer 1. Turn on your computer and printer, and make sure they are connected. 2. Load paper of the same type and size in both paper trays. 3. With your document open, click File® Print. The Print dialog box opens. 4. Click Preferences, Properties, Options, or Setup (depending on the program or operating system). The Printing Preferences dialog box opens. 5. On the Print Setup tab, select Automatic from the Paper Source drop-down list. 6. On the Print Setup and Advanced tabs, make any necessary changes for your document. 7. When you finish customizing your settings, click OK. The Printing Preferences dialog box closes. 8. Click OK or Print. Enabling Tray Linking for Print Jobs Using the Operator Panel 1. From the main menu, use the up or down Arrow button the Select button . to scroll to Setup, and then press 2. From Paper Handling, press the Select button . 3. Press the up or down Arrow button Arrow button to scroll to Auto. 4. Press the Back button . to scroll to Tray Linking, and then press the left or right Enabling Tray Linking For Copying Jobs 1. Load paper of the same type and size in both paper trays. 2. From the Main menu, press the up or down Arrow button press the Select button . 3. From the Setup menu, press the up or down Arrow button to scroll to Setup, and then to scroll to Change Copy Default
-
 1
1 -
2
-
3
-
4
-
5
-
6
-
7
-
8
-
9
-
10
-
11
-
12
-
13
-
14
-
15
-
16
-
17
-
18
-
19
-
20
-
21
-
22
-
23
-
24
-
25
-
26
-
27
-
28
-
29
-
30
-
31
-
32
-
33
-
34
-
35
-
36
-
37
-
38
-
39
-
40
-
41
-
42
-
43
-
44
-
45
-
46
-
47
-
48
-
49
-
50
-
51
-
52
-
53
-
54
-
55
-
56
-
57
-
58
-
59
-
60
-
61
-
62
-
63
-
64
-
65
-
66
-
67
-
68
-
69
-
70
-
71
-
72
-
73
-
74
-
75
-
76
-
77
-
78
-
79
-
80
-
81
-
82
-
83
-
84
-
85
-
86
-
87
-
88
-
89
-
 90
90 -
 91
91 -
 92
92 -
 93
93 -
 94
94 -
 95
95 -
 96
96 -
 97
97 -
 98
98 -
 99
99 -
 100
100 -
101
-
102
-
103
-
104
-
105
-
106
-
107
-
108
-
109
-
110
-
111
-
112
-
113
-
114
-
115
-
116
-
117
-
118
-
119
-
120
-
121
-
122
-
123
-
124
-
125
-
126
-
127
-
128
-
129
-
130
-
131
-
132
-
133
-
134
-
135
-
136
-
137
-
138
-
139
-
140
-
141
-
142
-
143
-
144
-
145
-
146
-
147
-
148
-
149
-
150
-
151
-
152
-
153
-
154
-
155
-
156
-
157
-
158
-
159
-
160
-
161
-
162
-
163
-
164
-
165
-
166
-
167
-
168
-
169
-
170
-
171
-
172
-
173
-
174
-
175
-
176
-
177
-
178
-
179
-
180
-
181
 |
 |
