Dell 968w All In One Wireless Photo Printer User's Guide - Page 93
Automatic, Normal, Photo, Draft
 |
View all Dell 968w All In One Wireless Photo Printer manuals
Add to My Manuals
Save this manual to your list of manuals |
Page 93 highlights
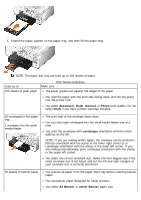
25 greeting cards, index cards, postcards, or photo cards in the paper tray NOTE: For more information on how to load banner paper, see Loading Banner Paper. The print side of the cards faces down. You can also insert cards into the small media feeder one at a time. 1 greeting card, index card, postcard, or photo card into the small media feeder You select Automatic, Normal or Photo print quality. 30 sheets of Hagaki or Hagaki photo cards in the paper tray 50 sheets of glossy/photo or heavyweight matte paper 10 mm stack of iron-on transfers 50 sheets of transparencies 25 sheets of labels 150 sheets of letterhead paper 150 sheets of custom size paper The print side of the paper faces down. The paper guides rest against the edges of the paper. You select Automatic, Normal or Photo print quality. You follow the loading instructions on the iron-on transfer packaging. The print side of the transfer faces down. The paper guides rest against the edges of the transfer. You select Automatic, Normal or Photo print quality. The rough side of the transparencies faces down. The paper guides rest against the edges of the transparencies. You select Automatic, Draft, Normal or Photo print quality. The print side of the labels faces down. The top of the labels feeds into the printer first. The paper guides rest against the edges of the paper. The print side of the letterhead faces down. The top of the letterhead feeds into the printer first. The paper guides rest against the edges of the paper. The paper fits within these dimensions: Width: 3.0 - 8.5 inches (76 - 216 mm)
-
 1
1 -
2
-
3
-
4
-
5
-
6
-
7
-
8
-
9
-
10
-
11
-
12
-
13
-
14
-
15
-
16
-
17
-
18
-
19
-
20
-
21
-
22
-
23
-
24
-
25
-
26
-
27
-
28
-
29
-
30
-
31
-
32
-
33
-
34
-
35
-
36
-
37
-
38
-
39
-
40
-
41
-
42
-
43
-
44
-
45
-
46
-
47
-
48
-
49
-
50
-
51
-
52
-
53
-
54
-
55
-
56
-
57
-
58
-
59
-
60
-
61
-
62
-
63
-
64
-
65
-
66
-
67
-
68
-
69
-
70
-
71
-
72
-
73
-
74
-
75
-
76
-
77
-
78
-
79
-
80
-
81
-
82
-
83
-
84
-
85
-
86
-
87
-
 88
88 -
 89
89 -
 90
90 -
 91
91 -
 92
92 -
 93
93 -
 94
94 -
 95
95 -
 96
96 -
 97
97 -
 98
98 -
99
-
100
-
101
-
102
-
103
-
104
-
105
-
106
-
107
-
108
-
109
-
110
-
111
-
112
-
113
-
114
-
115
-
116
-
117
-
118
-
119
-
120
-
121
-
122
-
123
-
124
-
125
-
126
-
127
-
128
-
129
-
130
-
131
-
132
-
133
-
134
-
135
-
136
-
137
-
138
-
139
-
140
-
141
-
142
-
143
-
144
-
145
-
146
-
147
-
148
-
149
-
150
-
151
-
152
-
153
-
154
-
155
-
156
-
157
-
158
-
159
-
160
-
161
-
162
-
163
-
164
-
165
-
166
-
167
-
168
-
169
-
170
-
171
-
172
-
173
-
174
-
175
-
176
-
177
-
178
-
179
-
180
-
181
 |
 |
