Fujitsu T4215 T4215 User's Guide - Page 62
Microphone Jack, Headphone Jack, External Video Port, External Dvi Port
 |
View all Fujitsu T4215 manuals
Add to My Manuals
Save this manual to your list of manuals |
Page 62 highlights
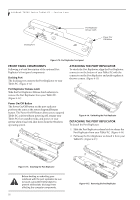
LifeBook T4200 Series Tablet PC - Section Four MICROPHONE JACK The microphone jack allows you to connect an external mono microphone. Your microphone must be equipped with a 1/8"(3.5 mm) mono mini-plug in order to fit into the microphone jack of your Tablet PC. In order to connect a microphone follow these easy steps: (See Figure 2-4 on page 10 for location) 1. Align the connector with the port opening. 2. Push the connector into the port until it is seated. HEADPHONE JACK The headphone jack allows you to connect headphones or powered external speakers to your Tablet PC. Your headphones or speakers must be equipped with a 1/8" (3.5 mm) stereo mini-plug. In order to connect headphones or speakers follow these easy steps: (See Figure 24 on page 10 for location) 1. Align the connector with the port opening. 2. Push the connector into the port until it is seated. If you plug headphones into the headphone jack, the built-in stereo speakers will be disabled. EXTERNAL VIDEO PORT The external video port allows you to connect an external monitor or LCD projector. In order to connect an external monitor follow these easy steps: (See Figure 2-7 on page 14 for location). There is also an external VGA monitor on the port replicator (See Figure 4-11 on page 51 for location). 1. Remove the cover from the port opening, if present. 2. Align the connector with the port opening. 3. Push the connector into the port until it is seated. 4. Tighten the two hold-down screws, located on each side of the connector. When an external monitor is plugged in, pressing the [Fn] + [F10] keys allows you to change your selection of where to send your display video. Each time you press the key combination, you will step to the next choice, starting with the built-in display panel only, moving to the external monitor only, finally moving to both the built-in display panel and an external monitor. EXTERNAL DVI PORT The external Digital Video Interface (DVI) port on the optional port replicator allows you to connect an external digital monitor or projector. In order to connect a DVI monitor follow these easy steps: (See Figure 4-11 on page 51 for location). 1. Align the connector with the port opening. 2. Push the connector into the port until it is seated. 3. Tighten the two hold-down screws, located on each side of the connector. 54
-
 1
1 -
2
-
3
-
4
-
5
-
6
-
7
-
8
-
9
-
10
-
11
-
12
-
13
-
14
-
15
-
16
-
17
-
18
-
19
-
20
-
21
-
22
-
23
-
24
-
25
-
26
-
27
-
28
-
29
-
30
-
31
-
32
-
33
-
34
-
35
-
36
-
37
-
38
-
39
-
40
-
41
-
42
-
43
-
44
-
45
-
46
-
47
-
48
-
49
-
50
-
51
-
52
-
53
-
54
-
55
-
56
-
 57
57 -
 58
58 -
 59
59 -
 60
60 -
 61
61 -
 62
62 -
 63
63 -
 64
64 -
 65
65 -
 66
66 -
 67
67 -
68
-
69
-
70
-
71
-
72
-
73
-
74
-
75
-
76
-
77
-
78
-
79
-
80
-
81
-
82
-
83
-
84
-
85
-
86
-
87
-
88
-
89
-
90
-
91
-
92
-
93
-
94
-
95
-
96
-
97
-
98
-
99
-
100
-
101
-
102
-
103
-
104
-
105
-
106
-
107
-
108
-
109
-
110
-
111
-
112
-
113
-
114
-
115
-
116
-
117
-
118
-
119
-
120
-
121
-
122
-
123
-
124
-
125
-
126
-
127
-
128
-
129
-
130
-
131
-
132
-
133
-
134
-
135
-
136
 |
 |