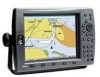
Garmin GPSMAP 3210 Owner's Manual - Page 103
To adjust the VRM/EBL, To move the center location of the VRM, MARPA, To designate a MARPA target
 |
UPC - 753759053062
View all Garmin GPSMAP 3210 manuals
Add to My Manuals
Save this manual to your list of manuals |
Page 103 highlights
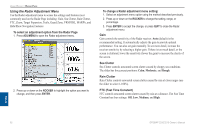
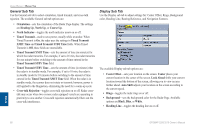
To adjust the VRM/EBL: 1. Highlight Adjust and press ENTER. 2. Press right or left on the ROCKER to rotate the EBL around the center point of the VRM. 3. Press up or down on the ROCKER to increase or decrease the size of the VMR. 4. Press ENTER to accept the changes. To move the center location of the VRM: 1. Highlight Move, and press ENTER. 2. Using the ROCKER, move the center point of the VRM to the selected location. 3. Press ENTER to set the new location. To use the VRM/EBL, expand the diameter of the VRM so that the outer edge touches the target. Rotate the EBL until it intersects the VRM at the target location. The measured range and bearing are displayed in the lower-left corner of the screen. MARPA The Mini Automatic Radar Plotting Aid (MARPA) function helps with collision avoidance. MARPA can track up to 10 designated targets. Detailed information including bearing, range, course, speed, closest point of approach (CPA), and time to closest point of approach (TCPA) for each target is shown in the MARPA list. Note: MARPA requires the use of a heading sensor. The heading sensor must output the NMEA sentence HDM or HDG at format 0183, v2.30 or higher. The Gamin Marine Network has been tested using the KVH® 1000 heading sensor using six second dampening. Using Radar > Radar Page MARPA relies on a Heading Sensor to provide accurate own vessel heading information. Accurate heading data enhances MARPA's performance. Each target being tracked by MARPA is represented by a symbol. The symbols indicate the current state of the target. Acquiring target Target is safe Target is dangerous Lost target For each target, a number and Vector Line is shown with the symbol. The number is the MARPA list ID number. The Vector Line is a visual reference of the target's course and speed. To designate a MARPA target: 1. Use the ROCKER to move the pointer to the target location. 2. Press the Acquire Target soft key. While a target is being designated, a red box appears around the target. When MARPA begins tracking the target, the box is replaced with the appropriate symbol. Radar GPSMAP 3206/3210 Owner's Manual 95
-
 1
1 -
2
-
3
-
4
-
5
-
6
-
7
-
8
-
9
-
10
-
11
-
12
-
13
-
14
-
15
-
16
-
17
-
18
-
19
-
20
-
21
-
22
-
23
-
24
-
25
-
26
-
27
-
28
-
29
-
30
-
31
-
32
-
33
-
34
-
35
-
36
-
37
-
38
-
39
-
40
-
41
-
42
-
43
-
44
-
45
-
46
-
47
-
48
-
49
-
50
-
51
-
52
-
53
-
54
-
55
-
56
-
57
-
58
-
59
-
60
-
61
-
62
-
63
-
64
-
65
-
66
-
67
-
68
-
69
-
70
-
71
-
72
-
73
-
74
-
75
-
76
-
77
-
78
-
79
-
80
-
81
-
82
-
83
-
84
-
85
-
86
-
87
-
88
-
89
-
90
-
91
-
92
-
93
-
94
-
95
-
96
-
97
-
 98
98 -
 99
99 -
 100
100 -
 101
101 -
 102
102 -
 103
103 -
 104
104 -
 105
105 -
 106
106 -
 107
107 -
 108
108 -
109
-
110
-
111
-
112
-
113
-
114
-
115
-
116
-
117
-
118
-
119
-
120
-
121
-
122
-
123
-
124
-
125
-
126
-
127
-
128
-
129
-
130
 |
 |
