Garmin GPSMAP 3210 Owner's Manual - Page 90
Using the Pointer on the Sonar Marking an Underwater Waypoint, Sonar Tab
 |
UPC - 753759053062
View all Garmin GPSMAP 3210 manuals
Add to My Manuals
Save this manual to your list of manuals |
Page 90 highlights
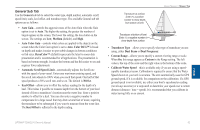
Using Sonar > Sonar Tab Using the Pointer on the Sonar Page You can display the pointer (arrow) to reference sonar items and mark underwater waypoints. This makes it easier to find and use an object such as a stump as a future fishing location. When using this feature, the Sonar Page pauses. The depth continues to update while the display is paused, but the unit does not show any new sonar data until the Sonar Page resumes scrolling. Discontinuity is possible from where the sonar information stops and where it starts again. Marking an Underwater Waypoint You can mark waypoints that are under the surface of the water. To mark an underwater waypoint: 1. On the Sonar Page, use the ROCKER to move the pointer to the location you want. 2. Press and release ENTER/MARK. The Review Waypoint Page appears with the waypoint's coordinates, default name, and pointer depth automatically filled in. 3. To change the name, symbol, or depth, highlight the appropriate field, and press ENTER. Make any changes, and press ENTER when finished. 4. Highlight OK, and press ENTER to return to the Sonar Page. 5. Press QUIT to resume scrolling. Sonar Tab When a GSD 20, GSD 21 or GSD 22 is connected to the GPSMAP 3206/3210, and either the Auto-Detect Services or Sonar check box is selected on the System tab, the Sonar tab appears on the Main Menu. Use the Sonar tab to set up the Sonar Page. The Sonar tab has three sub tabs: General, Graph, and Water Temp. To access and change a setting on the Sonar tab: 1. Press the Sonar Setup soft key to open the Main Menu. The Sonar tab is automatically selected. 2. Highlight the setting you want to change, and press ENTER. 3. Press QUIT to return to the Sonar Page. Sonar 82 GPSMAP 3206/3210 Owner's Manual
-
 1
1 -
2
-
3
-
4
-
5
-
6
-
7
-
8
-
9
-
10
-
11
-
12
-
13
-
14
-
15
-
16
-
17
-
18
-
19
-
20
-
21
-
22
-
23
-
24
-
25
-
26
-
27
-
28
-
29
-
30
-
31
-
32
-
33
-
34
-
35
-
36
-
37
-
38
-
39
-
40
-
41
-
42
-
43
-
44
-
45
-
46
-
47
-
48
-
49
-
50
-
51
-
52
-
53
-
54
-
55
-
56
-
57
-
58
-
59
-
60
-
61
-
62
-
63
-
64
-
65
-
66
-
67
-
68
-
69
-
70
-
71
-
72
-
73
-
74
-
75
-
76
-
77
-
78
-
79
-
80
-
81
-
82
-
83
-
84
-
 85
85 -
 86
86 -
 87
87 -
 88
88 -
 89
89 -
 90
90 -
 91
91 -
 92
92 -
 93
93 -
 94
94 -
 95
95 -
96
-
97
-
98
-
99
-
100
-
101
-
102
-
103
-
104
-
105
-
106
-
107
-
108
-
109
-
110
-
111
-
112
-
113
-
114
-
115
-
116
-
117
-
118
-
119
-
120
-
121
-
122
-
123
-
124
-
125
-
126
-
127
-
128
-
129
-
130
 |
 |
