Garmin GPSMAP 3210 Owner's Manual - Page 23
Creating Waypoints Manually, To create a new waypoint from a map feature
 |
UPC - 753759053062
View all Garmin GPSMAP 3210 manuals
Add to My Manuals
Save this manual to your list of manuals |
Page 23 highlights
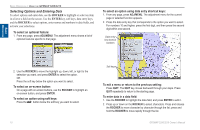
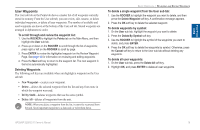
Basic Operation To create a new waypoint from a map feature: 1. Use the ROCKER to move the map pointer and highlight the map feature you want. 2. Press ENTER/MARK to capture the pointer location. The Review Page for the selected map feature appears. 3. Press the Create Wpt soft key to open the Review Waypoint Page. 4. To accept the waypoint with the default information, press ENTER. OR To change any waypoint information, highlight the appropriate field and press ENTER. After entering your changes, press the OK soft key. Basic Operation > Creating and Using Waypoints Creating Waypoints Manually You can manually enter position coordinates to create a waypoint using the Points tab on the Main Menu. This method is useful for creating a waypoint at a specific latitude/longitude position from a chart or other source. Caution: When entering a waypoint manually, be sure that the MFD is set to the same position format and map datum as the paper chart or coordinates' source. Entering coordinates into the GPSMAP 3206/3210 while it is set to a datum different from the datum in which the coordinates were created can result in an incorrect waypoint location. You can enter location coordinates manually. Waypoint Created from a Map Feature GPSMAP 3206/3210 Owner's Manual Review Waypoint Page To create a new waypoint by entering position coordinates: 1. Press and hold ADJ/MENU to open the Main Menu. 2. Highlight the Points tab. You can also mark your present location using the steps on page 14, and then proceed to step 4. 15
-
 1
1 -
2
-
3
-
4
-
5
-
6
-
7
-
8
-
9
-
10
-
11
-
12
-
13
-
14
-
15
-
16
-
17
-
 18
18 -
 19
19 -
 20
20 -
 21
21 -
 22
22 -
 23
23 -
 24
24 -
 25
25 -
 26
26 -
 27
27 -
 28
28 -
29
-
30
-
31
-
32
-
33
-
34
-
35
-
36
-
37
-
38
-
39
-
40
-
41
-
42
-
43
-
44
-
45
-
46
-
47
-
48
-
49
-
50
-
51
-
52
-
53
-
54
-
55
-
56
-
57
-
58
-
59
-
60
-
61
-
62
-
63
-
64
-
65
-
66
-
67
-
68
-
69
-
70
-
71
-
72
-
73
-
74
-
75
-
76
-
77
-
78
-
79
-
80
-
81
-
82
-
83
-
84
-
85
-
86
-
87
-
88
-
89
-
90
-
91
-
92
-
93
-
94
-
95
-
96
-
97
-
98
-
99
-
100
-
101
-
102
-
103
-
104
-
105
-
106
-
107
-
108
-
109
-
110
-
111
-
112
-
113
-
114
-
115
-
116
-
117
-
118
-
119
-
120
-
121
-
122
-
123
-
124
-
125
-
126
-
127
-
128
-
129
-
130
 |
 |
