HP 1600 HP Color LaserJet 1600 - User Guide - Page 51
To print from Windows, Gaining access to printer driver settings
 |
UPC - 882780316614
View all HP 1600 manuals
Add to My Manuals
Save this manual to your list of manuals |
Page 51 highlights
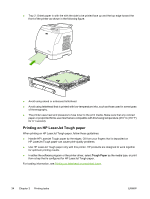
To print from Windows 1. Make sure that print media is loaded in the printer. 2. On the File menu, click Page Setup or a similar command. Make sure that the settings are correct for this document. 3. From the File menu, click Print, Print Setup, or a similar command. The Print dialog box opens. 4. Select this printer and change settings as necessary. Do not change any settings, such as page size or orientation, that you set in the Page Setup dialog box. 5. If this print job is for a standard size and weight of paper, you probably do not need to change the Source is (tray), Type is, or Size is settings, and you can go to step 7. Otherwise, go to step 6. 6. If this print job is to be printed on a non-standard size or weight of paper, select how the printer pulls paper. ● To print by Source (tray), select the tray in the Print dialog box, if possible. ● To print by Source (tray) when this setting is not available in the Print dialog box, click Properties, and on the Paper tab, select the tray in the Source is field. ● To print by Type or Size, click Properties and, on the Paper tab, select the type or size in the Type is or Size is field. (For some paper, such as letterhead, you will set both the Type and Size.) Always print by Type for special print media such as labels or transparencies. 7. If you have not yet done so, click Properties. The printer driver opens. 8. On the various tabs, set any settings that you want that did not appear in the Page Setup or Print dialog box. For more information about printer-driver settings, see Features in the printer driver. 9. Select the Print command to print the job. Gaining access to printer driver settings This section lists the common printing features that are controlled through the printer driver. (The printer driver is the software component you use to send print jobs to the printer.) You can change settings temporarily for the print jobs that you print while the program is still open. You can also make permanent changes to the default settings, and those new settings will be in effect now and in the future. Operating System Temporarily change settings for Permanently change default jobs that are printed now settings1 Change configuration settings (For example, to add an optional tray or to enable or disable a driver feature such as "Allow manual duplexing") Windows 98 Second Edition and Me On the File menu, click Print, select this printer, and then click Properties. (The actual steps can vary; this is the most common method.) Click Start, point to Settings, and then click Printers. Right-click the printer icon, and then click Properties. Click Start, point to Settings, and then click Printers. Right-click the printer icon, and then click Properties. Click the Configure tab. Windows 2000 and XP (Classic Start Menu) On the File menu, click Print, select this printer, and then click Properties or Preferences. (The actual steps can vary; this is the most common method.) Click Start, point to Settings, and then click Printers or Printers and Faxes. Right-click the printer icon, and then click Printing Preferences. Click Start, point to Settings, and then click Printers or Printers and Faxes. Right-click the printer icon, and then click Properties. Click the Configure tab. ENWW Controlling print jobs 39
-
 1
1 -
2
-
3
-
4
-
5
-
6
-
7
-
8
-
9
-
10
-
11
-
12
-
13
-
14
-
15
-
16
-
17
-
18
-
19
-
20
-
21
-
22
-
23
-
24
-
25
-
26
-
27
-
28
-
29
-
30
-
31
-
32
-
33
-
34
-
35
-
36
-
37
-
38
-
39
-
40
-
41
-
42
-
43
-
44
-
45
-
 46
46 -
 47
47 -
 48
48 -
 49
49 -
 50
50 -
 51
51 -
 52
52 -
 53
53 -
 54
54 -
 55
55 -
 56
56 -
57
-
58
-
59
-
60
-
61
-
62
-
63
-
64
-
65
-
66
-
67
-
68
-
69
-
70
-
71
-
72
-
73
-
74
-
75
-
76
-
77
-
78
-
79
-
80
-
81
-
82
-
83
-
84
-
85
-
86
-
87
-
88
-
89
-
90
-
91
-
92
-
93
-
94
-
95
-
96
-
97
-
98
-
99
-
100
-
101
-
102
-
103
-
104
-
105
-
106
-
107
-
108
-
109
-
110
-
111
-
112
-
113
-
114
-
115
-
116
-
117
-
118
-
119
-
120
-
121
-
122
-
123
-
124
-
125
-
126
-
127
-
128
-
129
-
130
-
131
-
132
-
133
-
134
-
135
-
136
-
137
-
138
-
139
-
140
-
141
-
142
 |
 |