HP 6125G HP 6125G & 6125G/XG Blade Switches Layer 3 - IP Routing Confi - Page 111
Display OSPF routing information on Switch C., Con OSPF basic functions. See
 |
View all HP 6125G manuals
Add to My Manuals
Save this manual to your list of manuals |
Page 111 highlights
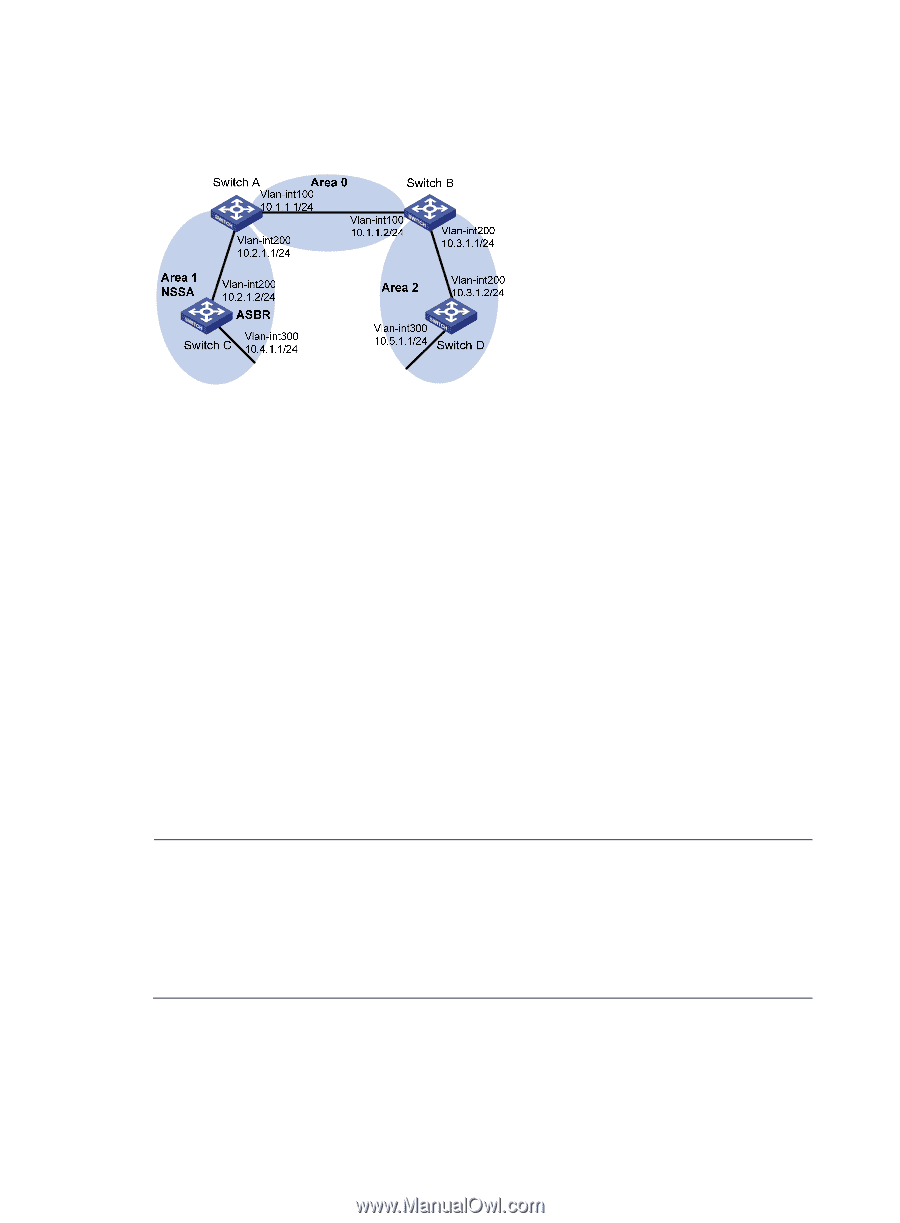
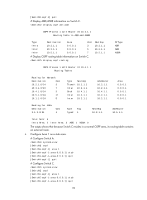
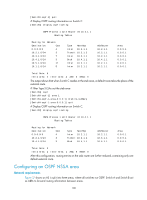
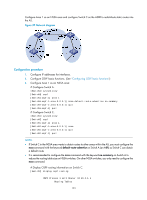
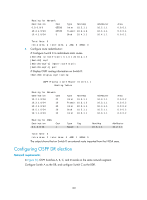
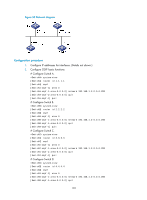
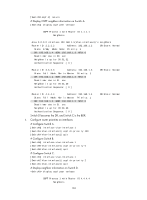
Configure Area 1 as an NSSA area and configure Switch C as the ASBR to redistribute static routes into the AS. Figure 37 Network diagram Configuration procedure 1. Configure IP addresses for interfaces. 2. Configure OSPF basic functions. (See "Configuring OSPF basic functions") 3. Configure Area 1 as an NSSA area: # Configure Switch A. system-view [SwitchA] ospf [SwitchA-ospf-1] area 1 [SwitchA-ospf-1-area-0.0.0.1] nssa default-route-advertise no-summary [SwitchA-ospf-1-area-0.0.0.1] quit [SwitchA-ospf-1] quit # Configure Switch C. system-view [SwitchC] ospf [SwitchC-ospf-1] area 1 [SwitchC-ospf-1-area-0.0.0.1] nssa [SwitchC-ospf-1-area-0.0.0.1] quit [SwitchC-ospf-1] quit NOTE: • If Switch C in the NSSA area wants to obtain routes to other areas within the AS, you must configure the nssa command with the keyword default-route-advertise on Switch A (an ABR) so Switch C can obtain a default route. • It is recommended to configure the nssa command with the keyword no-summary on Switch A to reduce the routing table size on NSSA switches. On other NSSA switches, you only need to configure the nssa command. # Display OSPF routing information on Switch C. [SwitchC] display ospf routing OSPF Process 1 with Router ID 10.4.1.1 Routing Tables 101
-
 1
1 -
2
-
3
-
4
-
5
-
6
-
7
-
8
-
9
-
10
-
11
-
12
-
13
-
14
-
15
-
16
-
17
-
18
-
19
-
20
-
21
-
22
-
23
-
24
-
25
-
26
-
27
-
28
-
29
-
30
-
31
-
32
-
33
-
34
-
35
-
36
-
37
-
38
-
39
-
40
-
41
-
42
-
43
-
44
-
45
-
46
-
47
-
48
-
49
-
50
-
51
-
52
-
53
-
54
-
55
-
56
-
57
-
58
-
59
-
60
-
61
-
62
-
63
-
64
-
65
-
66
-
67
-
68
-
69
-
70
-
71
-
72
-
73
-
74
-
75
-
76
-
77
-
78
-
79
-
80
-
81
-
82
-
83
-
84
-
85
-
86
-
87
-
88
-
89
-
90
-
91
-
92
-
93
-
94
-
95
-
96
-
97
-
98
-
99
-
100
-
101
-
102
-
103
-
104
-
105
-
 106
106 -
 107
107 -
 108
108 -
 109
109 -
 110
110 -
 111
111 -
 112
112 -
 113
113 -
 114
114 -
 115
115 -
 116
116 -
117
-
118
-
119
-
120
-
121
-
122
-
123
-
124
-
125
-
126
-
127
-
128
-
129
-
130
-
131
-
132
-
133
-
134
-
135
-
136
-
137
-
138
-
139
-
140
-
141
-
142
-
143
-
144
-
145
-
146
-
147
-
148
-
149
-
150
-
151
-
152
-
153
-
154
-
155
-
156
-
157
-
158
-
159
-
160
-
161
-
162
-
163
-
164
-
165
-
166
-
167
-
168
-
169
-
170
-
171
-
172
-
173
-
174
-
175
-
176
-
177
-
178
-
179
-
180
-
181
-
182
-
183
-
184
-
185
-
186
-
187
-
188
-
189
-
190
-
191
-
192
-
193
-
194
-
195
-
196
-
197
-
198
-
199
-
200
-
201
-
202
-
203
-
204
-
205
-
206
-
207
-
208
-
209
-
210
-
211
-
212
-
213
-
214
-
215
-
216
-
217
-
218
-
219
-
220
-
221
-
222
-
223
-
224
-
225
-
226
-
227
-
228
-
229
-
230
-
231
-
232
-
233
-
234
-
235
-
236
-
237
-
238
-
239
-
240
-
241
-
242
-
243
-
244
-
245
-
246
-
247
-
248
-
249
-
250
-
251
-
252
-
253
-
254
-
255
-
256
-
257
-
258
-
259
-
260
-
261
-
262
-
263
-
264
-
265
-
266
-
267
-
268
-
269
-
270
-
271
-
272
-
273
-
274
-
275
-
276
-
277
-
278
-
279
-
280
-
281
-
282
-
283
-
284
-
285
-
286
-
287
-
288
-
289
-
290
-
291
-
292
-
293
-
294
-
295
-
296
-
297
-
298
-
299
-
300
-
301
-
302
-
303
-
304
-
305
-
306
-
307
-
308
-
309
-
310
-
311
-
312
 |
 |