HP 6125G HP 6125G & 6125G/XG Blade Switches Layer 3 - IP Routing Confi - Page 253
Setting the DSCP value for IPv6 BGP packets, Configuring the maximum number of ECMP routes
 |
View all HP 6125G manuals
Add to My Manuals
Save this manual to your list of manuals |
Page 253 highlights
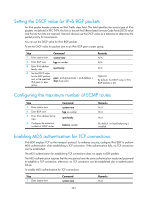
Setting the DSCP value for IPv6 BGP packets An IPv6 packet header contains an 8-bit Traffic class field. This field identifies the service type of IPv6 packets. As defined in RFC 2474, the first six bits set the Differentiated Services Code Point (DSCP) value and the last two bits are reserved. Network devices use the DSCP value as a reference to determine the packet priority for transmission. You can set the DSCP value for IPv6 BGP packets. To set the DSCP value for packets sent to an IPv6 BGP peer or peer group: Step 1. Enter system view. 2. Enter BGP view. 3. Enter IPv6 address family view. 4. Set the DSCP value for the BGP packets sent to the specified IPv6 peer or peer group. Command system-view bgp as-number ipv6-family peer { ipv6-group-name | ipv6-address } dscp dscp-value Remarks N/A N/A N/A Optional. By default, the DSCP value in IPv6 BGP packets is 48. Configuring the maximum number of ECMP routes Step 1. Enter system view. 2. Enter BGP view. 3. Enter IPv6 address family view. 4. Configure the maximum number of ECMP routes. Command system-view bgp as-number ipv6-family balance number Remarks N/A N/A N/A By default, no load balancing is enabled. Enabling MD5 authentication for TCP connections IPv6 BGP employs TCP as the transport protocol. To enhance security, configure IPv6 BGP to perform MD5 authentication when establishing a TCP connection. If the authentication fails, no TCP connection can be established. The MD5 authentication for establishing TCP connections does not apply to BGP packets. The MD5 authentication requires that the two parties have the same authentication mode and password to establish a TCP connection; otherwise, no TCP connection can be established due to authentication failure. To enable MD5 authentication for TCP connections: Step 1. Enter system view. Command system-view Remarks N/A 243
-
 1
1 -
2
-
3
-
4
-
5
-
6
-
7
-
8
-
9
-
10
-
11
-
12
-
13
-
14
-
15
-
16
-
17
-
18
-
19
-
20
-
21
-
22
-
23
-
24
-
25
-
26
-
27
-
28
-
29
-
30
-
31
-
32
-
33
-
34
-
35
-
36
-
37
-
38
-
39
-
40
-
41
-
42
-
43
-
44
-
45
-
46
-
47
-
48
-
49
-
50
-
51
-
52
-
53
-
54
-
55
-
56
-
57
-
58
-
59
-
60
-
61
-
62
-
63
-
64
-
65
-
66
-
67
-
68
-
69
-
70
-
71
-
72
-
73
-
74
-
75
-
76
-
77
-
78
-
79
-
80
-
81
-
82
-
83
-
84
-
85
-
86
-
87
-
88
-
89
-
90
-
91
-
92
-
93
-
94
-
95
-
96
-
97
-
98
-
99
-
100
-
101
-
102
-
103
-
104
-
105
-
106
-
107
-
108
-
109
-
110
-
111
-
112
-
113
-
114
-
115
-
116
-
117
-
118
-
119
-
120
-
121
-
122
-
123
-
124
-
125
-
126
-
127
-
128
-
129
-
130
-
131
-
132
-
133
-
134
-
135
-
136
-
137
-
138
-
139
-
140
-
141
-
142
-
143
-
144
-
145
-
146
-
147
-
148
-
149
-
150
-
151
-
152
-
153
-
154
-
155
-
156
-
157
-
158
-
159
-
160
-
161
-
162
-
163
-
164
-
165
-
166
-
167
-
168
-
169
-
170
-
171
-
172
-
173
-
174
-
175
-
176
-
177
-
178
-
179
-
180
-
181
-
182
-
183
-
184
-
185
-
186
-
187
-
188
-
189
-
190
-
191
-
192
-
193
-
194
-
195
-
196
-
197
-
198
-
199
-
200
-
201
-
202
-
203
-
204
-
205
-
206
-
207
-
208
-
209
-
210
-
211
-
212
-
213
-
214
-
215
-
216
-
217
-
218
-
219
-
220
-
221
-
222
-
223
-
224
-
225
-
226
-
227
-
228
-
229
-
230
-
231
-
232
-
233
-
234
-
235
-
236
-
237
-
238
-
239
-
240
-
241
-
242
-
243
-
244
-
245
-
246
-
247
-
 248
248 -
 249
249 -
 250
250 -
 251
251 -
 252
252 -
 253
253 -
 254
254 -
 255
255 -
 256
256 -
 257
257 -
 258
258 -
259
-
260
-
261
-
262
-
263
-
264
-
265
-
266
-
267
-
268
-
269
-
270
-
271
-
272
-
273
-
274
-
275
-
276
-
277
-
278
-
279
-
280
-
281
-
282
-
283
-
284
-
285
-
286
-
287
-
288
-
289
-
290
-
291
-
292
-
293
-
294
-
295
-
296
-
297
-
298
-
299
-
300
-
301
-
302
-
303
-
304
-
305
-
306
-
307
-
308
-
309
-
310
-
311
-
312
 |
 |