HP Scanjet Enterprise 7000n HP Scanjet 7000n Series - User Guide - Page 72
and then secure the pocket with the screw you removed in Step 2.
 |
View all HP Scanjet Enterprise 7000n manuals
Add to My Manuals
Save this manual to your list of manuals |
Page 72 highlights
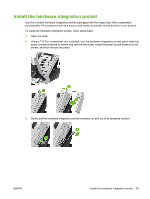
4. Using a credit card, gently pry up one edge of the hardware integration pocket insert, and then remove the insert. 5. Carefully thread the hardware integration pocket connector through the opening in the left side of the pocket. 6. Install the hardware integration pocket on the product as shown by rotating the pocket into place, and then secure the pocket with the screw you removed in Step 2. 64 Chapter 7 Manage and maintain the product ENWW
-
 1
1 -
2
-
3
-
4
-
5
-
6
-
7
-
8
-
9
-
10
-
11
-
12
-
13
-
14
-
15
-
16
-
17
-
18
-
19
-
20
-
21
-
22
-
23
-
24
-
25
-
26
-
27
-
28
-
29
-
30
-
31
-
32
-
33
-
34
-
35
-
36
-
37
-
38
-
39
-
40
-
41
-
42
-
43
-
44
-
45
-
46
-
47
-
48
-
49
-
50
-
51
-
52
-
53
-
54
-
55
-
56
-
57
-
58
-
59
-
60
-
61
-
62
-
63
-
64
-
65
-
66
-
 67
67 -
 68
68 -
 69
69 -
 70
70 -
 71
71 -
 72
72 -
 73
73 -
 74
74 -
 75
75 -
 76
76 -
 77
77 -
78
-
79
-
80
-
81
-
82
-
83
-
84
-
85
-
86
-
87
-
88
-
89
-
90
-
91
-
92
-
93
-
94
-
95
-
96
-
97
-
98
-
99
-
100
-
101
-
102
-
103
-
104
-
105
-
106
-
107
-
108
-
109
-
110
-
111
-
112
-
113
-
114
-
115
-
116
-
117
-
118
-
119
-
120
-
121
-
122
-
123
-
124
-
125
-
126
-
127
-
128
-
129
-
130
 |
 |
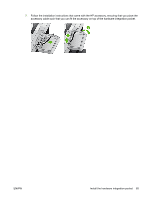
4.
Using a credit card, gently pry up one edge of the hardware integration pocket insert, and then
remove the insert.
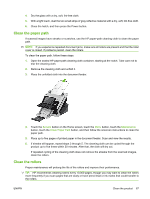
5.
Carefully thread the hardware integration pocket connector through the opening in the left side of
the pocket.
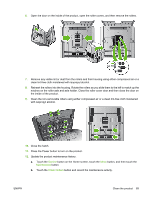
6.
Install the hardware integration pocket on the product as shown by rotating the pocket into place,
and then secure the pocket with the screw you removed in Step 2.
64
Chapter 7
Manage and maintain the product
ENWW