JVC KD-AV7010 Instructions - Page 10
Operation Methods - monitor
 |
UPC - 046838019401
View all JVC KD-AV7010 manuals
Add to My Manuals
Save this manual to your list of manuals |
Page 10 highlights
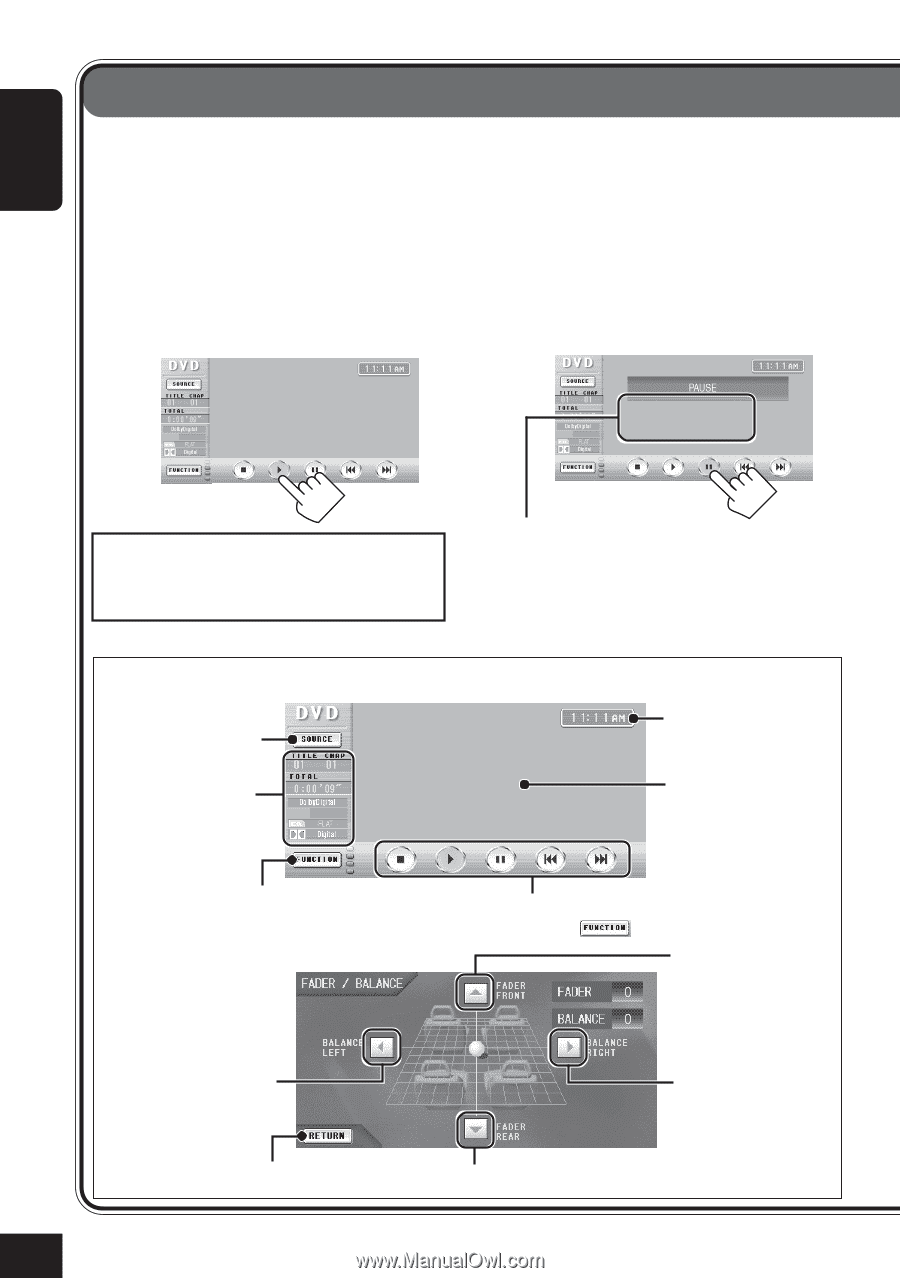
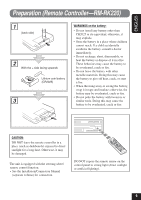
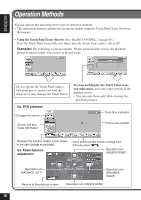
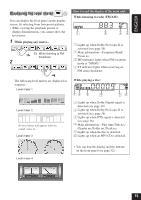
ENGLISH Operation Methods You can operate this unit using three types of operation methods. • This instruction manual explains the operations mainly using the Touch Panel Icons shown on the monitor. • Using the Touch Panel Icons directly (See "BLIND CONTROL" on page 46.) Press the Touch Panel Icons with your finger directly (if you wear a glove, take it off). Examples: The following is just an example. On the actual monitor screen, the playback picture is shown (while video source is played back). Do not operate the Touch Panel using a ball-point pen or similar tool with the sharp tip (it may damage the Touch Panel). Ex. DVD playback Changes the source. To erase and display the Touch Panel icons and indications, press the center portion of the monitor screen. • You can erase them only while viewing the playback pictures. Clock time indication Source and play mode information Picture view window Changes the function modes (icons shown to the right change accordingly). Ex. Fader/balance adjustment Icons shown on this column change each time you press . Operation icon (FADER FRONT) Operation icon (BALANCE LEFT) Returns to the previous screen. Operation icon (BALANCE RIGHT) Operation icon (FADER REAR) 10
-
 1
1 -
2
-
3
-
4
-
 5
5 -
 6
6 -
 7
7 -
 8
8 -
 9
9 -
 10
10 -
 11
11 -
 12
12 -
 13
13 -
 14
14 -
 15
15 -
16
-
17
-
18
-
19
-
20
-
21
-
22
-
23
-
24
-
25
-
26
-
27
-
28
-
29
-
30
-
31
-
32
-
33
-
34
-
35
-
36
-
37
-
38
-
39
-
40
-
41
-
42
-
43
-
44
-
45
-
46
-
47
-
48
-
49
-
50
-
51
-
52
-
53
-
54
-
55
-
56
-
57
-
58
-
59
-
60
-
61
-
62
-
63
-
64
-
65
-
66
-
67
-
68
-
69
-
70
-
71
-
72
-
73
-
74
-
75
-
76
-
77
-
78
-
79
-
80
-
81
-
82
-
83
-
84
-
85
-
86
-
87
-
88
-
89
-
90
-
91
-
92
-
93
-
94
-
95
-
96
-
97
-
98
-
99
-
100
-
101
-
102
-
103
-
104
-
105
-
106
-
107
-
108
-
109
-
110
-
111
-
112
-
113
-
114
-
115
-
116
-
117
-
118
-
119
-
120
-
121
-
122
-
123
-
124
-
125
-
126
-
127
-
128
-
129
-
130
-
131
-
132
-
133
-
134
-
135
-
136
-
137
-
138
-
139
-
140
-
141
-
142
-
143
-
144
-
145
-
146
-
147
-
148
-
149
-
150
-
151
-
152
-
153
-
154
-
155
-
156
-
157
-
158
-
159
-
160
-
161
-
162
-
163
-
164
-
165
-
166
-
167
-
168
-
169
-
170
-
171
-
172
-
173
-
174
-
175
-
176
-
177
-
178
-
179
-
180
-
181
-
182
-
183
-
184
-
185
-
186
-
187
-
188
-
189
-
190
-
191
-
192
-
193
-
194
-
195
-
196
-
197
-
198
-
199
-
200
-
201
-
202
-
203
-
204
-
205
-
206
-
207
-
208
-
209
-
210
-
211
-
212
-
213
-
214
-
215
-
216
-
217
-
218
-
219
-
220
-
221
-
222
-
223
-
224
-
225
-
226
-
227
-
228
-
229
-
230
-
231
-
232
-
233
-
234
-
235
-
236
-
237
-
238
-
239
-
240
-
241
-
242
-
243
-
244
-
245
-
246
-
247
-
248
-
249
-
250
-
251
-
252
-
253
-
254
-
255
 |
 |