JVC KD-AV7010 Instructions - Page 52
Av2 Input Select, Back Gear, Camera View, Fm If Filter, Tv Channel Area, Dimmer Mode - hideaway
 |
UPC - 046838019401
View all JVC KD-AV7010 manuals
Add to My Manuals
Save this manual to your list of manuals |
Page 52 highlights
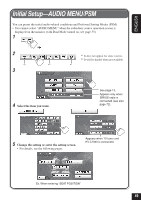
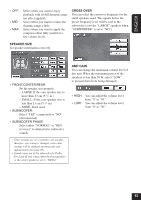
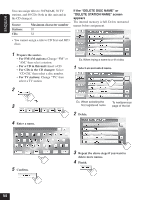
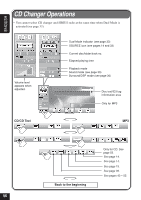
ENGLISH AV2 INPUT SELECT You can determine the use of AV INPUT 2 jacks on the hideaway unit-select either "VIDEO" or "CAMERA." • When the playback source is "AV2," this setting cannot be changed. FM IF FILTER In some areas, adjacent stations may interfere with each other. If this interference occurs, noise may be heard. • AUTO: When this type of interference occurs, this unit automatically increases the tuner selectivity so that interference noise will be reduced. (But the stereo effect will also be lost.) • WIDE: Subject to the interference from adjacent stations, but sound quality will not be degraded and the stereo effect will not be lost. • VIDEO: The source "AV2" works for viewing the playback picture through the component connected to the AV INPUT 2 jacks. • CAMERA: Select this when connecting the rear view camera. - You can set the remaining two items (BACK GEAR/ CAMERA VIEW). TV CHANNEL AREA This appears when TV tuner unit KV-C1000 is connected. • No setting is required. BACK GEAR • AUTO: The rear view through the rear view camera is automatically displayed on the monitor when you change the gear to the back position. • OFF: Cancels this function. To watch the rear view, select "AV2" for the source. DIMMER MODE CAMERA VIEW • NORMAL: You can watch the rear view as the camera takes. • MIRROR: You can watch the rear view as reflected on the mirror. While watching the camera view, you can change it to the source playback screen by touching the center portion of the monitor screen. (In this case, you cannot change the aspect ratio and make monitor adjustments-see pages 24 and 42.) • AUTO: Dims the display when you turn on the headlights. • ON: Activates dimmer. • OFF: Cancels this function. 52
-
 1
1 -
2
-
3
-
4
-
5
-
6
-
7
-
8
-
9
-
10
-
11
-
12
-
13
-
14
-
15
-
16
-
17
-
18
-
19
-
20
-
21
-
22
-
23
-
24
-
25
-
26
-
27
-
28
-
29
-
30
-
31
-
32
-
33
-
34
-
35
-
36
-
37
-
38
-
39
-
40
-
41
-
42
-
43
-
44
-
45
-
46
-
 47
47 -
 48
48 -
 49
49 -
 50
50 -
 51
51 -
 52
52 -
 53
53 -
 54
54 -
 55
55 -
 56
56 -
 57
57 -
58
-
59
-
60
-
61
-
62
-
63
-
64
-
65
-
66
-
67
-
68
-
69
-
70
-
71
-
72
-
73
-
74
-
75
-
76
-
77
-
78
-
79
-
80
-
81
-
82
-
83
-
84
-
85
-
86
-
87
-
88
-
89
-
90
-
91
-
92
-
93
-
94
-
95
-
96
-
97
-
98
-
99
-
100
-
101
-
102
-
103
-
104
-
105
-
106
-
107
-
108
-
109
-
110
-
111
-
112
-
113
-
114
-
115
-
116
-
117
-
118
-
119
-
120
-
121
-
122
-
123
-
124
-
125
-
126
-
127
-
128
-
129
-
130
-
131
-
132
-
133
-
134
-
135
-
136
-
137
-
138
-
139
-
140
-
141
-
142
-
143
-
144
-
145
-
146
-
147
-
148
-
149
-
150
-
151
-
152
-
153
-
154
-
155
-
156
-
157
-
158
-
159
-
160
-
161
-
162
-
163
-
164
-
165
-
166
-
167
-
168
-
169
-
170
-
171
-
172
-
173
-
174
-
175
-
176
-
177
-
178
-
179
-
180
-
181
-
182
-
183
-
184
-
185
-
186
-
187
-
188
-
189
-
190
-
191
-
192
-
193
-
194
-
195
-
196
-
197
-
198
-
199
-
200
-
201
-
202
-
203
-
204
-
205
-
206
-
207
-
208
-
209
-
210
-
211
-
212
-
213
-
214
-
215
-
216
-
217
-
218
-
219
-
220
-
221
-
222
-
223
-
224
-
225
-
226
-
227
-
228
-
229
-
230
-
231
-
232
-
233
-
234
-
235
-
236
-
237
-
238
-
239
-
240
-
241
-
242
-
243
-
244
-
245
-
246
-
247
-
248
-
249
-
250
-
251
-
252
-
253
-
254
-
255
 |
 |
