Konica Minolta PS7000 Twain Driver and Overlay Manager Software Installation a - Page 28
Automatic, Brightness, Contrast
 |
View all Konica Minolta PS7000 manuals
Add to My Manuals
Save this manual to your list of manuals |
Page 28 highlights
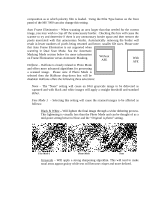
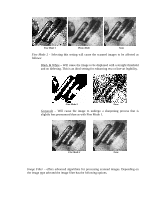
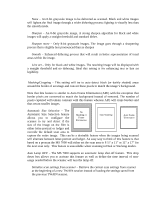
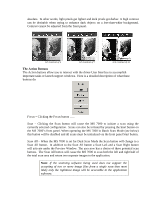
Auto Card Feeder - Automatically feed cards (AFC) during a scanning session All Cards - This enabled option and AFC option to scan all cards in a single scan session. Number of cards edit box - When AFC is enabled and all card option is disabled, use this area to enter a number of cards that will be feed in a single scanning session. Brightness & Contrast Controls This set of controls allows users to change the composition of the scanned image as detailed below. Please note that when using the slider bars you may notice some slight lag or resistance -- this is normal and is due to the bi-directional communication between the driver and scanner . Automatic Brightness - Check this box if you wish to have the scanner perform a prescan and apply an appropriate brightness setting based on the detected original. Automatic brightness will assume an original of normal exposure. Brightness - Changing this value will cause the scanned image to appear lighter or darker. When automatic brightness (AB) is selected this value will work as a small adjustment to the brightness applied by the AB function and the slider can be set between 0 and 30. When AB is not selected this value will apply an absolute brightness based on a setting between 0 and 90. In grayscale a lower brightness setting will result in each pixel being given a value closer to white while a higher setting will cause each pixel to be given a value closer to black. When scanning with Image Type set for black and white, a low brightness setting will cause the threshold process to result in more pixels being set to white while a higher brightness will result in more pixels being set to black. Please note that all Brightness and Contrast controls are applied prior to any Halftone or Photo settings. Brightness settings can be adjusted using the front panel Auto, Darker and Lighter buttons. G/S Auto Brightness of 7 G/S Auto Brightness of 15 G/S Auto Brightness of 22 Contrast - The contrast settings extend from 0 to 14. Changing these settings will cause the scanned image to either increase or decrease the range between dark and light areas. A low contrast setting will result in each pixel being set to a value closer to the median (gray) while a high contrast setting will result in each pixel being set to a value closer to its
-
 1
1 -
2
-
3
-
4
-
5
-
6
-
7
-
8
-
9
-
10
-
11
-
12
-
13
-
14
-
15
-
16
-
17
-
18
-
19
-
20
-
21
-
22
-
 23
23 -
 24
24 -
 25
25 -
 26
26 -
 27
27 -
 28
28 -
 29
29 -
 30
30 -
 31
31 -
 32
32 -
 33
33 -
34
-
35
-
36
-
37
-
38
-
39
-
40
-
41
-
42
-
43
-
44
-
45
-
46
-
47
-
48
-
49
-
50
-
51
-
52
-
53
-
54
-
55
-
56
-
57
-
58
-
59
 |
 |