Konica Minolta PS7000 Twain Driver and Overlay Manager Software Installation a - Page 45
Split L/R, Split R/L, Image Type, Resolution DPI - ps 7000 scanner
 |
View all Konica Minolta PS7000 manuals
Add to My Manuals
Save this manual to your list of manuals |
Page 45 highlights
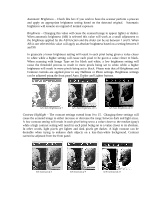
Split L/R - This setting is similar to Spread scan mode except that the two separate scans will be vertically merged in the scanner prior to delivery to the application. With this setting you scan 2 images thus 2 separate files, each of which can be up to an 11" x 17". The left-hand image will be placed scanned first and then the right-hand image. Split R/L - This setting is the same as Split L/R except that the right-hand image will be scanned first and then the left-hand image. If using the front panel of the PS 7000 the scan mode can be selected by pressing the button under "Size" tab, then select landscape or portrait mode by pressing the button under the appropriate tab. The display will show you an arrow pointing left and two different paper sizes and an arrow pointing right. Use the buttons under the arrow tabs to cycle through the different paper sizes. Select the paper size by pressing the button directly under its tab. Change the scan mode now by pressing the button on the right side of the display under the "Book Split". The green led will be on next to the selected mode. Press the button under "OK" tab on the display panel. Resolution (DPI) - This drop-down box allows you to select the resolution at which the scanner will deliver data to the scanning software. The resolution is measured in Dots Per Inch or DPI. Available settings for the PS 7000 are 200, 300, 400, and 600 DPI( up to 11" x 17" area only). Higher DPI settings will result in better quality scans as well as longer scanning times. In addition, higher resolutions will result in larger file sizes. Larger scan sizes, especially when grayscale is selected, could render the 600 DPI resolution unavailable. The optical resolution of PS 7000 is 400. All other resolutions are derived from on board interpolation or reduction algorithms. If using the front panel of the PS 7000 the resolution can be selected by pressing the button under "Reso" tab, then select the resolution by pressing the button under the desired DPI tab. Press the button under "OK" tab on the display panel. Paper Size - This drop-down box allows you to select the actual Scan Area captured by the PS 7000. The driver supports a wide range of standard U.S. sizes. If desired, you can also select the custom setting and define a unique scan area. The scan area selected will be reflected in the Preview Window via a dashed box. When using custom areas you can define any area within the 17" x 23" window. 17" x 14", 17" x 11", 14" x 11", Legal, Letter, and H. Letter paper sizes can be selected via the front panel of the PS 7000. (See the Preview Window for more information on custom scan areas). Image Type - This drop-down box lets you define the bit-depth of the image by selecting Black/White Text, Black/White Photo, Grayscale Text, Grayscale Photo. Black/White Text - This will cause all images delivered to the PC to have a depth of 1-bit. As a result all pixels will be either black or white. The scanner will threshold the image without using a dithering algorithm
-
 1
1 -
2
-
3
-
4
-
5
-
6
-
7
-
8
-
9
-
10
-
11
-
12
-
13
-
14
-
15
-
16
-
17
-
18
-
19
-
20
-
21
-
22
-
23
-
24
-
25
-
26
-
27
-
28
-
29
-
30
-
31
-
32
-
33
-
34
-
35
-
36
-
37
-
38
-
39
-
 40
40 -
 41
41 -
 42
42 -
 43
43 -
 44
44 -
 45
45 -
 46
46 -
 47
47 -
 48
48 -
 49
49 -
 50
50 -
51
-
52
-
53
-
54
-
55
-
56
-
57
-
58
-
59
 |
 |