Konica Minolta PS7000 Twain Driver and Overlay Manager Software Installation a - Page 7
resolution setting between 8H, 6H, 4H, 3H and 2H. - driver
 |
View all Konica Minolta PS7000 manuals
Add to My Manuals
Save this manual to your list of manuals |
Page 7 highlights
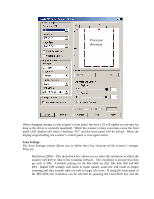
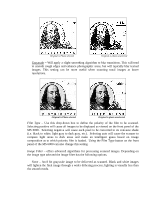
Print Mode/Resolution keys at the same time. Each subsequent press will cycle the resolution setting between 8H, 6H, 4H, 3H and 2H. Note: The optical resolution of the scanner is 400 DPI. All other resolutions are derived from on-board interpolation or reduction algorithms. Paper Size - This drop-down box allows you to select the actual Scan Area captured by the MS 6000. The driver supports a wide range of standard U.S. and European sizes. The scan area selected will be reflected in the Preview Window through the use of a dashed box. If desired, you can also select the custom setting and define any unique scan area within the 12" x 12" window. Pre-configured paper sizes cannot be selected via the front panel of the MS 6000; however, the optional Manual Masking Kit provides functionality for defining a custom scan area. (See the Preview Window section for more information). Image Type - This drop-down box lets you define the bit-depth of the image. If the optional grayscale kit is not installed, you will only have the option of selecting Black/White. If the optional grayscale kit is installed then you have the following two choices: Black/White - This will cause all images delivered to the PC to have a depth of 1-bit. As a result all pixels will be either black or white. The scanner will threshold the image and perform a dithering algorithm (see the Halftone setting for more information on setting dithers and halftones). Grayscale - This setting will cause all images to be delivered to the PC to have a bit-depth of 8. This will result in images with 256 possible shades of gray. Note: In order to utilize grayscale with the MS 6000 it will be necessary to purchase and install the optional grayscale kit.
-
 1
1 -
 2
2 -
 3
3 -
 4
4 -
 5
5 -
 6
6 -
 7
7 -
 8
8 -
 9
9 -
 10
10 -
 11
11 -
 12
12 -
13
-
14
-
15
-
16
-
17
-
18
-
19
-
20
-
21
-
22
-
23
-
24
-
25
-
26
-
27
-
28
-
29
-
30
-
31
-
32
-
33
-
34
-
35
-
36
-
37
-
38
-
39
-
40
-
41
-
42
-
43
-
44
-
45
-
46
-
47
-
48
-
49
-
50
-
51
-
52
-
53
-
54
-
55
-
56
-
57
-
58
-
59
 |
 |