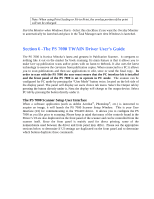
Konica Minolta PS7000 Twain Driver and Overlay Manager Software Installation a - Page 38
Dd.mm.yyyy - reviews
 |
View all Konica Minolta PS7000 manuals
Add to My Manuals
Save this manual to your list of manuals |
Page 38 highlights
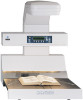
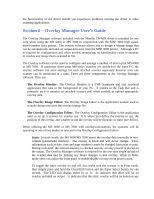
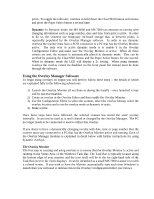
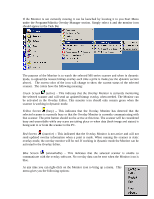
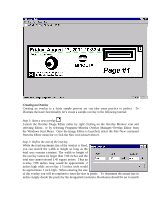
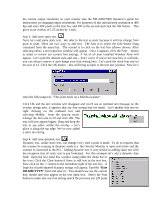
the current output resolution on your scanner (see the MS 6000/7000 Operator's guide for instructions on changing output resolution). For purposes of this tutorial keep resolution at 400 dpi and enter 500 pixels in the first box and 400 in the second and click the OK button. This gives us an overlay of 1.25 inches by 1 inch. Step 3: Add some static text Next, let's add some static text. We refer to the text as static because it will not change from print to print. There are two ways to add text. The first is to select the Edit>Insert Sting command from the menu bar. The second is to click on the text box (shown above). After selecting either, a text input box window will appear. Once it appears, click the Font... button to select or review our current font settings. A list of all your installed Window fonts will appear. Let's pick the desired style and size - don't worry if you're not sure how it will look, you can always remove it and change your font setting later. Let's pick the Arial font and set the size to 12. Click the OK button - this will bring us back to the text box window. Now let's enter the following text, "This print made on a Minolta scanner". Click OK and the text window will disappear and you'll see an outlined text message on the overlay design area. It appears that our font setting was too small. Let's modify this text by right clicking on the outlined text and selecting Modify.. from the pop-up menu. Change the font size to 20 and click OK. The text will now appear bigger. Drag and drop the text to any place within the overlay -- let's place it along the top edge. We've now added a static text string. Step 4: Add some dynamic text Dynamic text, unlike static text, can change every time a print is made. To do so requires that the scanner be running in dynamic mode (i.e. the Overlay Monitor is open and active and the scanner is connected to the PC). Adding dynamic text is very similar to adding static text with the exception that all static text is pre formatted. For this example let's add a dynamic date field. Open the text input box window using either the menu bar or the icon. Click the Clear button if there is still text in the text box. Now click on the >> button to the immediate right of the text box. A large list of preformatted dynamic strings will appear. Find the "Date DD.MM.YYYY" field and select it. You should now see the current day; month and year appear in the text input box. Select the Font button to make sure our font setting match the previous text (20 point
-
 1
1 -
2
-
3
-
4
-
5
-
6
-
7
-
8
-
9
-
10
-
11
-
12
-
13
-
14
-
15
-
16
-
17
-
18
-
19
-
20
-
21
-
22
-
23
-
24
-
25
-
26
-
27
-
28
-
29
-
30
-
31
-
32
-
 33
33 -
 34
34 -
 35
35 -
 36
36 -
 37
37 -
 38
38 -
 39
39 -
 40
40 -
 41
41 -
 42
42 -
 43
43 -
44
-
45
-
46
-
47
-
48
-
49
-
50
-
51
-
52
-
53
-
54
-
55
-
56
-
57
-
58
-
59
 |
 |