Konica Minolta bizhub C364e PageScope Authentication Manager User Manual Versi - Page 47
Exporting data
 |
View all Konica Minolta bizhub C364e manuals
Add to My Manuals
Save this manual to your list of manuals |
Page 47 highlights
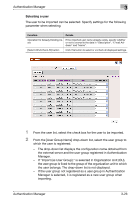
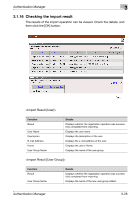
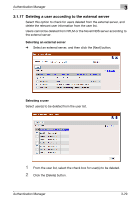
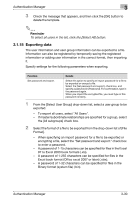
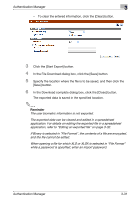
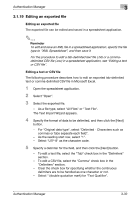
Authentication Manager 3 3 Check the message that appears, and then click the [OK] button to delete the template. 2 Reminder To select all users in the list, click the [Select All] button. 3.1.18 Exporting data The user information and user group information can be exported to a file. Information can also be registered by temporarily saving the registered information or adding user information in the correct format, then importing it. Specify settings for the following parameters when exporting. Function Set password and export. Details Select this option to specify an import password for a file to be exported or encrypt a file. Select the [Set password and export.] check box, and specify a password in [Password]. For confirmation, type in the password again. When you import the encrypted file, you must type in this password correctly. 1 From the [Select User Group] drop-down list, select a user group to be exported. - To export all users, select "All Users". - If master/subordinate relationships are specified for a group, select the [All subgroups] check box. 2 Select the format of a file to be exported from the drop-down list of [File Format]. - When specifying an import password for a file to be exported or encrypting a file, select the "Set password and export." check box to enter a password. - A password of 1-15 characters can be specified for files in the Excel 97 to Excel 2003 book formats (.xls). - A password of 1-255 characters can be specified for files in the Excel book format (Office excel 2007 or later) (.xlsx). - A password of 1-32 characters can be specified for files in the Binary format (system file) (.bin). Authentication Manager 3-30
-
 1
1 -
2
-
3
-
4
-
5
-
6
-
7
-
8
-
9
-
10
-
11
-
12
-
13
-
14
-
15
-
16
-
17
-
18
-
19
-
20
-
21
-
22
-
23
-
24
-
25
-
26
-
27
-
28
-
29
-
30
-
31
-
32
-
33
-
34
-
35
-
36
-
37
-
38
-
39
-
40
-
41
-
 42
42 -
 43
43 -
 44
44 -
 45
45 -
 46
46 -
 47
47 -
 48
48 -
 49
49 -
 50
50 -
 51
51 -
 52
52 -
53
-
54
-
55
-
56
-
57
-
58
-
59
-
60
-
61
-
62
-
63
-
64
-
65
-
66
-
67
-
68
-
69
-
70
-
71
-
72
-
73
-
74
-
75
-
76
-
77
-
78
-
79
-
80
-
81
-
82
-
83
-
84
-
85
-
86
-
87
-
88
-
89
-
90
-
91
-
92
-
93
-
94
-
95
-
96
-
97
-
98
-
99
-
100
-
101
-
102
-
103
-
104
-
105
-
106
-
107
-
108
-
109
-
110
-
111
-
112
-
113
-
114
-
115
-
116
-
117
-
118
-
119
-
120
-
121
-
122
-
123
-
124
-
125
-
126
-
127
-
128
-
129
-
130
-
131
-
132
-
133
-
134
-
135
-
136
-
137
-
138
-
139
-
140
-
141
-
142
-
143
-
144
-
145
-
146
-
147
-
148
-
149
-
150
-
151
-
152
-
153
-
154
-
155
-
156
-
157
-
158
-
159
-
160
-
161
-
162
-
163
-
164
-
165
-
166
-
167
-
168
-
169
-
170
-
171
-
172
-
173
-
174
-
175
-
176
-
177
-
178
-
179
-
180
-
181
-
182
-
183
-
184
-
185
-
186
-
187
-
188
 |
 |