Kyocera KM-1650 1650/2050/2550 Operation Guide (Advanced) - Page 109
Auto Cassette Switching, Paper Size cassettes 1 to 4, Auto Casstte SW, Machine default, Paper Size1st
 |
View all Kyocera KM-1650 manuals
Add to My Manuals
Save this manual to your list of manuals |
Page 109 highlights
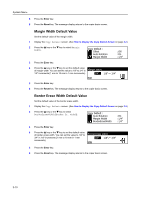
System Menu 5 If the management code is accepted, the Machine default screen is displayed. Next, perform the setting referring to the following description of each setting item. Machine default: End Auto Casstte SW Paper Size(1st) : On : Auto I Note The * (asterisk) at an item on each setting screen indicates the current setting. Auto Cassette Switching This machine can continue copying by switching the cassette to another cassette that contains paper of the same size and the same orientation as the current paper when paper runs out in the currently selected cassette. To prohibit switching to a cassette that has a different paper type, select On/Only same paper type. Note On the 16 ppm model, this item is displayed only if the optional paper feeder is installed. 1 Display the Machine default screen. (See How to Display the Machine Default Screen on page 3-12.) 2 Press the S key or the T key to select Auto Cassette SW. Machine default: End Auto Casstte SW Paper Size(1st) : On : Auto I 3 Press the Enter key. 4 Press the S key or the T key to select On/All types of paper, On/Only same paper type, or Off. Automatic cassette switching: * Off On/All types of paper On/Only same paper type 5 Press the Enter key. 6 Press the Reset key. The message display returns to the copier basic screen. Paper Size (cassettes 1 to 4) Set the paper sizes of cassettes 1 to 4. To detect the paper size automatically, set Auto Detection Metric or Auto Detection Inch. Sizes that can be set: 8 1/2 × 13", 8K, 16K Note For the 16 ppm model, cassettes 2 to 4 are included in the optional paper feeder. For the 20/25 ppm model, cassettes 3 and 4 are included in the optional paper feeder. This setting is displayed only if the optional paper feeder is installed. 1 Display the Machine default screen. (See How to Display the Machine Default Screen on page 3-12.) 2 Press the S key or the T key to select the cassette for which you set the paper size from Paper Size(1st) to (4th). Machine default: End Auto Casstte SW Paper Size(1st) : On : Auto I 3 Press the Enter key. 3-13
-
 1
1 -
2
-
3
-
4
-
5
-
6
-
7
-
8
-
9
-
10
-
11
-
12
-
13
-
14
-
15
-
16
-
17
-
18
-
19
-
20
-
21
-
22
-
23
-
24
-
25
-
26
-
27
-
28
-
29
-
30
-
31
-
32
-
33
-
34
-
35
-
36
-
37
-
38
-
39
-
40
-
41
-
42
-
43
-
44
-
45
-
46
-
47
-
48
-
49
-
50
-
51
-
52
-
53
-
54
-
55
-
56
-
57
-
58
-
59
-
60
-
61
-
62
-
63
-
64
-
65
-
66
-
67
-
68
-
69
-
70
-
71
-
72
-
73
-
74
-
75
-
76
-
77
-
78
-
79
-
80
-
81
-
82
-
83
-
84
-
85
-
86
-
87
-
88
-
89
-
90
-
91
-
92
-
93
-
94
-
95
-
96
-
97
-
98
-
99
-
100
-
101
-
102
-
103
-
 104
104 -
 105
105 -
 106
106 -
 107
107 -
 108
108 -
 109
109 -
 110
110 -
 111
111 -
 112
112 -
 113
113 -
 114
114 -
115
-
116
-
117
-
118
-
119
-
120
-
121
-
122
-
123
-
124
-
125
-
126
-
127
-
128
-
129
-
130
-
131
-
132
-
133
-
134
-
135
-
136
-
137
-
138
-
139
-
140
-
141
-
142
-
143
-
144
-
145
-
146
-
147
-
148
-
149
-
150
-
151
-
152
-
153
-
154
-
155
-
156
-
157
-
158
-
159
-
160
-
161
-
162
-
163
-
164
-
165
-
166
-
167
-
168
-
169
-
170
-
171
-
172
-
173
-
174
-
175
-
176
 |
 |
