Kyocera KM-1650 1650/2050/2550 Operation Guide (Advanced) - Page 93
Resource Protect Mode, Auto Continue, Permanent
 |
View all Kyocera KM-1650 manuals
Add to My Manuals
Save this manual to your list of manuals |
Page 93 highlights
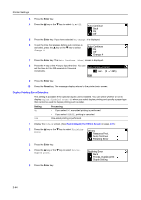
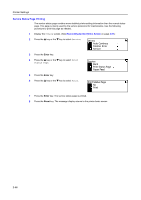
Printer Settings Resource Protect Mode The resource protect mode protects the resource data such as downloaded fonts and macros and memorizes the PCL resources even if the emulation mode is switched. If you select Permanent, temporary resources are not protected. If you select Perm/Temp, however, temporary resources are also protected. 1 Display the Others screen. (See How to Display the Others Screen on page 2-51.) 2 Press the S key or the T key to select Resource Prot. Others Print HEX-DUMP Printer Reset Resource Prot. 3 Press the Enter key. 4 Press the S key or the T key to select Off, Permanent or Perm/Temp. Resource Prot. Back Off Permanent 5 Press the Enter key. 6 Press the Reset key. The message display returns to the printer basic screen. Auto Continue 1 2 If any of the following error messages appears, the error can be cleared and printing can be continued after the preset recovery time elapses (auto continue). • Memory Overflow/Press GO • Print overrun Press GO • KPDL error Press GO • File not found Press GO • HARD DISK error Press GO • RAM disk error Press GO • MemoryCard err Press GO • Illegal Account Press GO • Exceeded Max.out Press GO • Account error Press Go • Duplex disabled Press GO • Add Staples and Press GO • e-MPS not stored Press GO • Opt. ROM error Press GO Also you can set the time that elapses before auto continue is activated. Display the Others screen. (See How to Display the Others Screen on page 2-51.) Press the S key or the T key to select Auto Continue. Others Printer Reset Resource Prot. Auto Continue 2-53
-
 1
1 -
2
-
3
-
4
-
5
-
6
-
7
-
8
-
9
-
10
-
11
-
12
-
13
-
14
-
15
-
16
-
17
-
18
-
19
-
20
-
21
-
22
-
23
-
24
-
25
-
26
-
27
-
28
-
29
-
30
-
31
-
32
-
33
-
34
-
35
-
36
-
37
-
38
-
39
-
40
-
41
-
42
-
43
-
44
-
45
-
46
-
47
-
48
-
49
-
50
-
51
-
52
-
53
-
54
-
55
-
56
-
57
-
58
-
59
-
60
-
61
-
62
-
63
-
64
-
65
-
66
-
67
-
68
-
69
-
70
-
71
-
72
-
73
-
74
-
75
-
76
-
77
-
78
-
79
-
80
-
81
-
82
-
83
-
84
-
85
-
86
-
87
-
 88
88 -
 89
89 -
 90
90 -
 91
91 -
 92
92 -
 93
93 -
 94
94 -
 95
95 -
 96
96 -
 97
97 -
 98
98 -
99
-
100
-
101
-
102
-
103
-
104
-
105
-
106
-
107
-
108
-
109
-
110
-
111
-
112
-
113
-
114
-
115
-
116
-
117
-
118
-
119
-
120
-
121
-
122
-
123
-
124
-
125
-
126
-
127
-
128
-
129
-
130
-
131
-
132
-
133
-
134
-
135
-
136
-
137
-
138
-
139
-
140
-
141
-
142
-
143
-
144
-
145
-
146
-
147
-
148
-
149
-
150
-
151
-
152
-
153
-
154
-
155
-
156
-
157
-
158
-
159
-
160
-
161
-
162
-
163
-
164
-
165
-
166
-
167
-
168
-
169
-
170
-
171
-
172
-
173
-
174
-
175
-
176
 |
 |
