Kyocera KM-1650 1650/2050/2550 Operation Guide (Advanced) - Page 139
Changing Limit of Use, Important
 |
View all Kyocera KM-1650 manuals
Add to My Manuals
Save this manual to your list of manuals |
Page 139 highlights
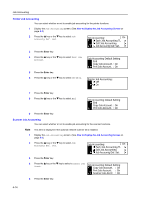
Job Accounting 11 Press the Enter key. Changing Limit of Use Change the limit of use that has been set for each account. Important! 1 2 To set the limit of use in managing accounts, you must set Copier Job Accounting and Printer Job Accounting in the default settings from Off to On. If the optional network scanner kit or fax kit is installed, set Scanner Job Accounting or Fax Job Accounting in the default settings to On. (See Default Settings on page 4-13.) Display the Job Accounting screen. (See How to Display the Job Accounting Screen on page 4-3.) Press the S key or the T key to select Edit Job Accounting. Job Accounting: [ On ] Each Job Accounting TL Edit Job Accounting Job Accountg Def. Set. 3 Press the Enter key. 4 Press the S key or the T key to select Change limit in use. Edit Job Accounting: New registration Delete Change limit in use 5 Press the Enter key. 6 Press the S key or the T key to select the ID-code to change. Change limit in use: End 11111111 22222222 : 123.456 : 000.234 7 Press the Enter key. 8 Change the limit of use. Note 9 For the method of setting the limit of use, see Setting Limit of Use on page 4-5. After all operation of change is complete, press the S key or the T to select End. Change limit in use: End 11111111 22222222 : 123.456 : 000.234 10 Press the Enter key 4-9
-
 1
1 -
2
-
3
-
4
-
5
-
6
-
7
-
8
-
9
-
10
-
11
-
12
-
13
-
14
-
15
-
16
-
17
-
18
-
19
-
20
-
21
-
22
-
23
-
24
-
25
-
26
-
27
-
28
-
29
-
30
-
31
-
32
-
33
-
34
-
35
-
36
-
37
-
38
-
39
-
40
-
41
-
42
-
43
-
44
-
45
-
46
-
47
-
48
-
49
-
50
-
51
-
52
-
53
-
54
-
55
-
56
-
57
-
58
-
59
-
60
-
61
-
62
-
63
-
64
-
65
-
66
-
67
-
68
-
69
-
70
-
71
-
72
-
73
-
74
-
75
-
76
-
77
-
78
-
79
-
80
-
81
-
82
-
83
-
84
-
85
-
86
-
87
-
88
-
89
-
90
-
91
-
92
-
93
-
94
-
95
-
96
-
97
-
98
-
99
-
100
-
101
-
102
-
103
-
104
-
105
-
106
-
107
-
108
-
109
-
110
-
111
-
112
-
113
-
114
-
115
-
116
-
117
-
118
-
119
-
120
-
121
-
122
-
123
-
124
-
125
-
126
-
127
-
128
-
129
-
130
-
131
-
132
-
133
-
 134
134 -
 135
135 -
 136
136 -
 137
137 -
 138
138 -
 139
139 -
 140
140 -
 141
141 -
 142
142 -
 143
143 -
 144
144 -
145
-
146
-
147
-
148
-
149
-
150
-
151
-
152
-
153
-
154
-
155
-
156
-
157
-
158
-
159
-
160
-
161
-
162
-
163
-
164
-
165
-
166
-
167
-
168
-
169
-
170
-
171
-
172
-
173
-
174
-
175
-
176
 |
 |
