Kyocera KM-1650 1650/2050/2550 Operation Guide (Advanced) - Page 48
e-MPS Function, Printing Quick Copy/Proof-and-Hold
 |
View all Kyocera KM-1650 manuals
Add to My Manuals
Save this manual to your list of manuals |
Page 48 highlights
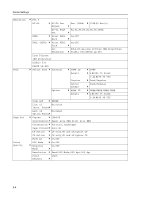
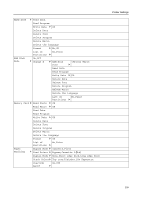
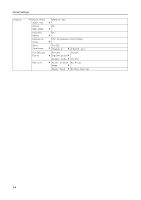
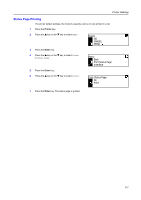
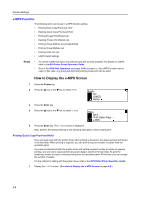
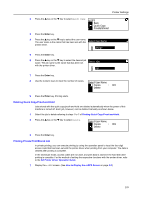
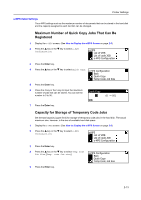
Printer Settings e-MPS Function The following items can be set in e-MPS function setting. • Printing Quick Copy/Proof-and-Hold • Deleting Quick Copy/Proof-and-Hold • Printing Private Print/Stored Job • Deleting Private Print/Stored Job • Printing Virtual Mailbox Accumulated Data • Printing Virtual Mailbox List • Printing Code Job List • e-MPS Detail Settings Notes • To use the e-MPS functions, the optional hard disk must be installed. For details on e-MPS, refer to the KX Printer Driver Operation Guide. • Even if the RAM Disk Operation (see page 2-44) is turned On, the e-MPS function can be used. In this case, only proof-and-hold and printing private print can be used. How to Display the e-MPS Screen 1 Press the Printer key. 2 Press the S key or the T key to select MENU. Ready GO CANCEL MENU 3 Press the Enter key. 4 Press the S key or the T key to select e-MPS. Menu Back Print Status Page e-MPS 5 Press the Enter key. The e-MPS screen is displayed. Next, perform the setting referring to the following description of each setting item. Printing Quick Copy/Proof-and-Hold If you set quick copy with the printer driver when printing a document, the data is printed and stored in the hard disk. When printing is required, you can print a required number of copies from the operation panel. If you set proof-and-hold with the printer driver and set the required number of copies to execute printing, only one set is output and the document data is stored in the hard disk. To print the remaining number of copies, execute printing from the operation panel. At this time, you can change the number of copies. For the method of setting with the printer driver, refer to the KX Printer Driver Operation Guide. 1 Display the e-MPS screen. (See How to Display the e-MPS Screen on page 2-8.) 2-8
-
 1
1 -
2
-
3
-
4
-
5
-
6
-
7
-
8
-
9
-
10
-
11
-
12
-
13
-
14
-
15
-
16
-
17
-
18
-
19
-
20
-
21
-
22
-
23
-
24
-
25
-
26
-
27
-
28
-
29
-
30
-
31
-
32
-
33
-
34
-
35
-
36
-
37
-
38
-
39
-
40
-
41
-
42
-
 43
43 -
 44
44 -
 45
45 -
 46
46 -
 47
47 -
 48
48 -
 49
49 -
 50
50 -
 51
51 -
 52
52 -
 53
53 -
54
-
55
-
56
-
57
-
58
-
59
-
60
-
61
-
62
-
63
-
64
-
65
-
66
-
67
-
68
-
69
-
70
-
71
-
72
-
73
-
74
-
75
-
76
-
77
-
78
-
79
-
80
-
81
-
82
-
83
-
84
-
85
-
86
-
87
-
88
-
89
-
90
-
91
-
92
-
93
-
94
-
95
-
96
-
97
-
98
-
99
-
100
-
101
-
102
-
103
-
104
-
105
-
106
-
107
-
108
-
109
-
110
-
111
-
112
-
113
-
114
-
115
-
116
-
117
-
118
-
119
-
120
-
121
-
122
-
123
-
124
-
125
-
126
-
127
-
128
-
129
-
130
-
131
-
132
-
133
-
134
-
135
-
136
-
137
-
138
-
139
-
140
-
141
-
142
-
143
-
144
-
145
-
146
-
147
-
148
-
149
-
150
-
151
-
152
-
153
-
154
-
155
-
156
-
157
-
158
-
159
-
160
-
161
-
162
-
163
-
164
-
165
-
166
-
167
-
168
-
169
-
170
-
171
-
172
-
173
-
174
-
175
-
176
 |
 |
