Kyocera KM-1650 1650/2050/2550 Operation Guide (Advanced) - Page 57
Network Setting
 |
View all Kyocera KM-1650 manuals
Add to My Manuals
Save this manual to your list of manuals |
Page 57 highlights
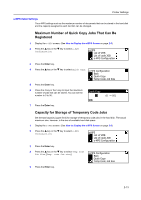
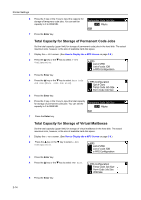
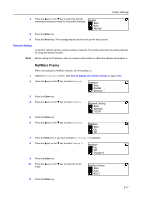
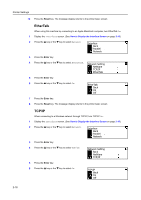
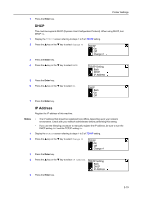
Printer Settings 4 Press the S key or the T key to select the desired transmission/reception mode for the parallel interface. Parallel Back Auto Normal 5 Press the Enter key. 6 Press the Reset key. The message display returns to the printer basic screen. Network Setting To perform network printing, network setting is required. This section describes the setting required for using the network function. Note Before setting the IP address, ask your network administrator to obtain the address and prepare it. NetWare Frame When connecting to a NetWare network, turn this setting On. 1 Display the Interface screen. (See How to Display the Interface Screen on page 2-16.) 2 Press the S key or the T key to select Network. Interface Back Parallel Network 3 Press the Enter key. 4 Press the S key or the T key to select NetWare. Network Setting Back NetWare TCP/IP 5 Press the Enter key. 6 Press the S key or the T key to select On or Off. NetWare Back On Off 7 Press the Enter key. If you have selected On, Change # is displayed. 8 Press the S key or the T key to select Change #. NetWare On Off Change # 9 Press the Enter key. 10 Press the S key or the T key to select the frame mode. NetWare Frame Back Auto 802.3 11 Press the Enter key. 2-17
-
 1
1 -
2
-
3
-
4
-
5
-
6
-
7
-
8
-
9
-
10
-
11
-
12
-
13
-
14
-
15
-
16
-
17
-
18
-
19
-
20
-
21
-
22
-
23
-
24
-
25
-
26
-
27
-
28
-
29
-
30
-
31
-
32
-
33
-
34
-
35
-
36
-
37
-
38
-
39
-
40
-
41
-
42
-
43
-
44
-
45
-
46
-
47
-
48
-
49
-
50
-
51
-
 52
52 -
 53
53 -
 54
54 -
 55
55 -
 56
56 -
 57
57 -
 58
58 -
 59
59 -
 60
60 -
 61
61 -
 62
62 -
63
-
64
-
65
-
66
-
67
-
68
-
69
-
70
-
71
-
72
-
73
-
74
-
75
-
76
-
77
-
78
-
79
-
80
-
81
-
82
-
83
-
84
-
85
-
86
-
87
-
88
-
89
-
90
-
91
-
92
-
93
-
94
-
95
-
96
-
97
-
98
-
99
-
100
-
101
-
102
-
103
-
104
-
105
-
106
-
107
-
108
-
109
-
110
-
111
-
112
-
113
-
114
-
115
-
116
-
117
-
118
-
119
-
120
-
121
-
122
-
123
-
124
-
125
-
126
-
127
-
128
-
129
-
130
-
131
-
132
-
133
-
134
-
135
-
136
-
137
-
138
-
139
-
140
-
141
-
142
-
143
-
144
-
145
-
146
-
147
-
148
-
149
-
150
-
151
-
152
-
153
-
154
-
155
-
156
-
157
-
158
-
159
-
160
-
161
-
162
-
163
-
164
-
165
-
166
-
167
-
168
-
169
-
170
-
171
-
172
-
173
-
174
-
175
-
176
 |
 |
