Kyocera KM-1650 1650/2050/2550 Operation Guide (Advanced) - Page 51
Printing Virtual Mailbox Accumulated Data, Printing Virtual Mailbox List, Quick Copy, Private/Stored
 |
View all Kyocera KM-1650 manuals
Add to My Manuals
Save this manual to your list of manuals |
Page 51 highlights
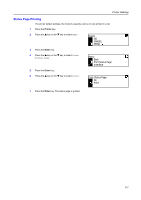
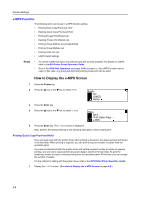
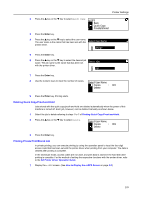
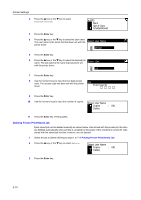
Printer Settings Printing Virtual Mailbox Accumulated Data With the virtual mailbox function, a job is stored in the virtual mailbox. If you use the virtual mailbox function to print a document with the printer driver, the job is stored and is not printed until you execute printing from the operation panel. For the method of setting with the printer driver, refer to the KX Printer Driver Operation Guide. 1 Display the e-MPS screen. (See How to Display the e-MPS Screen on page 2-8.) 2 Press the S key or the T key to select Print VMB Data. e-MPS Quick Copy Private/Stored Print VMB Data 3 Press the Enter key. 4 Press the S key or the T key to select the mailbox to print. Print VMB Data 001: File B 5 Press the Enter key. 6 Use the numeric keys to input the five-digit access code. The access code has been set with the KM-NET 001:File B Printer Disk Manager. Enter User ID 7 Press the Enter key. Printing starts. Once printing is complete, the document data in the mailbox is deleted. Printing Virtual Mailbox List A list that includes the currently set virtual mailbox tray numbers (mailbox numbers), presence of accumulated data, data sizes, etc. is printed. 1 Display the e-MPS screen. (See How to Display the e-MPS Screen on page 2-8.) 2 Press the S key or the T key to select List of VMB. e-MPS Private/Stored Print VMB Data List of VMB 3 Press the Enter key. 4 Press the S key or the T key to select Print. List of VMB No Print 2-11
-
 1
1 -
2
-
3
-
4
-
5
-
6
-
7
-
8
-
9
-
10
-
11
-
12
-
13
-
14
-
15
-
16
-
17
-
18
-
19
-
20
-
21
-
22
-
23
-
24
-
25
-
26
-
27
-
28
-
29
-
30
-
31
-
32
-
33
-
34
-
35
-
36
-
37
-
38
-
39
-
40
-
41
-
42
-
43
-
44
-
45
-
 46
46 -
 47
47 -
 48
48 -
 49
49 -
 50
50 -
 51
51 -
 52
52 -
 53
53 -
 54
54 -
 55
55 -
 56
56 -
57
-
58
-
59
-
60
-
61
-
62
-
63
-
64
-
65
-
66
-
67
-
68
-
69
-
70
-
71
-
72
-
73
-
74
-
75
-
76
-
77
-
78
-
79
-
80
-
81
-
82
-
83
-
84
-
85
-
86
-
87
-
88
-
89
-
90
-
91
-
92
-
93
-
94
-
95
-
96
-
97
-
98
-
99
-
100
-
101
-
102
-
103
-
104
-
105
-
106
-
107
-
108
-
109
-
110
-
111
-
112
-
113
-
114
-
115
-
116
-
117
-
118
-
119
-
120
-
121
-
122
-
123
-
124
-
125
-
126
-
127
-
128
-
129
-
130
-
131
-
132
-
133
-
134
-
135
-
136
-
137
-
138
-
139
-
140
-
141
-
142
-
143
-
144
-
145
-
146
-
147
-
148
-
149
-
150
-
151
-
152
-
153
-
154
-
155
-
156
-
157
-
158
-
159
-
160
-
161
-
162
-
163
-
164
-
165
-
166
-
167
-
168
-
169
-
170
-
171
-
172
-
173
-
174
-
175
-
176
 |
 |
