Kyocera TASKalfa 500ci 250ci/300ci/400ci/500ci/552ci Operation Guide Rev-1 - Page 385

Managing Accounts, Management, Adding a User on Job Accounting Setting, Accounting List

Page 385 highlights

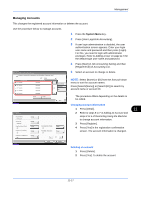
Management Managing Accounts This changes the registered account information or deletes the account. Use the procedure below to manage accounts. User Login/Job Accounting - Accounting List Register an account that is permitted to use this machine. (Maximum: 1000) Account Name 01 Account Sort Name Account ID 00001000 02 Account 00002000 03 Account 00003000 1/2 04 Account 00004000 05 Account 00005000 Search(Name) Search(ID) Add Detail Delete Status Close 10/10/2008 10:10 Account: xx Account Name: 01 Account Account ID: 00001000 Copy Restriction (Total): Off Copy Restr. (Full Color): Off Copy Restr. (SingleColor): Off Change Change Change Change Change Status Print Restriction (Total): Off Print Restr. (Full Color): Off Change Change 1/2 Cancel Register 10/10/2008 10:10 1 Press the System Menu key. 2 Press [User Login/Job Accounting]. 3 If user login administration is disabled, the user authentication screen appears. Enter your login user name and password and then press [Login]. For this, you need to login with administrator privileges. Refer to Adding a User on page 11-5 for the default login user name and password. 4 Press [Next] of Job Accounting Setting and then [Register/Edit] of Accounting List. 5 Select an account to change or delete. NOTE: Select [Name] or [ID] from the Sort pull-down menu to sort the account names. Press [Search(Name)] or [Search(ID)] to search by account name or account ID. The procedure differs depending on the details to be edited. Changing account information 1 Press [Detail]. 2 Refer to steps 5 to 7 of Adding an Account and steps 2 to 5 of Restricting Using the Machine to change account information. 3 Press [Register]. 4 Press [Yes] in the registration confirmation screen. The account information is changed. Deleting an account 1 Press [Delete]. 2 Press [Yes]. To delete the account. 11 11-17

  • 1
  • 2
  • 3
  • 4
  • 5
  • 6
  • 7
  • 8
  • 9
  • 10
  • 11
  • 12
  • 13
  • 14
  • 15
  • 16
  • 17
  • 18
  • 19
  • 20
  • 21
  • 22
  • 23
  • 24
  • 25
  • 26
  • 27
  • 28
  • 29
  • 30
  • 31
  • 32
  • 33
  • 34
  • 35
  • 36
  • 37
  • 38
  • 39
  • 40
  • 41
  • 42
  • 43
  • 44
  • 45
  • 46
  • 47
  • 48
  • 49
  • 50
  • 51
  • 52
  • 53
  • 54
  • 55
  • 56
  • 57
  • 58
  • 59
  • 60
  • 61
  • 62
  • 63
  • 64
  • 65
  • 66
  • 67
  • 68
  • 69
  • 70
  • 71
  • 72
  • 73
  • 74
  • 75
  • 76
  • 77
  • 78
  • 79
  • 80
  • 81
  • 82
  • 83
  • 84
  • 85
  • 86
  • 87
  • 88
  • 89
  • 90
  • 91
  • 92
  • 93
  • 94
  • 95
  • 96
  • 97
  • 98
  • 99
  • 100
  • 101
  • 102
  • 103
  • 104
  • 105
  • 106
  • 107
  • 108
  • 109
  • 110
  • 111
  • 112
  • 113
  • 114
  • 115
  • 116
  • 117
  • 118
  • 119
  • 120
  • 121
  • 122
  • 123
  • 124
  • 125
  • 126
  • 127
  • 128
  • 129
  • 130
  • 131
  • 132
  • 133
  • 134
  • 135
  • 136
  • 137
  • 138
  • 139
  • 140
  • 141
  • 142
  • 143
  • 144
  • 145
  • 146
  • 147
  • 148
  • 149
  • 150
  • 151
  • 152
  • 153
  • 154
  • 155
  • 156
  • 157
  • 158
  • 159
  • 160
  • 161
  • 162
  • 163
  • 164
  • 165
  • 166
  • 167
  • 168
  • 169
  • 170
  • 171
  • 172
  • 173
  • 174
  • 175
  • 176
  • 177
  • 178
  • 179
  • 180
  • 181
  • 182
  • 183
  • 184
  • 185
  • 186
  • 187
  • 188
  • 189
  • 190
  • 191
  • 192
  • 193
  • 194
  • 195
  • 196
  • 197
  • 198
  • 199
  • 200
  • 201
  • 202
  • 203
  • 204
  • 205
  • 206
  • 207
  • 208
  • 209
  • 210
  • 211
  • 212
  • 213
  • 214
  • 215
  • 216
  • 217
  • 218
  • 219
  • 220
  • 221
  • 222
  • 223
  • 224
  • 225
  • 226
  • 227
  • 228
  • 229
  • 230
  • 231
  • 232
  • 233
  • 234
  • 235
  • 236
  • 237
  • 238
  • 239
  • 240
  • 241
  • 242
  • 243
  • 244
  • 245
  • 246
  • 247
  • 248
  • 249
  • 250
  • 251
  • 252
  • 253
  • 254
  • 255
  • 256
  • 257
  • 258
  • 259
  • 260
  • 261
  • 262
  • 263
  • 264
  • 265
  • 266
  • 267
  • 268
  • 269
  • 270
  • 271
  • 272
  • 273
  • 274
  • 275
  • 276
  • 277
  • 278
  • 279
  • 280
  • 281
  • 282
  • 283
  • 284
  • 285
  • 286
  • 287
  • 288
  • 289
  • 290
  • 291
  • 292
  • 293
  • 294
  • 295
  • 296
  • 297
  • 298
  • 299
  • 300
  • 301
  • 302
  • 303
  • 304
  • 305
  • 306
  • 307
  • 308
  • 309
  • 310
  • 311
  • 312
  • 313
  • 314
  • 315
  • 316
  • 317
  • 318
  • 319
  • 320
  • 321
  • 322
  • 323
  • 324
  • 325
  • 326
  • 327
  • 328
  • 329
  • 330
  • 331
  • 332
  • 333
  • 334
  • 335
  • 336
  • 337
  • 338
  • 339
  • 340
  • 341
  • 342
  • 343
  • 344
  • 345
  • 346
  • 347
  • 348
  • 349
  • 350
  • 351
  • 352
  • 353
  • 354
  • 355
  • 356
  • 357
  • 358
  • 359
  • 360
  • 361
  • 362
  • 363
  • 364
  • 365
  • 366
  • 367
  • 368
  • 369
  • 370
  • 371
  • 372
  • 373
  • 374
  • 375
  • 376
  • 377
  • 378
  • 379
  • 380
  • 381
  • 382
  • 383
  • 384
  • 385
  • 386
  • 387
  • 388
  • 389
  • 390
  • 391
  • 392
  • 393
  • 394
  • 395
  • 396
  • 397
  • 398
  • 399
  • 400
  • 401
  • 402
  • 403
  • 404
  • 405
  • 406
  • 407
  • 408
  • 409
  • 410
  • 411
  • 412
  • 413
  • 414
  • 415
  • 416
  • 417
  • 418
  • 419
  • 420
  • 421
  • 422
  • 423
  • 424
  • 425
  • 426
  • 427
  • 428
  • 429
  • 430
  • 431
  • 432
  • 433
  • 434
  • 435
  • 436
  • 437
  • 438
  • 439
  • 440

Management
11-17
11
Managing Accounts
This changes the registered account information or deletes the account.
Use the procedure below to manage accounts.
1
Press the
System Menu
key.
2
Press [User Login/Job Accounting].
3
If user login administration is disabled, the user
authentication screen appears. Enter your login
user name and password and then press [Login].
For this, you need to login with administrator
privileges. Refer to
Adding a User on page 11-5
for
the default login user name and password.
4
Press [Next] of
Job Accounting Setting
and then
[Register/Edit] of
Accounting List
.
5
Select an account to change or delete.
NOTE:
Select [Name] or [ID] from the
Sort
pull-down
menu to sort the account names.
Press [Search(Name)] or [Search(ID)] to search by
account name or account ID.
The procedure differs depending on the details to
be edited.
Changing account information
1
Press [Detail].
2
Refer to steps 5 to 7 of
Adding an Account
and
steps 2 to 5 of
Restricting Using the Machine
to change account information.
3
Press [Register].
4
Press [Yes] in the registration confirmation
screen. The account information is changed.
Deleting an account
1
Press [Delete].
2
Press [Yes]. To delete the account.
User Login/Job Accounting - Accounting List
1/2
Register an account that is permitted to use this machine. (Maximum: 1000)
Search(Name)
Search(ID)
Account Name
Account ID
Detail
Name
Sort
01
02
03
04
05
00001000
00002000
00005000
00003000
00004000
Delete
Add
Close
10/10/2008
10:10
Status
Account
Account
Account
Account
Account
Account: xx
Print Restriction (Total):
Copy Restriction (Total):
Register
Copy Restr. (Full Color):
Account ID:
Cancel
Off
Off
Off
00001000
Print Restr. (Full Color):
Off
Account Name:
Change
10/10/2008
10:10
Status
Copy Restr. (SingleColor):
Off
Change
Change
Change
Change
Change
Change
1/2
01 Account