LG PQCPA11A0E Owner's Manual - Page 33
Installing the ACP and Connecting the cable
 |
View all LG PQCPA11A0E manuals
Add to My Manuals
Save this manual to your list of manuals |
Page 33 highlights
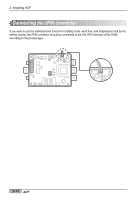
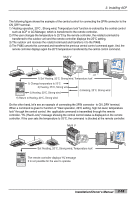
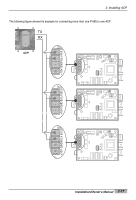
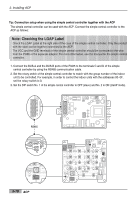
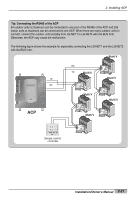
2. Installing ACP Installing the ACP and Connecting the cable After setting the PI485, the ACP should be installed at the suitable place and the RS485 cable should be connected to communicate with the PI485. And, the Ethernet cable should be connected for connecting to the Internet or the AC Manager. Fixing the ACP at the installation site The ACP is basically designed to be installed at the wall to use. Install the ACP at the suitable place as the following description. Here, the installation method of the ACP is described with the example installing the ACP at the wall. 1. Decide the space to install the ACP. Before installing the ACP, check whether the place is suitable for connecting the ACP and the RS485 cable. 2. Use the screw driver to fix them at the wall. It can be fixed as shown at the following figure according to the installation place. 1 2 DI 3 4 5 6 7 8 9 10 11 12 13 14 15 16 17 18 19 20 SMEELNEUC/T 1 2 DO 3 4 LG-NET 1 TX LG-NET 2 RX TX LG-NET 3 RX TX LG-NET 4 RX TX RX FDD TX Ext. RX TX RX Ethernet 1 ACT LNK Ethernet 2 ACT LNK Console TX RX Run Power Installation/Owner's Manual 2-19
-
 1
1 -
2
-
3
-
4
-
5
-
6
-
7
-
8
-
9
-
10
-
11
-
12
-
13
-
14
-
15
-
16
-
17
-
18
-
19
-
20
-
21
-
22
-
23
-
24
-
25
-
26
-
27
-
 28
28 -
 29
29 -
 30
30 -
 31
31 -
 32
32 -
 33
33 -
 34
34 -
 35
35 -
 36
36 -
 37
37 -
 38
38 -
39
-
40
-
41
-
42
-
43
-
44
-
45
-
46
-
47
-
48
-
49
-
50
-
51
-
52
-
53
-
54
-
55
-
56
-
57
-
58
-
59
-
60
-
61
-
62
-
63
-
64
-
65
-
66
-
67
-
68
-
69
-
70
-
71
-
72
-
73
-
74
-
75
-
76
-
77
-
78
-
79
-
80
-
81
-
82
-
83
-
84
-
85
-
86
-
87
-
88
-
89
-
90
-
91
-
92
-
93
-
94
-
95
-
96
-
97
-
98
-
99
-
100
-
101
-
102
-
103
-
104
-
105
-
106
-
107
-
108
-
109
-
110
-
111
-
112
-
113
-
114
-
115
-
116
-
117
-
118
-
119
-
120
-
121
-
122
-
123
-
124
-
125
-
126
-
127
-
128
-
129
-
130
-
131
-
132
-
133
-
134
-
135
-
136
-
137
-
138
-
139
-
140
-
141
-
142
-
143
-
144
-
145
-
146
-
147
-
148
-
149
-
150
-
151
-
152
-
153
-
154
-
155
-
156
-
157
-
158
-
159
-
160
-
161
-
162
-
163
 |
 |
