Lexmark T642 Service Manual - Page 193
Configuration menu (CONFIG MENU), Entering Configuration Menu, Available menus - reset maintenance count
 |
UPC - 734646722001
View all Lexmark T642 manuals
Add to My Manuals
Save this manual to your list of manuals |
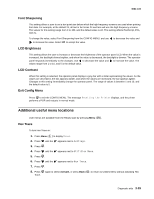
Page 193 highlights
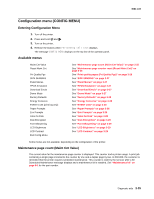
4061-xx0 Configuration menu (CONFIG MENU) Entering Configuration Menu 1. Turn off the printer. 2. Press and hold and . 3. Turn on the printer. 4. Release the buttons when Performing Self Test displays. The message CONFIG MENU displays on the top line of the operator panel. Available menus Maint Cnt Value Reset Maint Cnt Prt Quality Pgs SIZE SENSING Panel Menus PPDS Emulation Download Emuls Demo Mode Factory Defaults Energy Conserve EVENT LOG (print log only) Paper Prompts Env Prompts Jobs On Disk Disk Encryption Font Sharpening LCD Brightness LCD Contrast Exit Config Menu See "Maintenance page count (Maint Cnt Value)" on page 3-25 See "Maintenance page counter reset (Reset Maint Cnt)" on page 3-26 See "Print quality pages (Prt Quality Pgs)" on page 3-26 See "SIZE SENSING" on page 3-27 See "Panel Menus" on page 3-27 See "PPDS Emulation" on page 3-27 See "Download Emuls" on page 3-27 See "Demo Mode" on page 3-27 See "Factory Defaults" on page 3-28 See "Energy Conserve" on page 3-28 See "EVENT LOG" on page 3-28 See "Paper Prompts" on page 3-28 See "Env Prompts" on page 3-28 See "Jobs On Disk" on page 3-28 See "Disk Encryption" on page 3-28 See "Font Sharpening" on page 3-29 See "LCD Brightness" on page 3-29 See "LCD Contrast" on page 3-29 Some menus are not available, depending on the configuration of the printer. Maintenance page count (Maint Cnt Value) The current value for the maintenance page counter is displayed. This counter tracks printer usage. A print job containing a single page increments the counter by one and a duplex page by two. At 300,000, the customer is reminded that the printer requires scheduled maintenance. This counter is reset by the servicer after a 80 Scheduled Maintenance message displays and a maintenance kit is installed. See "Maintenance kit" on page 6-1 for the part number. Diagnostic aids 3-25
-
 1
1 -
2
-
3
-
4
-
5
-
6
-
7
-
8
-
9
-
10
-
11
-
12
-
13
-
14
-
15
-
16
-
17
-
18
-
19
-
20
-
21
-
22
-
23
-
24
-
25
-
26
-
27
-
28
-
29
-
30
-
31
-
32
-
33
-
34
-
35
-
36
-
37
-
38
-
39
-
40
-
41
-
42
-
43
-
44
-
45
-
46
-
47
-
48
-
49
-
50
-
51
-
52
-
53
-
54
-
55
-
56
-
57
-
58
-
59
-
60
-
61
-
62
-
63
-
64
-
65
-
66
-
67
-
68
-
69
-
70
-
71
-
72
-
73
-
74
-
75
-
76
-
77
-
78
-
79
-
80
-
81
-
82
-
83
-
84
-
85
-
86
-
87
-
88
-
89
-
90
-
91
-
92
-
93
-
94
-
95
-
96
-
97
-
98
-
99
-
100
-
101
-
102
-
103
-
104
-
105
-
106
-
107
-
108
-
109
-
110
-
111
-
112
-
113
-
114
-
115
-
116
-
117
-
118
-
119
-
120
-
121
-
122
-
123
-
124
-
125
-
126
-
127
-
128
-
129
-
130
-
131
-
132
-
133
-
134
-
135
-
136
-
137
-
138
-
139
-
140
-
141
-
142
-
143
-
144
-
145
-
146
-
147
-
148
-
149
-
150
-
151
-
152
-
153
-
154
-
155
-
156
-
157
-
158
-
159
-
160
-
161
-
162
-
163
-
164
-
165
-
166
-
167
-
168
-
169
-
170
-
171
-
172
-
173
-
174
-
175
-
176
-
177
-
178
-
179
-
180
-
181
-
182
-
183
-
184
-
185
-
186
-
187
-
 188
188 -
 189
189 -
 190
190 -
 191
191 -
 192
192 -
 193
193 -
 194
194 -
 195
195 -
 196
196 -
 197
197 -
 198
198 -
199
-
200
-
201
-
202
-
203
-
204
-
205
-
206
-
207
-
208
-
209
-
210
-
211
-
212
-
213
-
214
-
215
-
216
-
217
-
218
-
219
-
220
-
221
-
222
-
223
-
224
-
225
-
226
-
227
-
228
-
229
-
230
-
231
-
232
-
233
-
234
-
235
-
236
-
237
-
238
-
239
-
240
-
241
-
242
-
243
-
244
-
245
-
246
-
247
-
248
-
249
-
250
-
251
-
252
-
253
-
254
-
255
-
256
-
257
-
258
-
259
-
260
-
261
-
262
-
263
-
264
-
265
-
266
-
267
-
268
-
269
-
270
-
271
-
272
-
273
-
274
-
275
-
276
-
277
-
278
-
279
-
280
-
281
-
282
-
283
-
284
-
285
-
286
-
287
-
288
-
289
-
290
-
291
-
292
-
293
-
294
-
295
-
296
-
297
-
298
-
299
-
300
-
301
-
302
-
303
-
304
-
305
-
306
-
307
-
308
-
309
-
310
-
311
-
312
-
313
-
314
-
315
-
316
-
317
-
318
-
319
-
320
-
321
-
322
-
323
-
324
-
325
-
326
-
327
-
328
-
329
-
330
-
331
-
332
-
333
-
334
-
335
-
336
-
337
-
338
-
339
-
340
-
341
-
342
-
343
-
344
-
345
-
346
-
347
-
348
-
349
-
350
-
351
-
352
-
353
-
354
-
355
-
356
-
357
-
358
-
359
-
360
-
361
-
362
-
363
-
364
-
365
-
366
-
367
-
368
-
369
-
370
-
371
-
372
-
373
-
374
-
375
-
376
-
377
-
378
-
379
-
380
-
381
-
382
-
383
-
384
-
385
-
386
-
387
-
388
-
389
-
390
-
391
-
392
-
393
-
394
-
395
-
396
-
397
-
398
-
399
-
400
-
401
-
402
-
403
-
404
-
405
-
406
-
407
-
408
-
409
-
410
-
411
-
412
-
413
-
414
-
415
-
416
-
417
-
418
-
419
-
420
-
421
-
422
 |
 |