Lexmark X8350 User's Guide for Windows - Page 116
Network troubleshooting
 |
UPC - 734646098717
View all Lexmark X8350 manuals
Add to My Manuals
Save this manual to your list of manuals |
Page 116 highlights
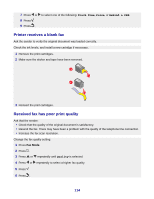
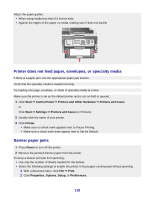
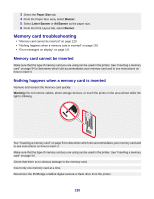
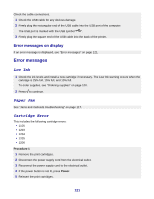
5 Press . 6 Press . • Legal size paper-reformat the document on letter size paper. Network troubleshooting • "The printer to be configured does not appear in the list of printers found on your network" on page 116 • "You cannot print to the network printer" on page 117 • "Network name does not appear in the list" on page 117 The printer to be configured does not appear in the list of printers found on your network SSID is not being broadcast. Make sure security keys are correct. Make sure the printer is connected to a power source and is turned on. For more information, see "Power button is not lit" on page 102. If you are using a print server: 1 Check the Ethernet cable for any obvious damage. 2 Firmly plug one end of the Ethernet cable into the printer or the print server. 3 Firmly plug the other end of the Ethernet cable into the network hub or wall connection. If you are also using a USB cable: 1 Check the USB cable for any obvious damage. 2 Firmly plug the rectangular end of the USB cable into the USB port of the computer. The USB port is marked with the USB symbol . 3 Firmly plug the square end of the USB cable into the USB port on the back of the printer. See the print server documentation for setup instructions if: • The lights of the print server are not on. • The USB cable is not connected to the print server. • The print server is not connected to a power source. If none of the previous actions fixes the problem, uninstall the printer software, and reinstall it. For more information, see "Removing and reinstalling the software" on page 125. 116
-
 1
1 -
2
-
3
-
4
-
5
-
6
-
7
-
8
-
9
-
10
-
11
-
12
-
13
-
14
-
15
-
16
-
17
-
18
-
19
-
20
-
21
-
22
-
23
-
24
-
25
-
26
-
27
-
28
-
29
-
30
-
31
-
32
-
33
-
34
-
35
-
36
-
37
-
38
-
39
-
40
-
41
-
42
-
43
-
44
-
45
-
46
-
47
-
48
-
49
-
50
-
51
-
52
-
53
-
54
-
55
-
56
-
57
-
58
-
59
-
60
-
61
-
62
-
63
-
64
-
65
-
66
-
67
-
68
-
69
-
70
-
71
-
72
-
73
-
74
-
75
-
76
-
77
-
78
-
79
-
80
-
81
-
82
-
83
-
84
-
85
-
86
-
87
-
88
-
89
-
90
-
91
-
92
-
93
-
94
-
95
-
96
-
97
-
98
-
99
-
100
-
101
-
102
-
103
-
104
-
105
-
106
-
107
-
108
-
109
-
110
-
 111
111 -
 112
112 -
 113
113 -
 114
114 -
 115
115 -
 116
116 -
 117
117 -
 118
118 -
 119
119 -
 120
120 -
 121
121 -
122
-
123
-
124
-
125
-
126
-
127
-
128
-
129
-
130
-
131
-
132
-
133
-
134
-
135
-
136
 |
 |
