Lexmark X8350 User's Guide for Windows - Page 40
Using the Photo Editor, Using Fast Pics, Using the Fax Setup Utility, Photo Editor
 |
UPC - 734646098717
View all Lexmark X8350 manuals
Add to My Manuals
Save this manual to your list of manuals |
Page 40 highlights
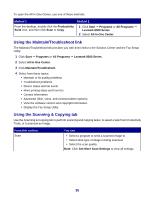
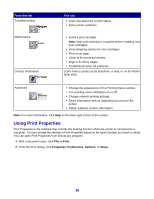
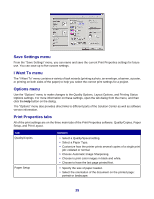
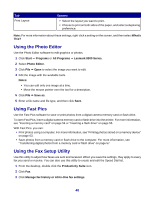
Tab Print Layout Options • Select the layout you want to print. • Choose to print on both sides of the paper, and select a duplexing preference. Note: For more information about these settings, right-click a setting on the screen, and then select What's This? Using the Photo Editor Use the Photo Editor software to edit graphics or photos. 1 Click Start Œ Programs or All Programs Œ Lexmark 8300 Series. 2 Select Photo Editor. 3 Click File Œ Open to select the image you want to edit. 4 Edit the image with the available tools. Notes: • You can edit only one image at a time. • Move the mouse pointer over the tool for a description. 5 Click File Œ Save as. 6 Enter a file name and file type, and then click Save. Using Fast Pics Use the Fast Pics software to save or print photos from a digital camera memory card or flash drive. To open Fast Pics, insert a digital camera memory card or flash drive into the printer. For more information, see "Inserting a memory card" on page 54 or "Inserting a flash drive" on page 55. With Fast Pics, you can: • Print photos using a computer. For more information, see "Printing photos stored on a memory device" on page 63. • Save photos from a memory card or flash drive to the computer. For more information, see "Transferring digital photos from a memory card or flash drive" on page 57. Using the Fax Setup Utility Use this utility to adjust how faxes are sent and received. When you save the settings, they apply to every fax you send or receive. You can also use this utility to create and edit the Speed Dial list. 1 From the desktop, double-click the Productivity Suite icon. 2 Click Fax. 3 Click Manage fax history or All-In-One fax settings. 40
-
 1
1 -
2
-
3
-
4
-
5
-
6
-
7
-
8
-
9
-
10
-
11
-
12
-
13
-
14
-
15
-
16
-
17
-
18
-
19
-
20
-
21
-
22
-
23
-
24
-
25
-
26
-
27
-
28
-
29
-
30
-
31
-
32
-
33
-
34
-
 35
35 -
 36
36 -
 37
37 -
 38
38 -
 39
39 -
 40
40 -
 41
41 -
 42
42 -
 43
43 -
 44
44 -
 45
45 -
46
-
47
-
48
-
49
-
50
-
51
-
52
-
53
-
54
-
55
-
56
-
57
-
58
-
59
-
60
-
61
-
62
-
63
-
64
-
65
-
66
-
67
-
68
-
69
-
70
-
71
-
72
-
73
-
74
-
75
-
76
-
77
-
78
-
79
-
80
-
81
-
82
-
83
-
84
-
85
-
86
-
87
-
88
-
89
-
90
-
91
-
92
-
93
-
94
-
95
-
96
-
97
-
98
-
99
-
100
-
101
-
102
-
103
-
104
-
105
-
106
-
107
-
108
-
109
-
110
-
111
-
112
-
113
-
114
-
115
-
116
-
117
-
118
-
119
-
120
-
121
-
122
-
123
-
124
-
125
-
126
-
127
-
128
-
129
-
130
-
131
-
132
-
133
-
134
-
135
-
136
 |
 |
