Magnavox MWR10D6 Quick Guide - Page 1
Magnavox MWR10D6 - DVD Recorder With TV Tuner Manual
 |
View all Magnavox MWR10D6 manuals
Add to My Manuals
Save this manual to your list of manuals |
Page 1 highlights
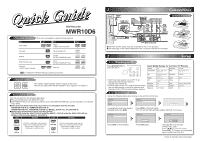
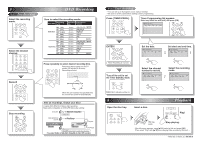
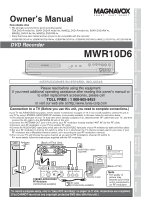
DVD Recorder MWR10D6 Playable discs Disc DVD-VIDEO This unit is compatible to play the following discs. Logo Disc DVD-R (VIDEO mode, Finalized) Logo DVD+RW CD-DA (AUDIO CD) DVD+R DVD+R Double Layer DVD-RW (VIDEO mode, Finalized) CD-RW (CD-DA FORMAT,MP3 files) CD-R (CD-DA FORMAT,MP3 files) Video CD is a trademark of DVD Format/Logo Licensing Corporation. Region codes The number inside the globe refers to region of the world. This unit can play DVDs that are labeled for ALL regions or for Region 1. Recordable discs This unit can record to the following disc types. IThis unit formats discs with DVD+VR mode. IDVD-R/DVD+R discs can only be recorded to once. DVD+RW/DVD-RW discs can be recorded to and erased many times. IDiscs that have been tested and are proven to be compatible with this recorder: VERBATIM DVD+R 8x, VERBATIM DVD+RW 4x VERBATIM DVD-R 8x, VERBATIM DVD-RW 2x, MAXELL DVD-R 16x, JVC DVD-RW 4x IWe strongly recommend for good recording quality: TDK DVD+R 4x/8x/16x, SONY DVD+R 4x/8x/16x, MAXELL DVD+R 4x/8x/16x, SONY DVD+RW 4x, MAXELL DVD-R 8x/16x, MAXELL DVD-RW 4x Logo Attributes Logo Attributes DVD+RW DVD+R 8cm/12cm, single-sided, single layer disc Approx. max. recording time (SLP mode): 360 minutes (4.7GB) (for 12cm) 108 minutes (1.4GB) (for 8cm) DVD-RW DVD-R 8cm/12cm, single-sided, single layer disc Approx. max. recording time (SLP mode): 360 minutes (4.7GB) (for 12cm) 108 minutes (1.4GB) (for 8cm) 1 Connections Cable TV signal or Antenna (Back of TV) VIDEO (Cable box or Satellite box) IN OUT 2 Connect RF cable (not supplied) 3 Connect Video cable (supplied) AUDIO IN 4 Connect Audio cable (supplied) 1 RF cable (supplied) Connect IN OUT VIDEO IN IN L R ANTENNA AUDIO IN (E1) COMPONENT VIDEO OUTPUT S-VIDEO Y OUT PB/CB PR/CR VIDEO OUT DIGITAL AUDIO OUTPUT PCM / BITSTREAM L R AUDIO OUT COAXIAL (Back of this unit) IBoth A/V and RF cables must be connected to the TV for operation. ISee front page of the Owner's Manual for the connection with the RF modulator. Remote Control 2 Setup 2 - 1 Watching on TV Press [STANDBY-ON ] to turn the unit on. 1.Switch the input selector on your TV to an appropriate external input channel (usually near channel 0). 2.Press a button on the TV's original remote control (see the table below) to select an external input channel until the DVD recorder's picture appears. Input Mode Names for Common TV Brands Admiral AUX Panasonic TV/VIDEO Curtis Mathis LINE1, LINE2, 00, 90, 91, 92, 93 RCA INPUT, TV/VCR, 00, 90, 91, 92, 93 GE INPUT, TV/VCR, 00, 90, Samsung TV/VIDEO 91, 92, 93 Hitachi INPUT, AUX Sanyo VIDEO JVC VIDEO, VIDEO1, VIDEO2, Sharp 00 VIDEO3 Kenwood AUX Sony VIDEO1, VIDEO2, VIDEO3 LXI-Series 00 Toshiba TV/GAME Magnavox AUX CHANNEL Zenith 00 2 - 2 Initial Setup Set up the following items when turning on the unit for the first time. Initial Setup English Français Español Initial Setup Channel Preset CH 1 Auto Presetting Now Using [K/ L], select your desired Press [OK] to Channel Preset. language and press [OK]. Then the unit will start getting available channels in your area. Initial Setup Clock Setting Initial Setup Initial Setup Press [OK] to Clock Setting. Press [OK] again. JAN / 01 / 2006 ( SUN ) 12: 00 AM Using [K/ L], enter the date (month / day / year). Press [{ / B] to move the cursor. Press [OK]. TV Program will automatically appear. (usually near channel 0) Follow to the back side of this sheet.
-
 1
1 -
 2
2 -
 3
3 -
 4
4 -
 5
5 -
 6
6 -
 7
7 -
8
-
9
-
10
-
11
-
12
-
13
-
14
-
15
-
16
-
17
-
18
-
19
-
20
-
21
-
22
-
23
-
24
-
25
-
26
-
27
-
28
-
29
-
30
-
31
-
32
-
33
-
34
-
35
-
36
-
37
-
38
-
39
-
40
-
41
-
42
-
43
-
44
-
45
-
46
-
47
-
48
-
49
-
50
-
51
-
52
-
53
-
54
-
55
-
56
-
57
-
58
-
59
-
60
-
61
-
62
-
63
-
64
-
65
-
66
-
67
-
68
-
69
-
70
-
71
-
72
-
73
-
74
-
75
-
76
-
77
-
78
-
79
-
80
-
81
-
82
 |
 |