Magnavox MWR10D6 Quick Guide - Page 12
Remote Control - dvd recorder remote
 |
View all Magnavox MWR10D6 manuals
Add to My Manuals
Save this manual to your list of manuals |
Page 12 highlights
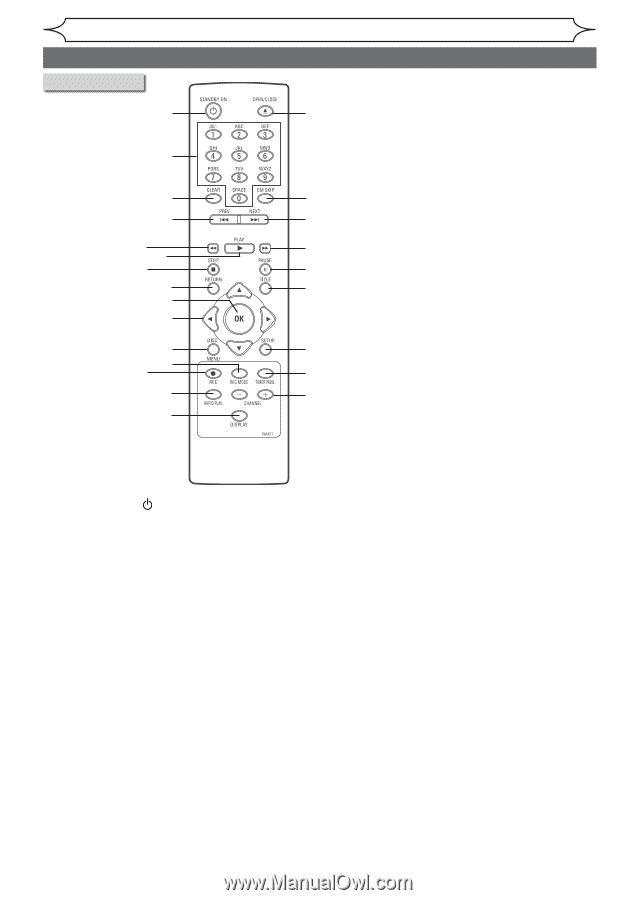
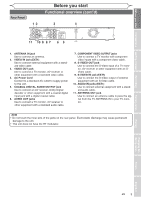
Before you start Functional overview (cont'd) Remote Control 1 16* 2 3 17 4 18 5 19 6 7 20 8 21 9 10 11 22 13 12 23 14 24 15 (*) The unit can also be turned on by press- ing this button. 1. STANDBY-ON button Press to turn the unit on and off. If timer programmings have been set, press to set the unit in timer-standby mode. 2. Number/Character buttons Press to select channel numbers. Press to select a title/chapter/ track on display. Press to enter values for the settings in the Setup menu. Or press to enter title names. 3. CLEAR button Press to clear the password once entered or to cancel the programming for CD or to clear the selecting marker number in the Edit menu or to clear the program once entered in the Timer Programming list, etc. 4. PREV H button During playback, press to return to the beginning of the current chapter or track. Or when playback is paused, press to play reverse step by step. 5. REV E button During playback, press to fast reverse. Or when playback is paused, press to play slow reverse. 6. PLAY B button Press to start or resume play. 7. STOP C button Press to stop playback or recording. Press to exit from the Title list. 8. RETURN button Press to return to the previously displayed menu screen. 9. OK button Press to confirm or select menu items. 10. Cursor K / L/ { / B buttons Press to select items or settings. 11. DISC MENU button Press to display the Disc menu. 12. REC MODE button Press to switch the recording mode. 13. REC I button Press once to start a recording. Press repeatedly to start a One-Touch Timer Recording. 14. RAPID PLAY button During playback, press to playback in a slightly faster/ slower mode with keeping the audio quality. 15. DISPLAY button Press to display the Display menu on or off. 16. OPEN/CLOSE A button* Press to open or close the disc tray. 17. CM SKIP button During playback, press to skip 30 seconds. 18. NEXT G button During playback, press to skip to the next chapter or track. Or when playback is paused, press to play forward step by step. 19. FWD D button During playback, press to play fast forward. Or when playback is paused, press to play slow forward. 20. PAUSE F button Press to pause play or recording. 21. TITLE button Press to display the Title list. 22. SETUP button Press to display the Setup menu. During DVD playback, press and hold for more than 3 seconds to switch the progressive scanning mode to the interlace mode. 23. TIMER PROG. button Press to display the Timer programming list. 24. CHANNEL - / + buttons Press to change the channel up and down. 10 EN
-
 1
1 -
2
-
3
-
4
-
5
-
6
-
 7
7 -
 8
8 -
 9
9 -
 10
10 -
 11
11 -
 12
12 -
 13
13 -
 14
14 -
 15
15 -
 16
16 -
 17
17 -
18
-
19
-
20
-
21
-
22
-
23
-
24
-
25
-
26
-
27
-
28
-
29
-
30
-
31
-
32
-
33
-
34
-
35
-
36
-
37
-
38
-
39
-
40
-
41
-
42
-
43
-
44
-
45
-
46
-
47
-
48
-
49
-
50
-
51
-
52
-
53
-
54
-
55
-
56
-
57
-
58
-
59
-
60
-
61
-
62
-
63
-
64
-
65
-
66
-
67
-
68
-
69
-
70
-
71
-
72
-
73
-
74
-
75
-
76
-
77
-
78
-
79
-
80
-
81
-
82
 |
 |