Magnavox MWR10D6 Quick Guide - Page 36
Settings for an external source
 |
View all Magnavox MWR10D6 manuals
Add to My Manuals
Save this manual to your list of manuals |
Page 36 highlights
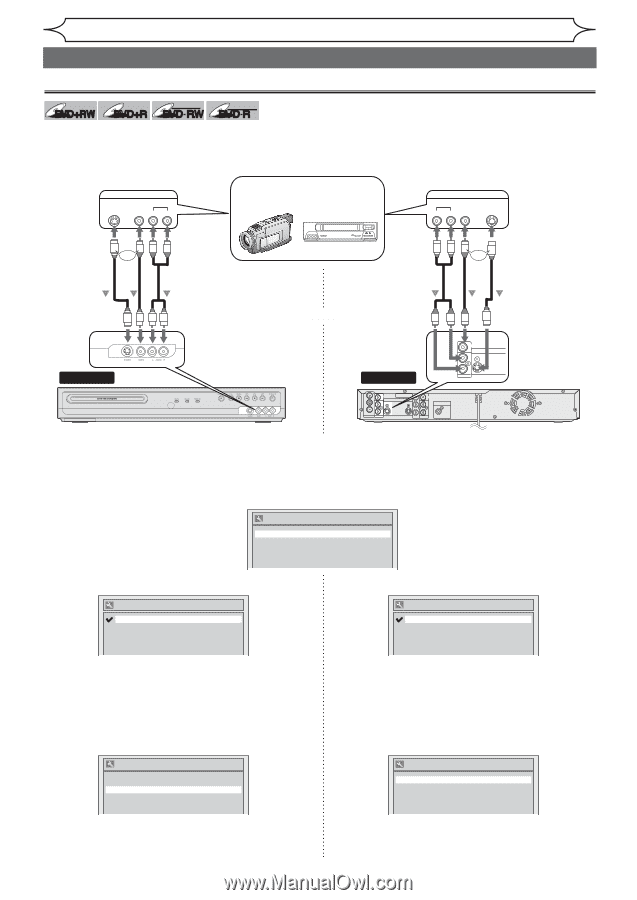
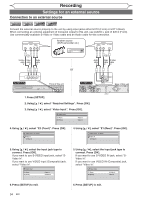
Recording Settings for an external source Connection to an external source +VR +VR DVD+RW DVD+R DVD-RW DVD-R Connect the external source properly to the unit by using input jacks either EXT2 (Front) or EXT1 (Rear). When connecting an external equipment of monaural output to this unit, use AUDIO L jack of EXT2 (Front). Use commercially available S-Video or Video cable and an Audio cable for this connection. OUTPUT S- VIDEO VIDEO AUDIO LR Another source (VCR camcorder etc.) OUTPUT AUDIO VIDEO S -VIDEO RL or S-Video Video Audio cable cable cable or Audio Video S-Video cable cable cable or To EXT 2 IN Front of this unit To EXT 1 IN VIDEO IN IN L S-VIDEO R AUDIO IN IN OUT VIDEO IN IN L R ANTENNA AUDIO IN (E1) COMPONENT VIDEO OUTPUT S-VIDEO Y OUT PB/CB PR/CR VIDEO OUT DIGITAL AUDIO OUTPUT PCM / BITSTREAM L R AUDIO OUT COAXIAL Rear of this unit 1. Press [SETUP]. 2. Using [K / L], select "Required Settings". Press [OK]. 3. Using [K / L], select "Video Input". Press [OK]. Video Input E1 (Rear) E2 (Front) Video In Video In 4. Using [K / L], select "E2 (Front)". Press [OK]. Video Input - E2 (Front) Video In S-Video In 4. Using [K / L], select "E1 (Rear)". Press [OK]. Video Input - E1 (Rear) Video In S-Video In 5. Using [K / L], select the input jack type to connect. Press [OK]. If you want to use S-VIDEO input jack, select "SVideo In". If you want to use VIDEO input (Composite) jack, select "Video In". Video Input E1 (Rear) E2 (Front) Video In S-Video In 5. Using [K / L], select the input jack type to connect. Press [OK]. If you want to use S-VIDEO IN jack, select "SVideo In". If you want to use VIDEO IN (Composite) jack, select "Video In". Video Input E1 (Rear) E2 (Front) S-Video In Video In 6. Press [SETUP] to exit. 34 EN 6. Press [SETUP] to exit.
-
 1
1 -
2
-
3
-
4
-
5
-
6
-
7
-
8
-
9
-
10
-
11
-
12
-
13
-
14
-
15
-
16
-
17
-
18
-
19
-
20
-
21
-
22
-
23
-
24
-
25
-
26
-
27
-
28
-
29
-
30
-
 31
31 -
 32
32 -
 33
33 -
 34
34 -
 35
35 -
 36
36 -
 37
37 -
 38
38 -
 39
39 -
 40
40 -
 41
41 -
42
-
43
-
44
-
45
-
46
-
47
-
48
-
49
-
50
-
51
-
52
-
53
-
54
-
55
-
56
-
57
-
58
-
59
-
60
-
61
-
62
-
63
-
64
-
65
-
66
-
67
-
68
-
69
-
70
-
71
-
72
-
73
-
74
-
75
-
76
-
77
-
78
-
79
-
80
-
81
-
82
 |
 |