Panasonic HPX300 Operating Instructions - Page 150
Maintenance, Eyepiece Care, Cleaning Inside the Viewfinder, Charging the internal battery
 |
UPC - 791871304297
View all Panasonic HPX300 manuals
Add to My Manuals
Save this manual to your list of manuals |
Page 150 highlights
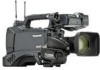
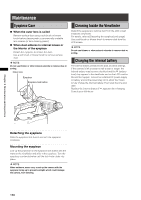
Maintenance Eyepiece Care When the outer lens is soiled Remove surface dust using a soft brush or blower brush before cleaning with a commercially available lens cleaner (or lens cleaning paper). When dust adheres to internal lenses or the interior of the eyepiece Detach the eyepiece to remove the dust. Use a soft brush or blower brush to remove surface dust. NOTE Do not use thinner or other mineral solvents to remove dust or soiling. Outer lens Eyepiece Eyepiece lock button Cleaning Inside the Viewfinder Detach the eyepiece to remove dust from the LCD screen inside the viewfinder. For details, refer to [Detaching the eyepiece] (this page). Use a soft brush or blower brush to remove dust from the LCD screen. NOTE Do not use thinner or other mineral solvents to remove dust or soiling. Charging the internal battery The internal battery preserves the date and time settings. If the camera is left unused for half a year or longer, the internal battery may become depleted and the (battery icon) may appear in the viewfinder and on the LCD monitor. Should this happen, connect an external DC power supply or battery and let the power stay on for about four hours to fully charge the internal battery. Then reset the time and date. Replace the internal battery if appears after charging. Consult your distributor. Chapter 9 Maintenance and Inspections Detaching the eyepiece Slide the eyepiece lock button and turn the eyepiece clockwise. Mounting the eyepiece Line up the projection on the eyepiece lock button with the mark on the viewfinder and slide in the eyepiece. Turn the eyepiece counterclockwise until the lock knob clicks into place. NOTE When outdoors, never carry or set up the camera with the eyepiece facing up to prevent sunlight, which could damage the camera, from entering. 150
-
 1
1 -
2
-
3
-
4
-
5
-
6
-
7
-
8
-
9
-
10
-
11
-
12
-
13
-
14
-
15
-
16
-
17
-
18
-
19
-
20
-
21
-
22
-
23
-
24
-
25
-
26
-
27
-
28
-
29
-
30
-
31
-
32
-
33
-
34
-
35
-
36
-
37
-
38
-
39
-
40
-
41
-
42
-
43
-
44
-
45
-
46
-
47
-
48
-
49
-
50
-
51
-
52
-
53
-
54
-
55
-
56
-
57
-
58
-
59
-
60
-
61
-
62
-
63
-
64
-
65
-
66
-
67
-
68
-
69
-
70
-
71
-
72
-
73
-
74
-
75
-
76
-
77
-
78
-
79
-
80
-
81
-
82
-
83
-
84
-
85
-
86
-
87
-
88
-
89
-
90
-
91
-
92
-
93
-
94
-
95
-
96
-
97
-
98
-
99
-
100
-
101
-
102
-
103
-
104
-
105
-
106
-
107
-
108
-
109
-
110
-
111
-
112
-
113
-
114
-
115
-
116
-
117
-
118
-
119
-
120
-
121
-
122
-
123
-
124
-
125
-
126
-
127
-
128
-
129
-
130
-
131
-
132
-
133
-
134
-
135
-
136
-
137
-
138
-
139
-
140
-
141
-
142
-
143
-
144
-
 145
145 -
 146
146 -
 147
147 -
 148
148 -
 149
149 -
 150
150 -
 151
151 -
 152
152 -
 153
153 -
 154
154 -
 155
155 -
156
-
157
-
158
-
159
-
160
-
161
-
162
-
163
-
164
-
165
-
166
 |
 |