Panasonic WVCU650 Operating Instructions - Page 52
Factory Default Setting of Button Functions and Joystick Button Functions
 |
UPC - 791871504277
View all Panasonic WVCU650 manuals
Add to My Manuals
Save this manual to your list of manuals |
Page 52 highlights
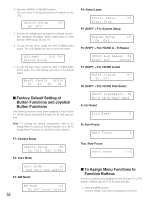
4. Press the ENTER or CAM (SET) button. The sub menu of selected function will appear on the LCD. System Setup 301 On Off 5. Perform the operations to activate the selected function. The operating procedure differs depending on each function. Refer to pp. 55 to p. 73. 6. To exit the sub menu, press the EXIT or MON (ESC) button. The LCD display will return to the main menu. LCD MENU SYS 301 System Setup 7. To exit the main menu, press the EXIT or MON (ESC) button again. The LCD display will return to the default status. Mon01 Cam016 HD316 F1 F2 F3 F4 ■ Factory Default Setting of Button Functions and Joystick Button Functions The following functions have been assigned to the function (F1 to F8) buttons and joystick function (A, B, and top) buttons. Note: To change the default assignments, refer to To Assign Menu Functions to Function Buttons, or p. 53 To Assign Menu Functions to Joystick Function Buttons. F1: Camera Setup Camera Setup F1 On Off Rst A.Rst F2: Auto Mode Auto Mode F2 Seq Sort Pan Patrol F3: BW Mode BW Mode F3 On Off Auto1 Auto2 52 F4: Patrol Learn Patrol Learn F4 Start Stop F5 (SHIFT + F1): System Setup System Setup F5 On Off F6 (SHIFT + F2): HD300 A - B Repeat HD300 A-B Repeat F6 Start End Cancel F7 (SHIFT + F3): HD300 Listed HD300 Listed F7 On Off F8 (SHIFT + F4): HD300 Disk Select HD300 DiskSelect F8 Nr-A Cp-A Cpy1 Cpy2 A: Iris Reset Iris Reset A B: Auto Focus Auto Focus B Top: Auto Focus Auto Focus J/S ■ To Assign Menu Functions to Function Buttons All menu functions are assignable to the function (F1 to F8) buttons. (Refer to pp. 55 to 73 for each function.) 1. Press the MENU button. "Camera Setup" main menu will appear on the LCD.
-
 1
1 -
2
-
3
-
4
-
5
-
6
-
7
-
8
-
9
-
10
-
11
-
12
-
13
-
14
-
15
-
16
-
17
-
18
-
19
-
20
-
21
-
22
-
23
-
24
-
25
-
26
-
27
-
28
-
29
-
30
-
31
-
32
-
33
-
34
-
35
-
36
-
37
-
38
-
39
-
40
-
41
-
42
-
43
-
44
-
45
-
46
-
 47
47 -
 48
48 -
 49
49 -
 50
50 -
 51
51 -
 52
52 -
 53
53 -
 54
54 -
 55
55 -
 56
56 -
 57
57 -
58
-
59
-
60
-
61
-
62
-
63
-
64
-
65
-
66
-
67
-
68
-
69
-
70
-
71
-
72
-
73
-
74
-
75
-
76
-
77
-
78
 |
 |
